Table of Contents
Introduction
The Agent-Level Heatmap report allows users to view a heatmap based on the average QA scores for a selected period. The report displays performance insights at both the section level and the parameter level. Users can switch between these two views using the available filter. By default, the report displays the section-level view.
Agent Level Heatmap
To access the report, navigate to Reports > Report > Supervisor Level Report > Agent Level Heatmap.
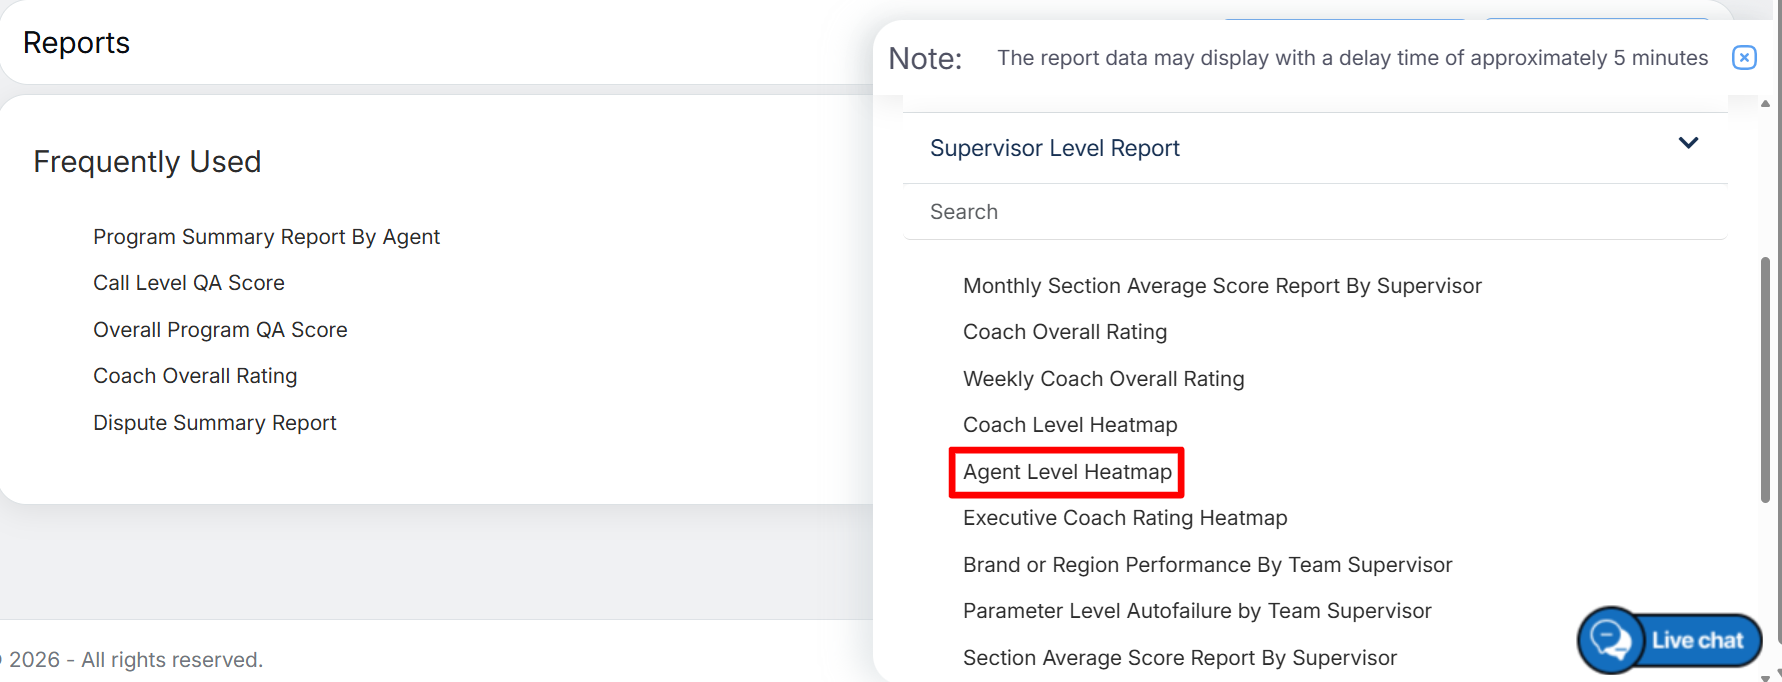
Agent Level Heatmap
The Agent-Level Heatmap report page will be displayed, as shown below.
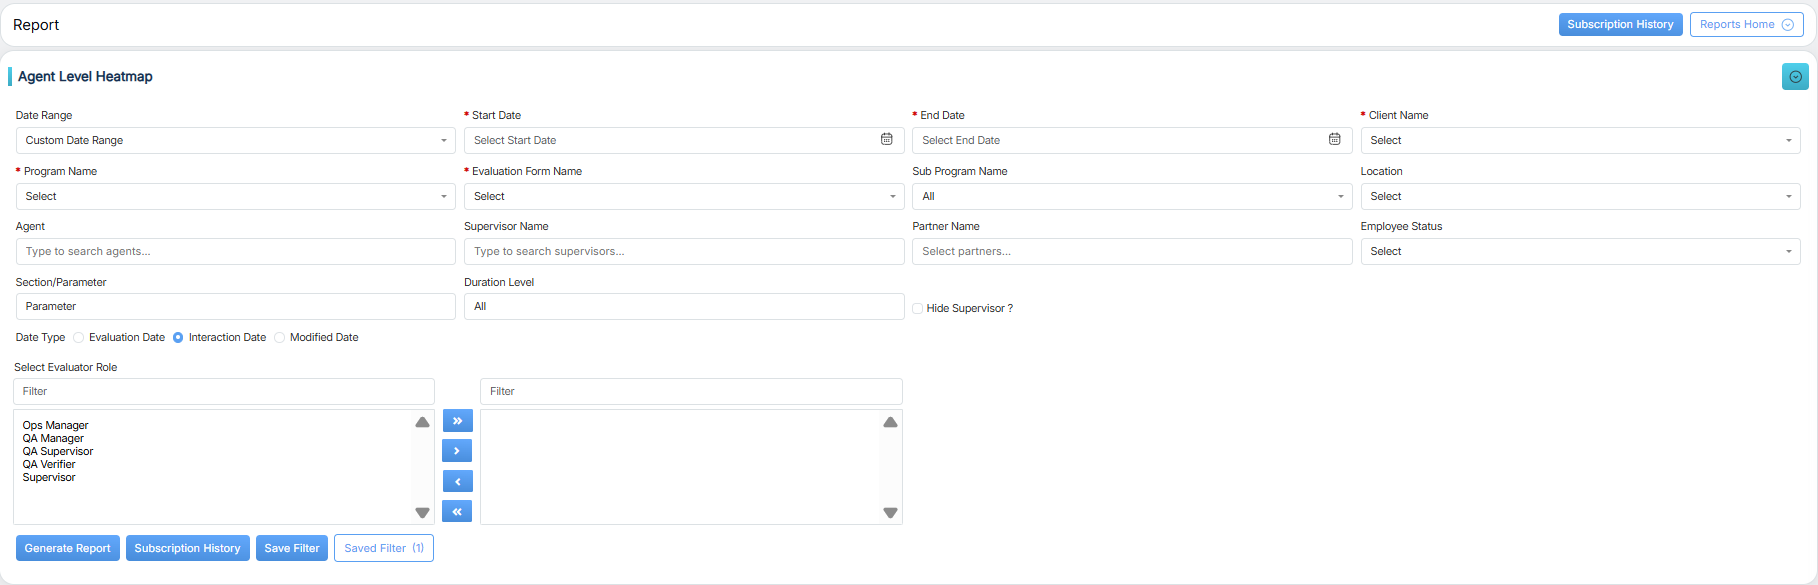
Agent Level Heatmap Details
Configure the following fields to view the required result:
|
Screen Elements |
Description |
|---|---|
|
Date Range |
Select a predefined timeframe from the dropdown or choose Custom Date Range to specify a required period. The available options include Last 7 Days, Last 10 Days, Last 30 Days, Last 12 Weeks, Last 6 Months, Today, Week to Date, Month to Date, Previous Day, Previous Week, Previous Month, and Custom Date Range. Choose the appropriate option to view the report for the desired period. |
|
Start Date |
If Custom Date Range is selected, specify the required start date and end date to view the report for the selected period. |
|
End Date |
Select the end date. |
|
Client Name |
Select the required client name from the dropdown list. |
|
Program Name |
Select a program from the dropdown list. The available programs will be displayed based on the selected Client Name. |
|
Evaluation Form Name |
Select the required evaluation form from the dropdown list. |
|
Sub Program Name |
Select a subprogram from the dropdown list. |
|
Location |
Select the required location from the dropdown list. |
|
Agent |
Enter the initial characters of the agent’s name and select one or more agents from the dropdown list. If no agent is selected, the report displays data for all agents. Note: A maximum of 10 agents can be selected at a time. |
|
Supervisor Name |
Enter the initial characters of the supervisor’s name and select one or more supervisors from the dropdown list. Note: A maximum of 10 supervisors can be selected at a time. |
|
Partner Name |
|
|
Employee Status |
|
|
Section/Parameter |
Select Section or Parameter from the dropdown list to choose how the report data is displayed. Section provides a summarized view grouped by categories, while Parameter displays detailed data focused on specific metrics for in-depth analysis. |
|
Duration Level |
Select the required duration from the dropdown list. The available options are All, Weekly, and Monthly. |
|
Hide Supervisor ? |
Select this checkbox to hide supervisor details in the report. |
|
Date Type |
Evaluation Date: Select this radio button to filter the report based on the evaluation date. Interaction Date: Select this radio button to filter the report based on the interaction date. Modified Date: Select this radio button to filter the report based on the date the evaluation form was last modified. Note: In QEval AI instances, Interaction Date is selected by default under Date Type in the filter panel. Select Evaluation Date or Modified Date to filter the report accordingly. |
|
Evaluator Role |
Select the required evaluator role(s) from the left-hand box, which displays all higher-level user roles. To find a specific role, enter its name in the Filter field. After selecting the required role(s), click the Right Arrow button to move them to the right-hand box. To move all roles to the right-hand box at once, click the Double Arrow to Right button. To move specific roles from the right-hand box back to the left-hand box, select the required roles and click the Left Arrow button. To move all roles from the right-hand box back to the left-hand box at once, click the Double Arrow to Left button. |
Once all the required search criteria are configured, click the Generate Report button to view the report results.
The report for the selected criteria will be displayed, as shown below.
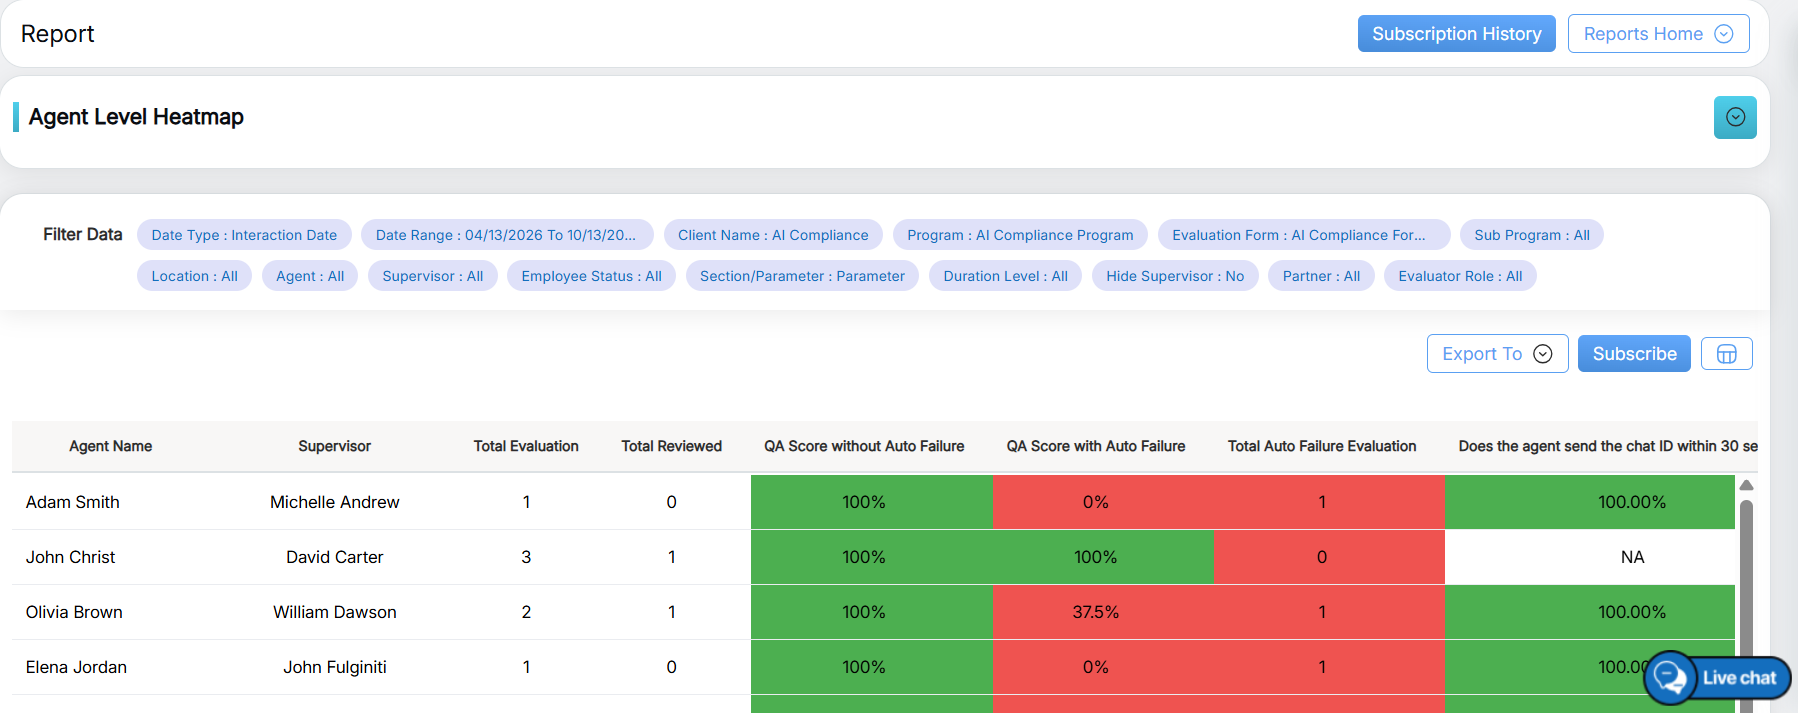
Generated Report
The report details are as follows-
|
Screen Elements |
Description |
|---|---|
|
Agent Name |
Displays the name of the agent whose performance is being evaluated. |
|
Supervisor |
Displays the name of the supervisor overseeing the agent. |
|
Total Evaluation |
Displays the total number of evaluations conducted for the agent. This metric reflects the overall volume of assessments and offers insights into the frequency of reviews. |
|
Total Reviewed |
Displays the total number of evaluations that have been reviewed, helping users track completed evaluations against those that are still pending. |
|
QA Score without Auto failure |
Displays the Quality Assurance score without Auto failure in numeric format as a percentage, representing the agent’s performance against established quality standards.
Notes : To enhance clarity and quick interpretation, the QA score is color-coded based on performance levels: |
|
|
Displays the Quality Assurance score with Auto failure in numeric format as a percentage, representing the agent’s performance against established quality standards.
|
|
Total Auto failure Evaluation |
Displays the Total Auto failure Evaluation score in numeric format representing the agent’s performance against established quality standards. |
After generating the Agent-Level Heatmap report, pagination controls will be displayed, as highlighted in the screen below. These controls allow users to navigate through the report pages and view the results easily.
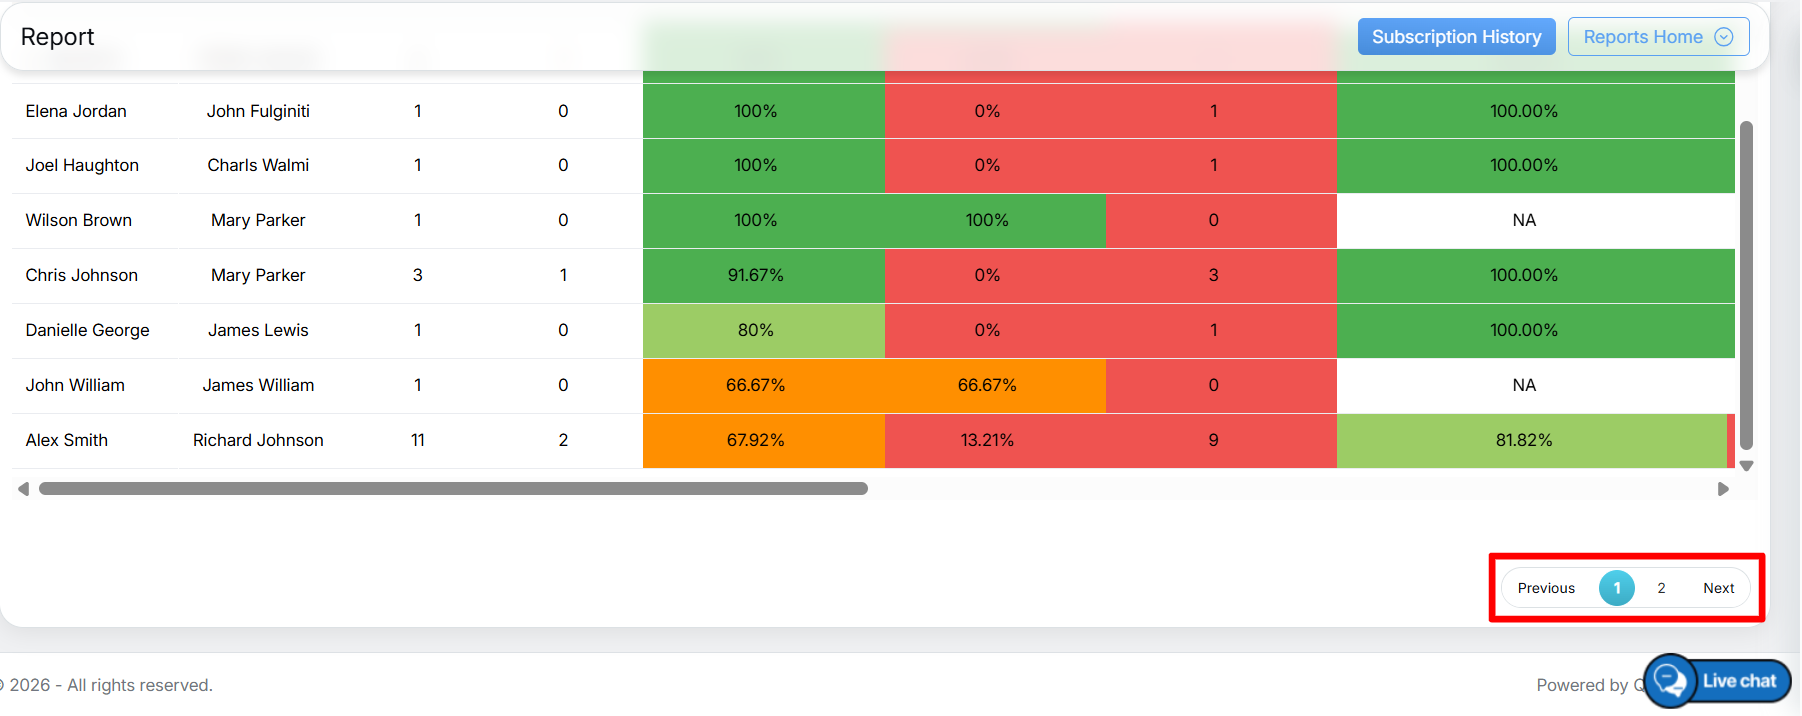
Navigation
The following table describes the data elements displayed in the report grid.
| Elements | Description |
| Agent Name | Displays the name of the agent being evaluated. |
| Supervisor |
Displays the name of the supervisor responsible for evaluating and reviewing the agent’s performance. |
| Total Evaluation | Represents the total number of evaluations conducted for the given period. |
| Total Reviewed | Shows the number of evaluations that have been reviewed by the supervisor or QA team. |
| Coach Reviewed | Indicates the number of evaluations that have undergone coaching review to provide feedback and improvement suggestions. |
| QA Scores | Displays the quality assurance score assigned based on evaluation metrics and predefined performance criteria. |
| Auto Source | Refers to evaluations that are automatically generated or sourced from system-driven processes without manual intervention. |
The report can be exported in Excel or CSV format. Click the corresponding Excel or CSV option to download the report in the required format.
- Red (0 – 40%): Represents poor performance, highlighting significant areas requiring immediate attention and improvement.
- Yellow (40% – 70%): Represents moderate performance, suggesting the need for consistent efforts to meet quality benchmarks.
- Light Green (70% – 90% ): Represents excellent performance, demonstrating full compliance with quality standards and best practices.
- Dark Green (>90%) : Represents outstanding performance, signifying superior quality and minimal improvement areas.
Users can customize the report layout by dragging and dropping columns into the desired order, as highlighted in the screen below.
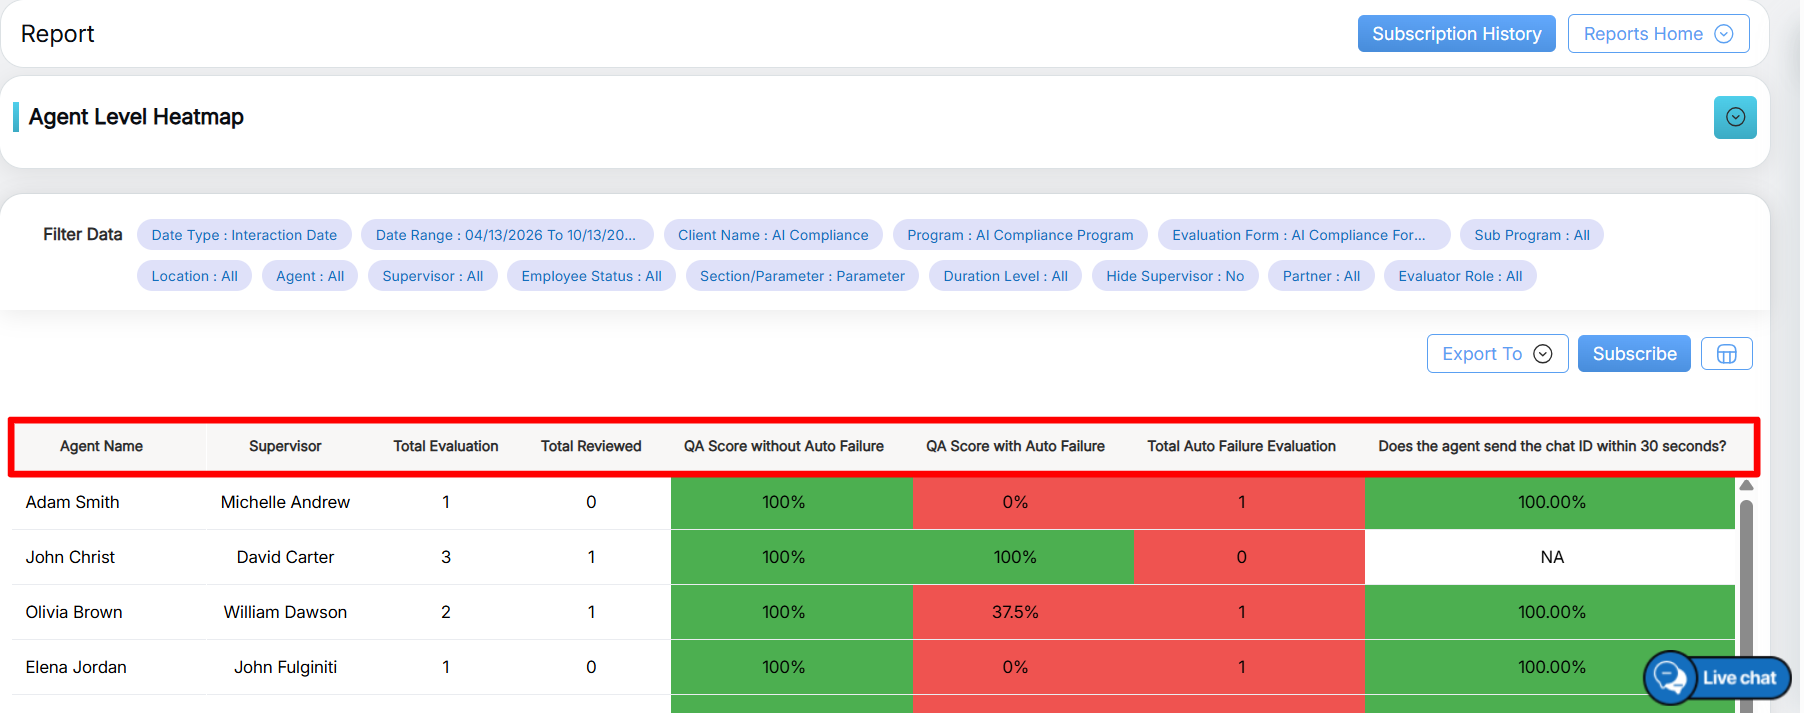
Headings in Generated Report
Click the Display Columns button to view all available column names in a table, as highlighted in the screen below.
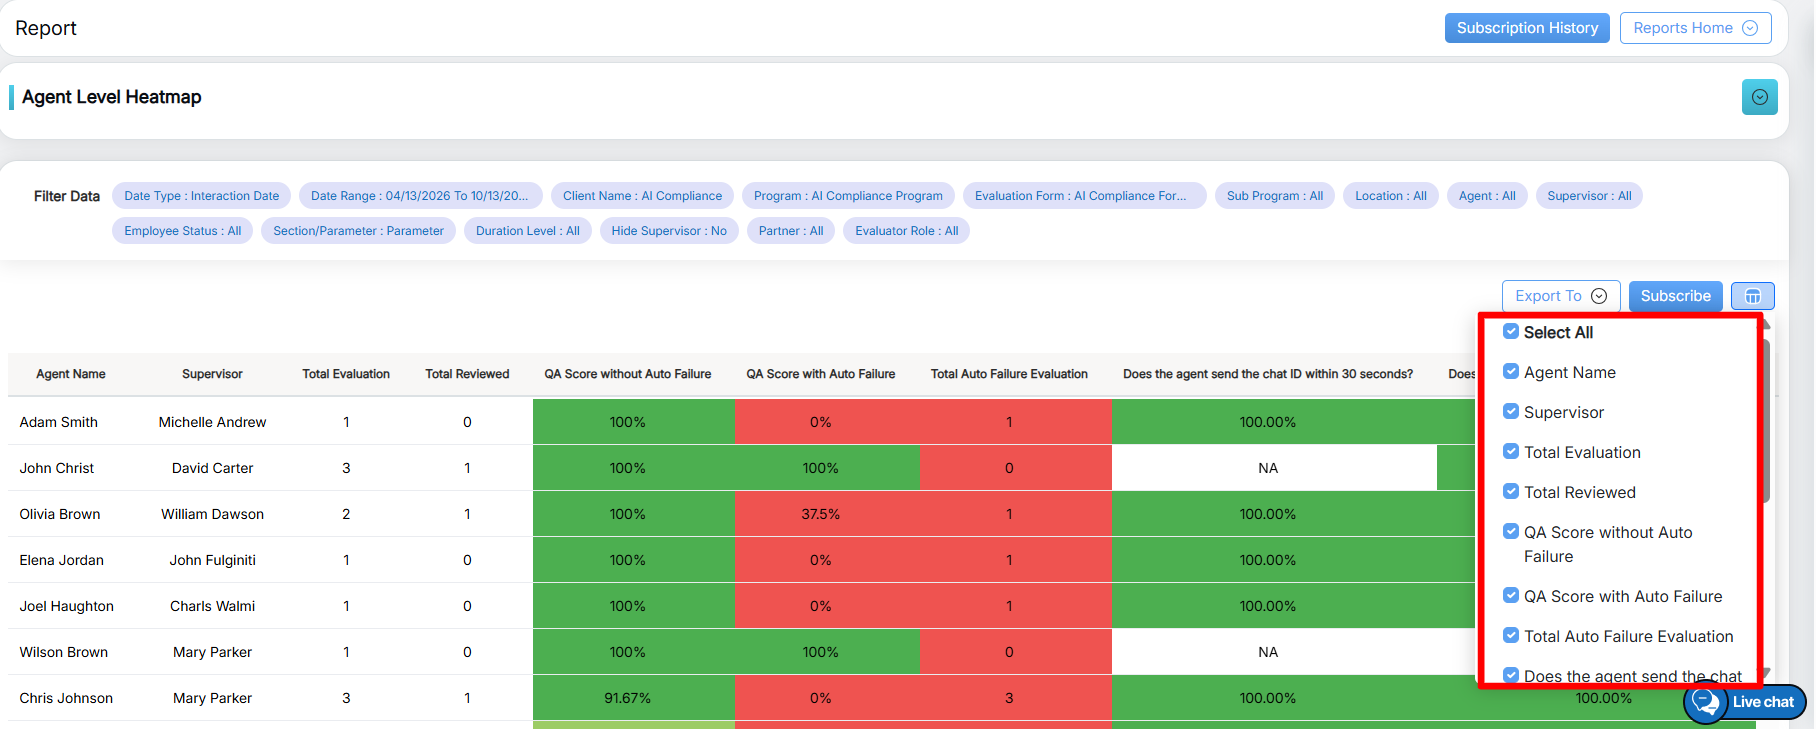
Display Columns
Note: Users can customize the report table by deselecting the checkboxes for specific columns. Unchecked columns will be removed from the column list and table display.
Once the report is generated using the required search criteria, click the Subscribe button, as highlighted in the screen below, to schedule the report.
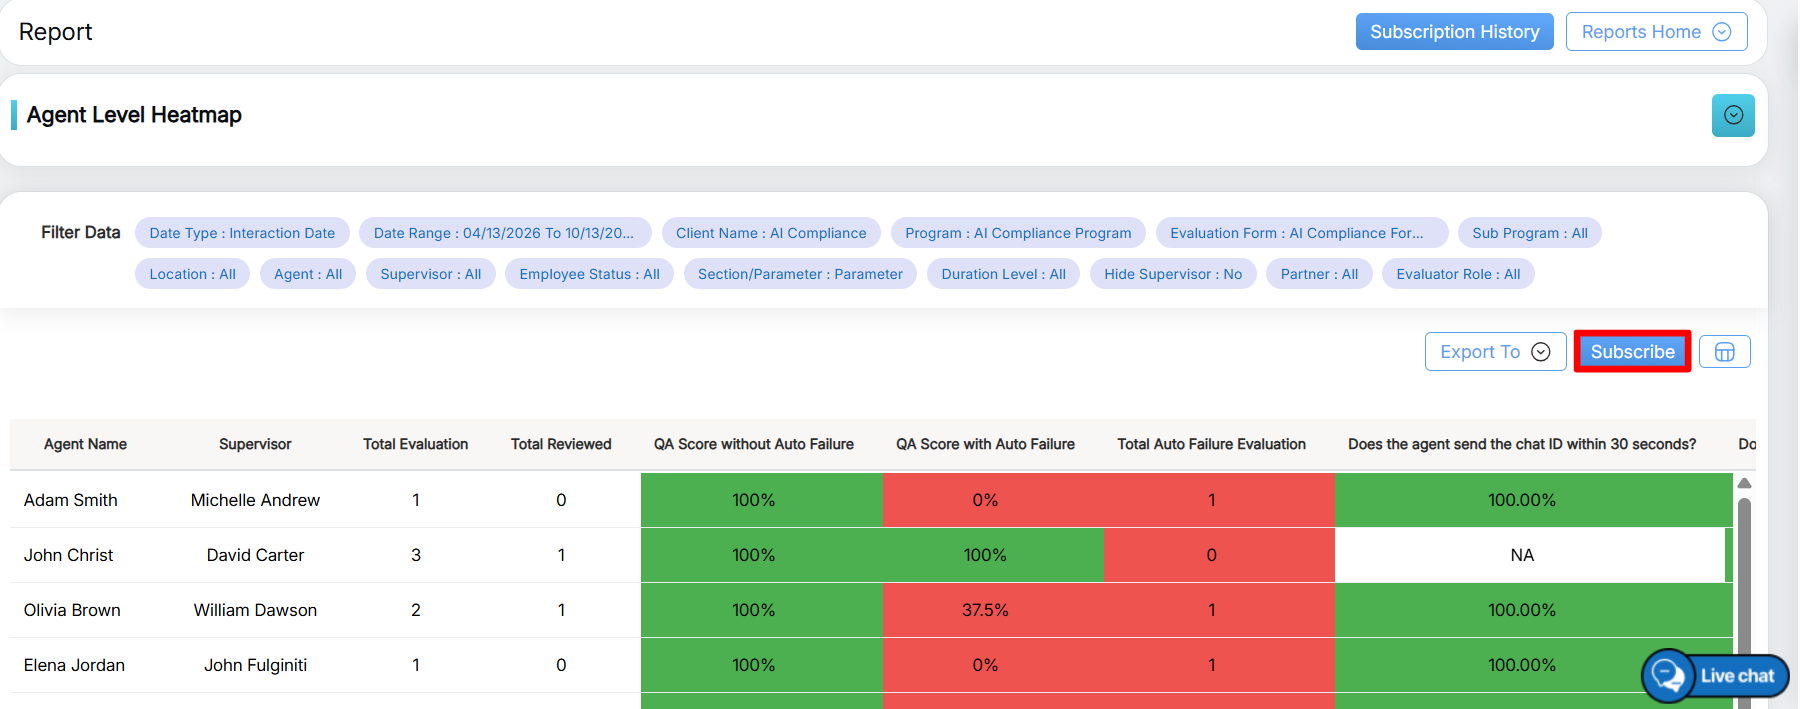
Subscribe
After clicking the Subscribe button, the Report Schedule window will appear, as shown in the screen below.
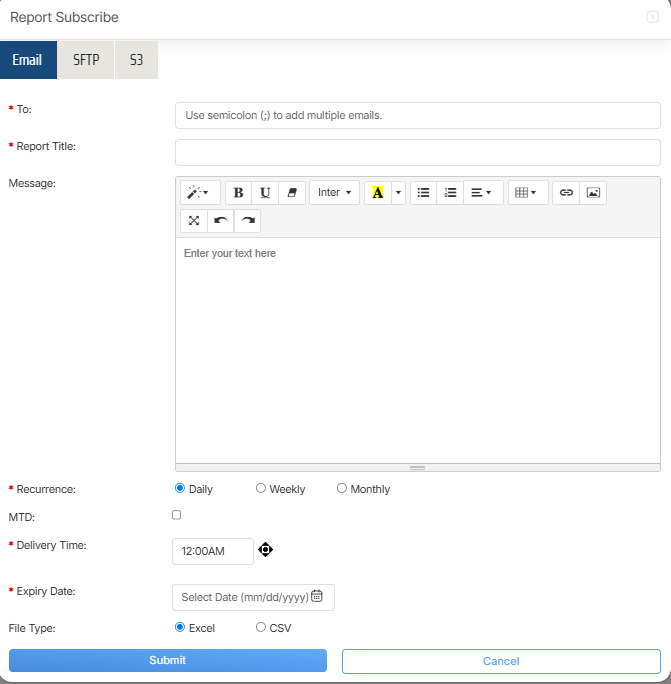
Report Subscribe: Email
The data fields displayed in the Report Schedule window are explained below:
- To: Enter the email address of the recipient who should receive the scheduled report. To send the report to multiple recipients, enter their email addresses separated by semicolons.
- Report Title: Enter a suitable title for the report.
- Message: Enter the message to be included in the email body.
- Recurrence: Select the required report frequency from the available options: Daily, Weekly, or Monthly.
When Daily is selected under Recurrence, configure the following fields:
- MTD (Month to Date): Select the MTD checkbox if the report should include data from the beginning of the current month to date.
- Delivery Time: Select the time at which the report should be delivered.
- Expiry Date: Select the date on which the report schedule should end.
- File Type: Select Excel or CSV based on the required file format for downloading the report.
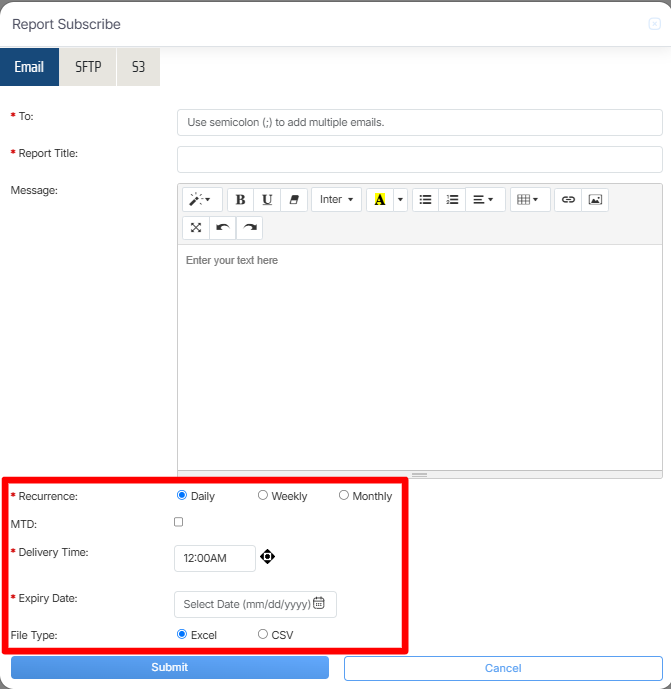
Recurrence on Daily Basis
When Weekly is selected under Recurrence, configure the following fields:
- MTD (Month to Date): Select the MTD checkbox if the report should include data from the beginning of the current month to date.
- Delivery Time: Select the time at which the report should be delivered.
- Selected Days: Select the checkboxes for the days on which the report should be emailed each week. For example, selecting Monday and Friday schedules the report for delivery every Monday and Friday.
- Expiry Date: Select the date on which the report schedule should end.
- File Type: Select Excel or CSV based on the required file format for downloading the report.
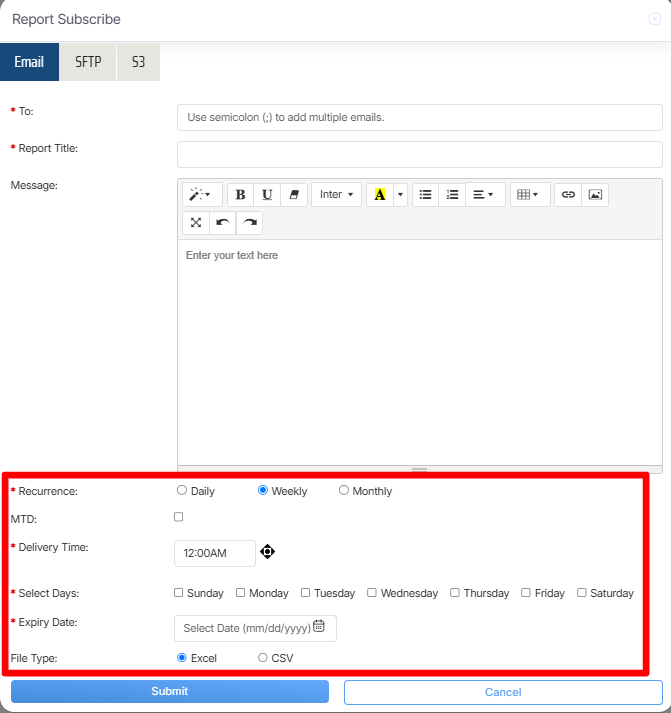
Recurrence on Weekly Basis
When Monthly is selected under Recurrence, configure the following field:
- Delivery Time: Select the preferred time for delivering the scheduled report.
Select one of the following options to define when the monthly report should be scheduled:
- On the Following Day: Select the required day and date to schedule the report for delivery on that day of the month.
- On This Day of the Month: Select the specific date of the month on which the report should be delivered.
- Expiry Date: Select the date on which the report schedule should end.
- File Type: Select Excel or CSV based on the required file format for downloading the report.
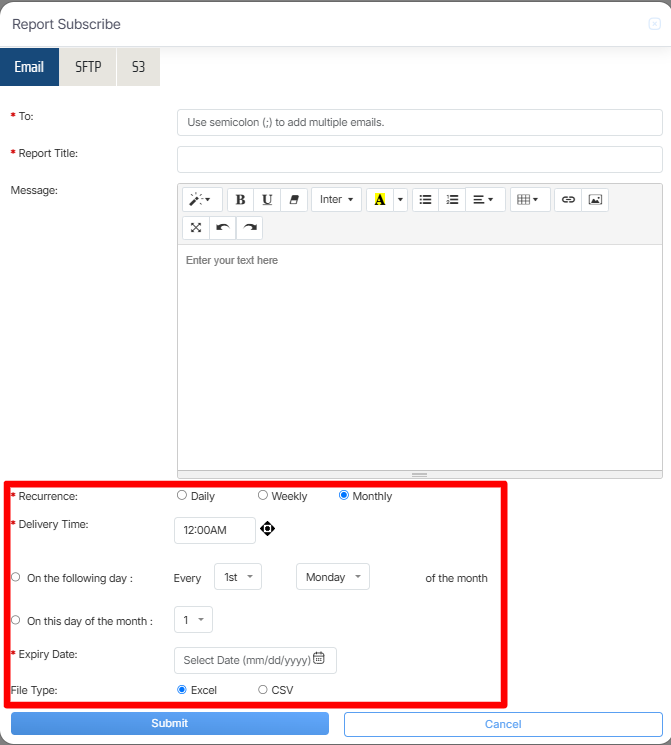
Recurrence on Monthly Basis
Once all the required details are configured, click Submit to subscribe to the report and save the schedule. To cancel the process, click Cancel.
A confirmation message will appear on the screen, indicating that the report has been scheduled successfully.
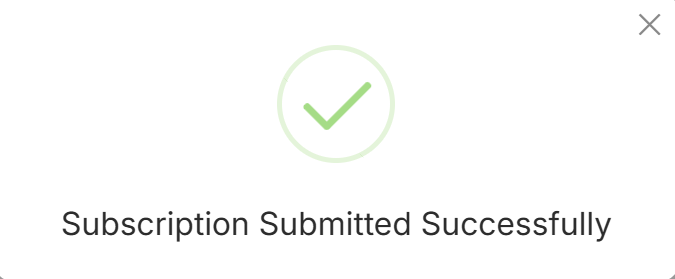
Acknowledgement Message
In the Report Schedule window, click the SFTP button, as shown in the screenshot below, to configure the report delivery through SFTP.
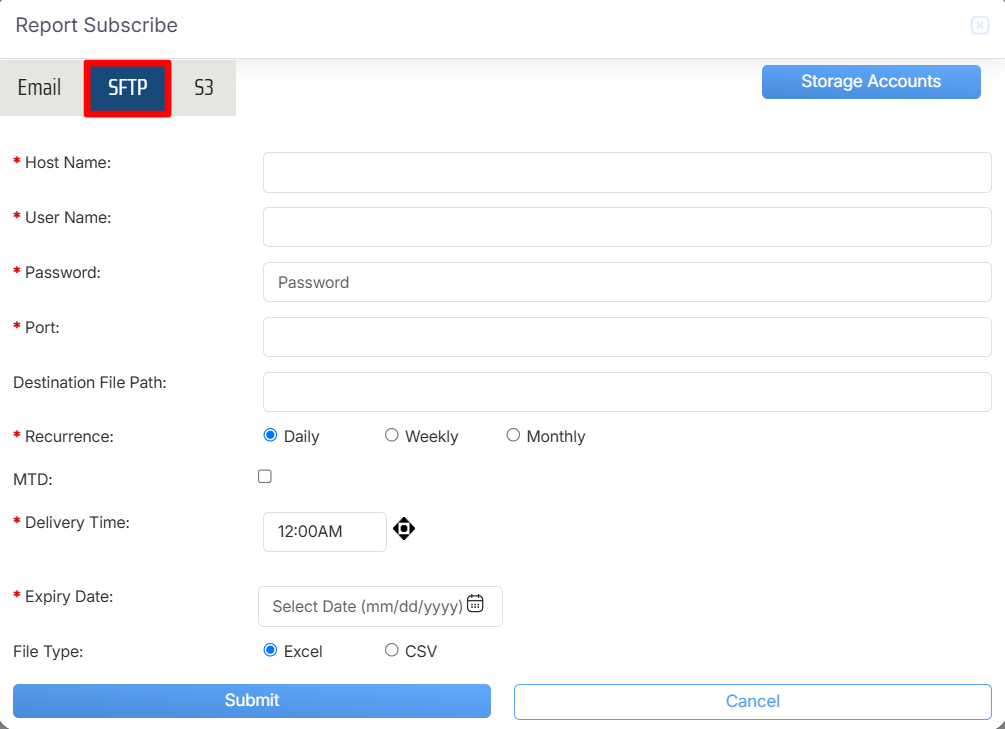
Report Subscribe: SFTP
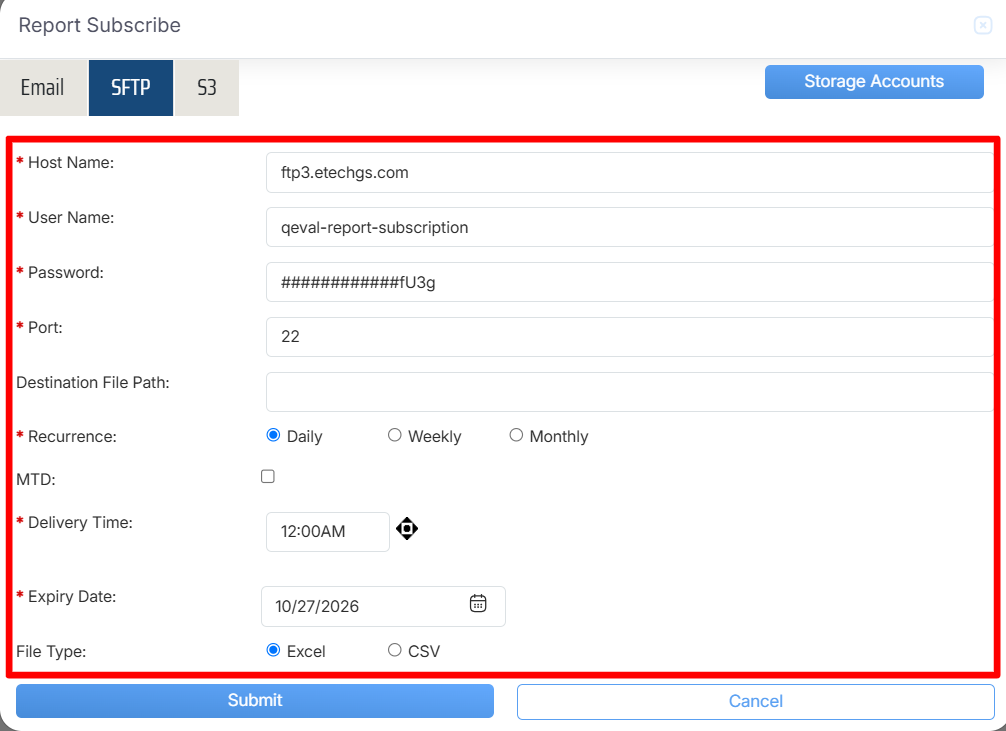
The data fields displayed in the SFTP configuration window are explained below:
- Host Name: Add the name or IP address of the server to be connected to.
- User Name: Enter the username used to authenticate the connection to the host.
- Password: Enter the password required to authenticate the connection.
- Port: Enter the network port number used for the connection, such as 22 for SSH/SFTP or 21 for FTP.
- Destination Path: Enter the folder path on the destination server where the report file should be saved. Use forward slashes (
/) to separate folder levels, for example,FolderA/FolderB/FolderC.
Note: If the Destination Path field is left blank, the report file will be delivered to the default root folder.
When Daily is selected under Recurrence, configure the following fields:
- MTD (Month to Date): Select the MTD checkbox if required to include data from the beginning of the current month to date.
- Delivery Time: Select the time at which the report should be delivered each day.
- Expiry Date: Select the date on which the report schedule should end.
- File Type: Select Excel or CSV based on the required file format for downloading the report.
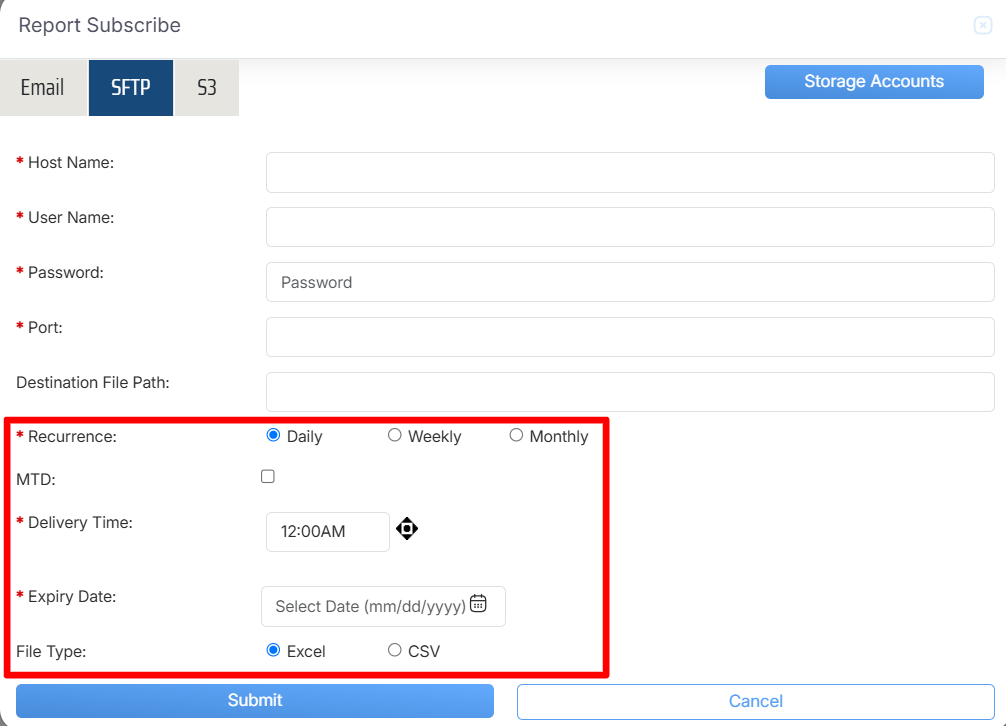
Recurrence on Daily Basis
When Weekly is selected under Recurrence, configure the following fields:
- MTD (Month to Date): Select the MTD checkbox if required to include data from the beginning of the current month to date.
- Delivery Time: Select the time at which the report should be delivered.
- Selected Days: Select the checkboxes for the days on which the report should be emailed each week. For example, selecting Monday and Friday schedules the report for delivery every Monday and Friday.
- Expiry Date: Select the date on which the report schedule should end.
- File Type: Select Excel or CSV based on the required file format for downloading the report.
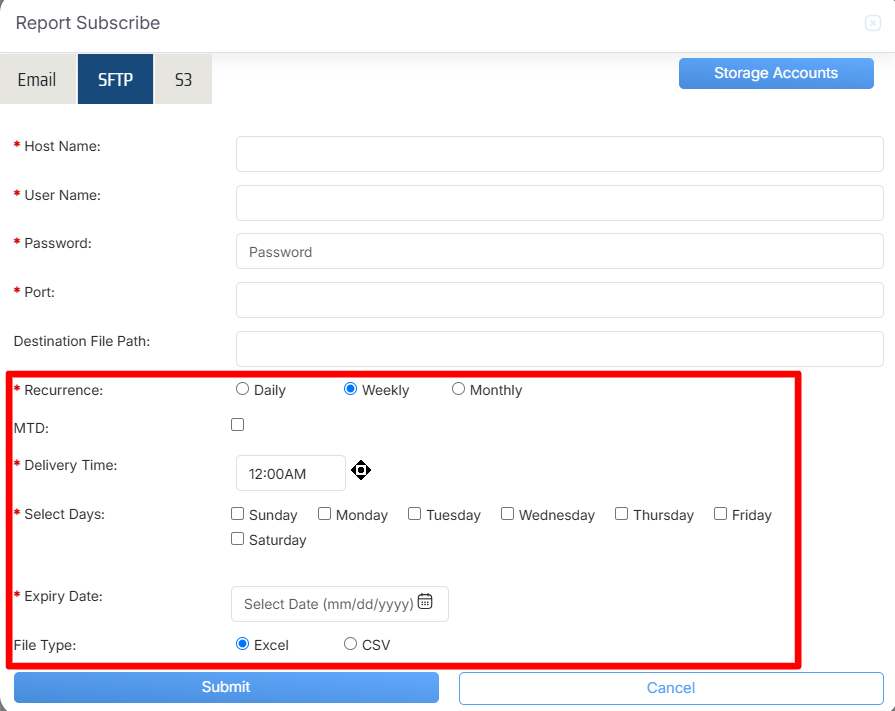
Recurrence on Weekly Basis
When Monthly is selected under Recurrence, configure the following field:
- Delivery Time: Select the time at which the report should be delivered each month.
Select one of the following options to define when the monthly report should be scheduled:
- On the Following Day: Select the required day and date to schedule the report for delivery on that day of the month.
- On This Day of the Month: Select the specific date of the month on which the report should be delivered.
- Expiry Date: Select the date on which the report schedule should end.
- File Type: Select Excel or CSV based on the required file format for downloading the report.
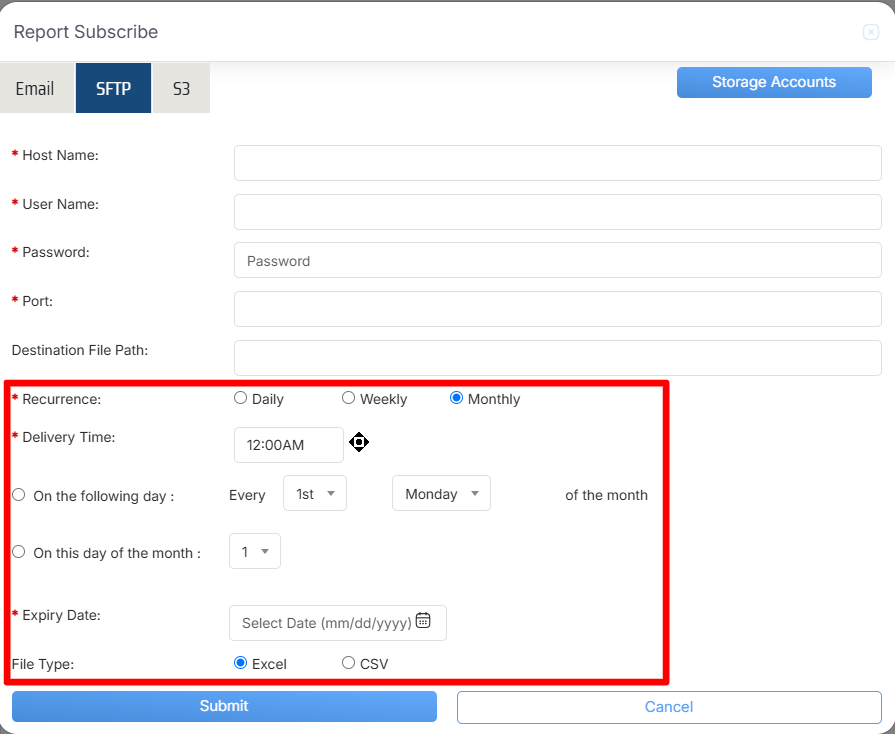
Recurrence on Monthly Basis
Once all the required details are configured, click Submit to subscribe to the report and save the schedule. To cancel the process, click Cancel.
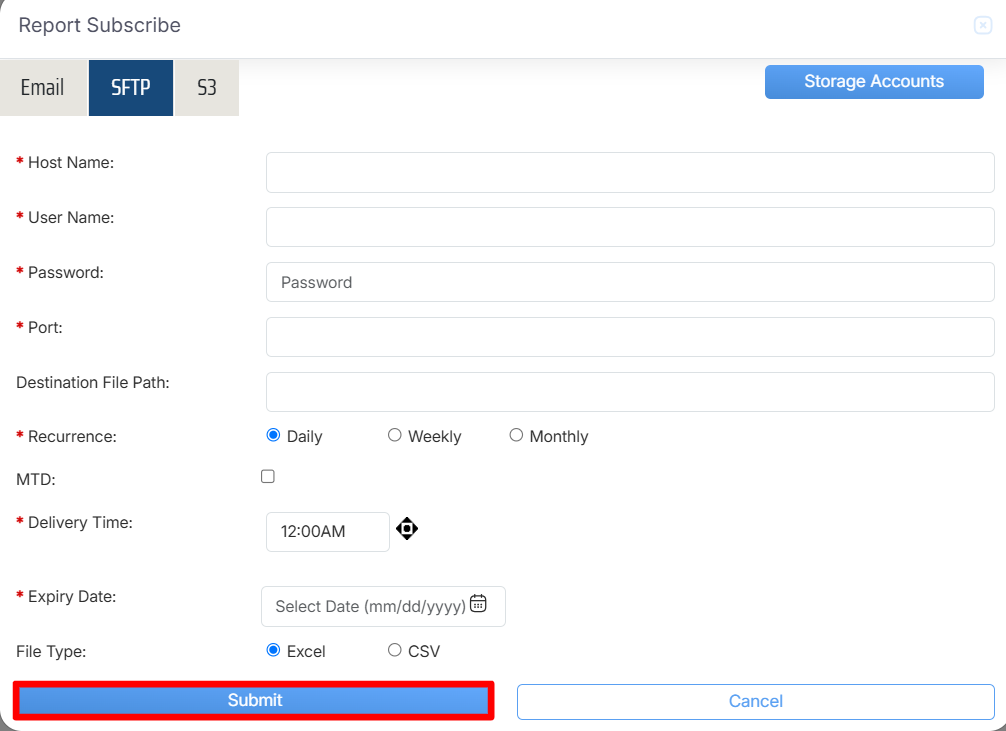
Submit
A confirmation message will appear on the screen, indicating that the report has been scheduled successfully.
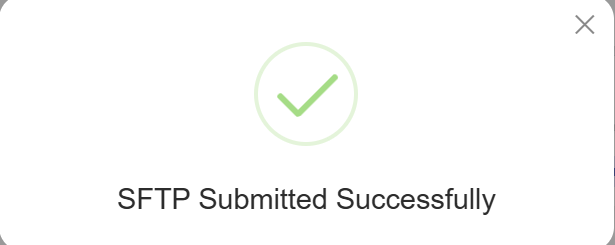
Acknowledgement Message
SFTP Storage Accounts
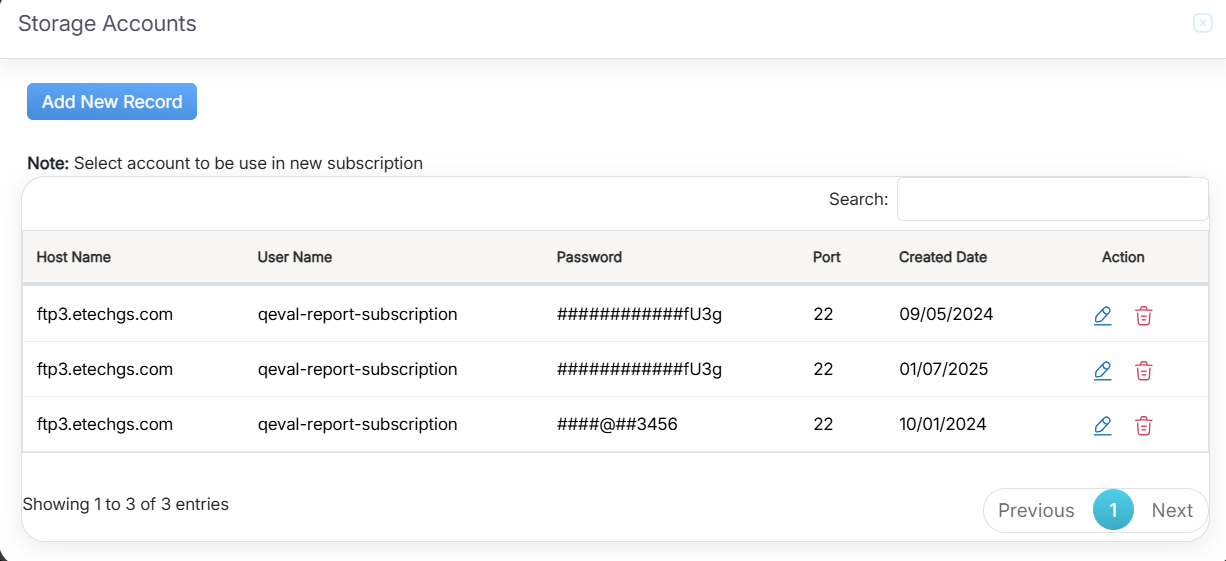
The Storage Account serves as a centralized location for storing and managing evaluation-related data. It displays details such as Host Name, User Name, Password, Port, Created Date, and Action. Users can add new storage account details and manage existing records as needed. This feature helps keep storage account information organized and accessible for future reference and processing.
To access this feature, click the Storage Accounts button, as highlighted in the screen below.
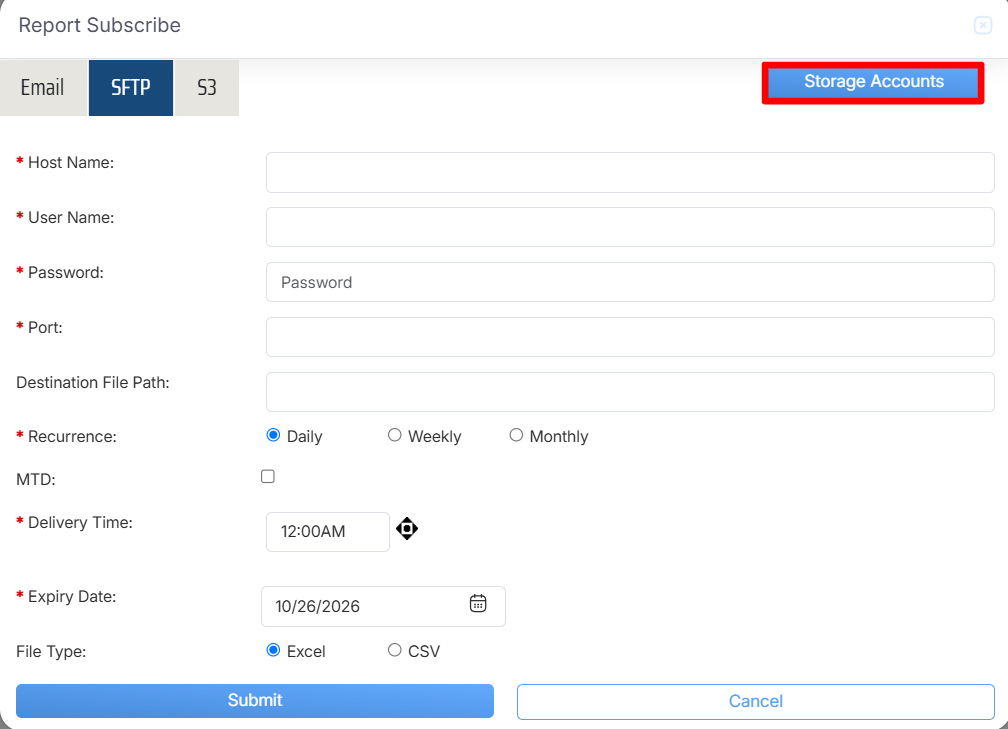
Storage Accounts
Records
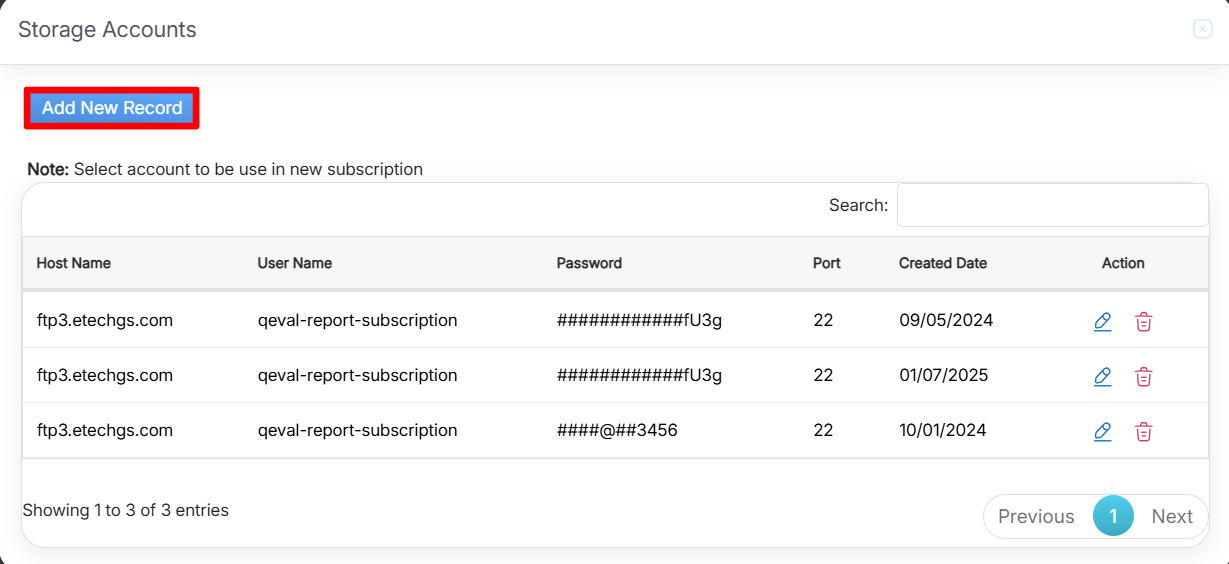
The Storage Accounts pop-up window will appear, displaying a list of all previously added records, as shown in the screen below.
The data fields displayed on the screen are explained below:
- Host Name: Add the name or IP address of the server to be connected to.
- User Name: Enter the username used to authenticate the connection to the host.
- Password: Enter the password required to authenticate the connection.
- Port: Enter the network port number used for the connection, such as 22 for SSH/SFTP or 21 for FTP.
- Created Date: Displays the date on which the storage account record was created.
- Action: Allows users to edit or delete a storage account record. Click the Edit icon to update the record or the Delete icon to remove it.
Add New Record
The Add New Record feature allows users to add and save new storage account details in the system.
Add New Record
To add a new record, click the Add New Record button, as highlighted in the screen below.
Add Record Details
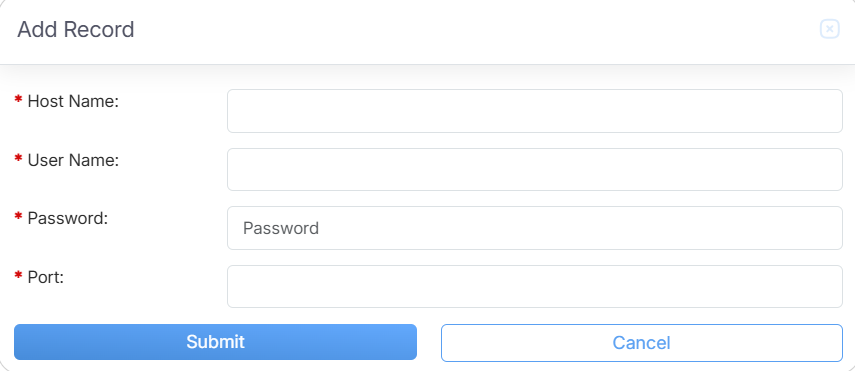
After clicking the Add New Record button, the Add Record pop-up window will appear, as shown in the screen below.
Enter the required information in the appropriate fields and click Submit to save the new record in the Storage Accounts list.
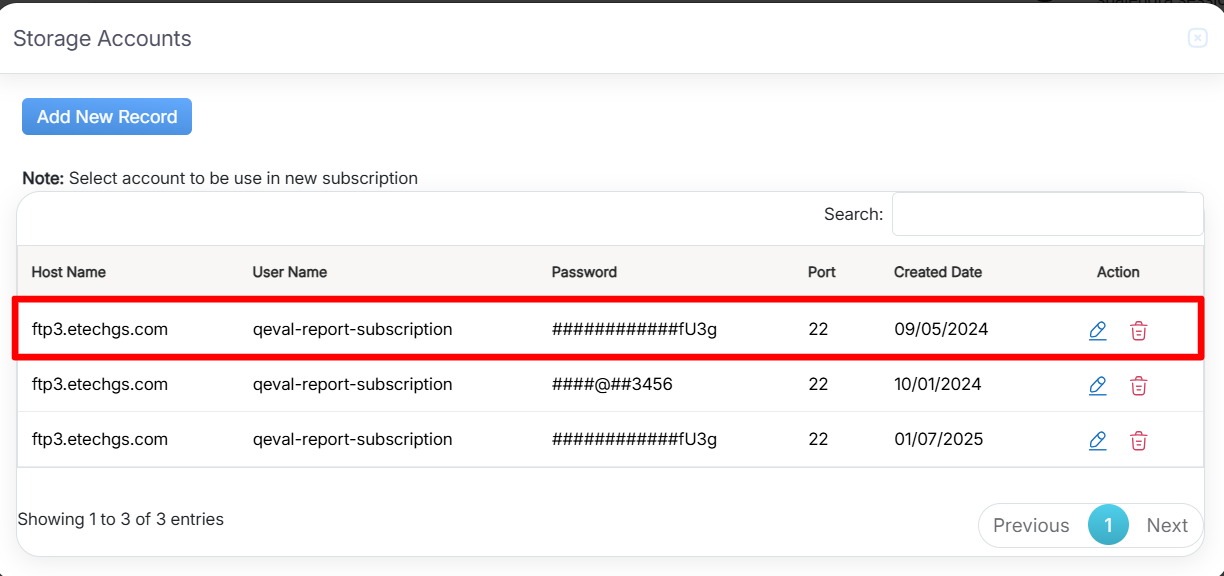
The system also provides an auto-fill feature that automatically populates the relevant fields with existing data when a record is selected from the list. This reduces manual data entry, saves time, and improves efficiency.
To use this feature, click the required record in the list to automatically populate the corresponding SFTP details, as highlighted in the screen below.
Existing Records
After selecting a record, the corresponding details will be automatically populated in the SFTP Details section, as shown in the screen below.
Record Details
In the Report Schedule window, click the S3 button, as highlighted in the screenshot below.
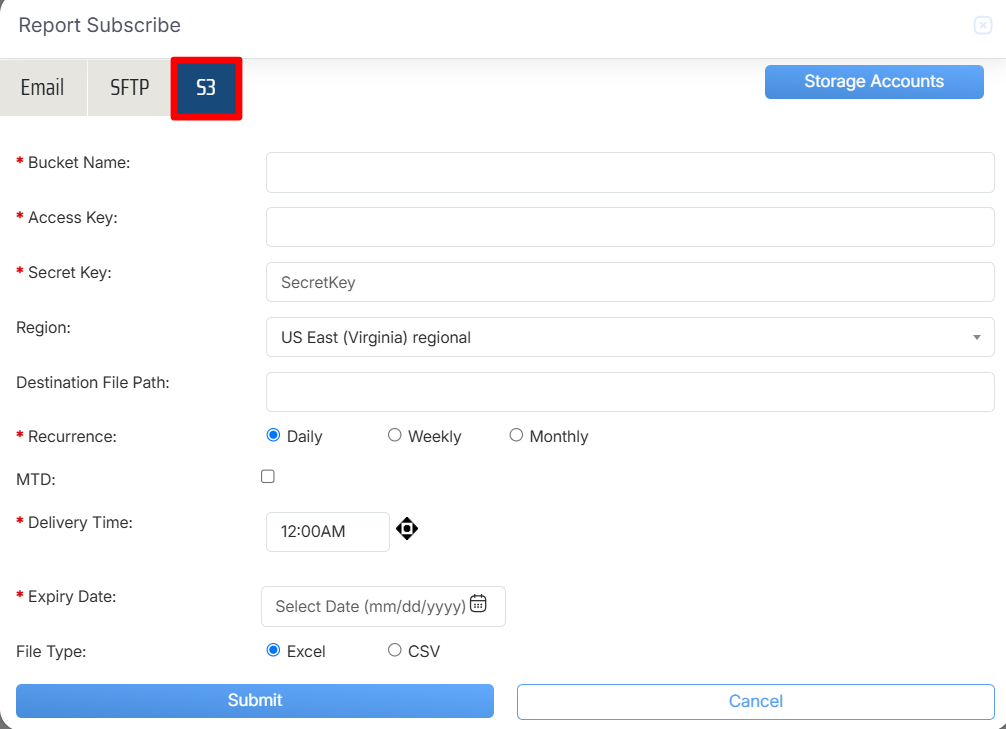
Report Subscribe: S3
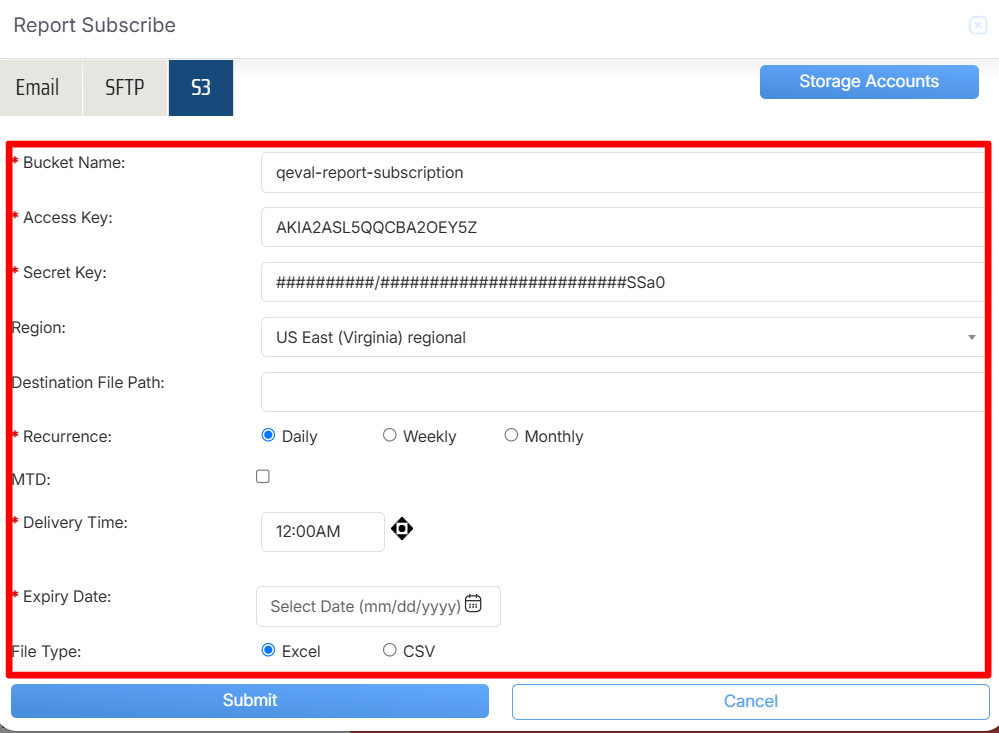
The data fields displayed in the S3 configuration window are explained below:
- Bucket Name: Enter the name of the storage bucket where the report files will be stored.
- Access Key: Enter the access key used to authenticate access to the storage bucket.
- Secret Key: Enter the secret key associated with the access key to securely authenticate the connection.
- Region: Select or enter the geographical region where the storage bucket is located, such as US-East or EU-West.
When Daily is selected under Recurrence, configure the following fields:
- MTD (Month to Date): Select the MTD checkbox if required to include data from the beginning of the current month to date.
- Delivery Time: Select the time at which the report should be delivered each day.
- Expiry Date: Select the date on which the report schedule should end.
- File Type: Select Excel or CSV based on the required file format for downloading the report.
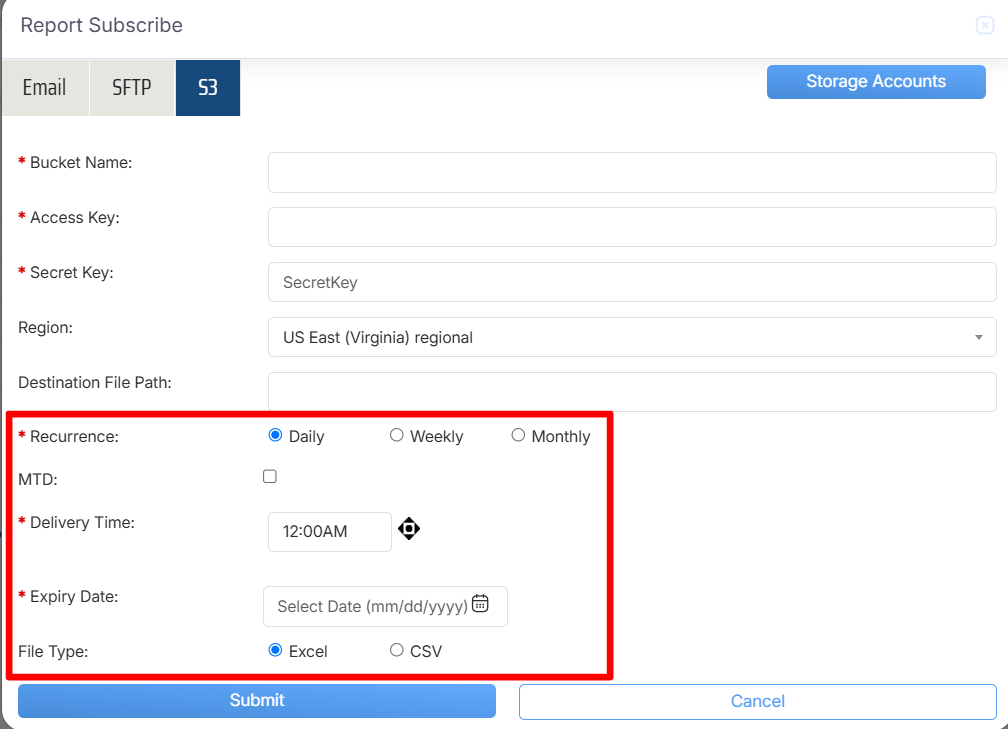
Recurrence on Daily Basis
When Weekly is selected under Recurrence, configure the following fields:
- MTD (Month to Date): Select the MTD checkbox if the report should include data from the beginning of the current month to date.
- Delivery Time: Select the time at which the report should be delivered.
- Selected Days: Select the checkboxes for the days on which the report should be emailed each week. For example, selecting Monday and Friday schedules the report for delivery every Monday and Friday.
- Expiry Date: Select the date on which the report schedule should end.
- File Type: Select Excel or CSV based on the required file format for downloading the report.
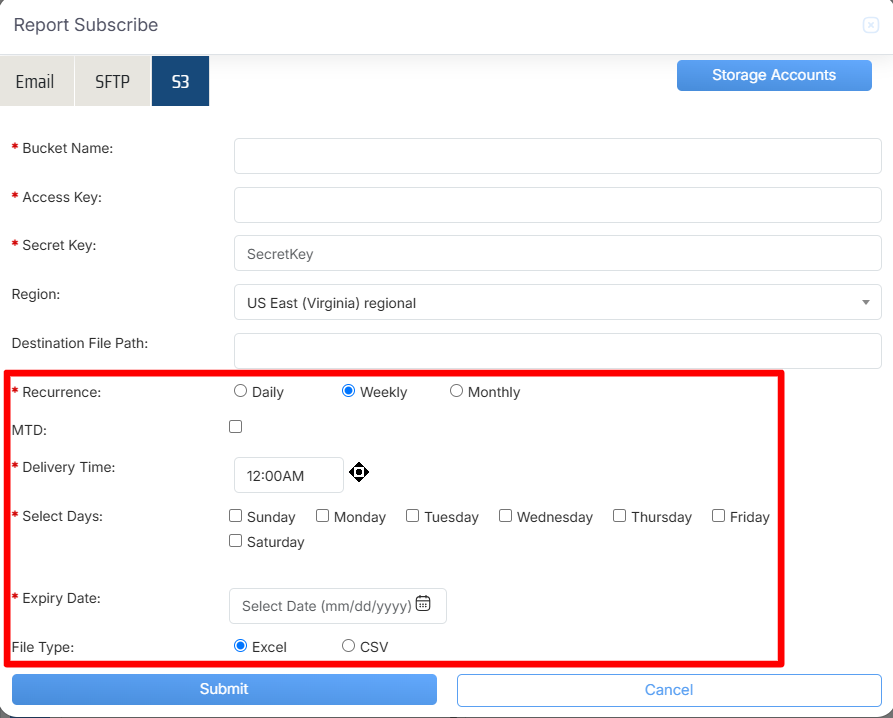
Recurrence on Weekly Basis
When Monthly is selected under Recurrence, configure the following field:
- Delivery Time: Select the time at which the report should be delivered each month.
Select one of the following options to define when the monthly report should be scheduled:
- On the Following Day: Select the required day and date to schedule the report for delivery on that day of the month.
- On This Day of the Month: Select the specific date of the month on which the report should be delivered.
- Expiry Date: Select the date on which the report schedule should end.
- File Type: Select Excel or CSV based on the required file format for downloading the report.
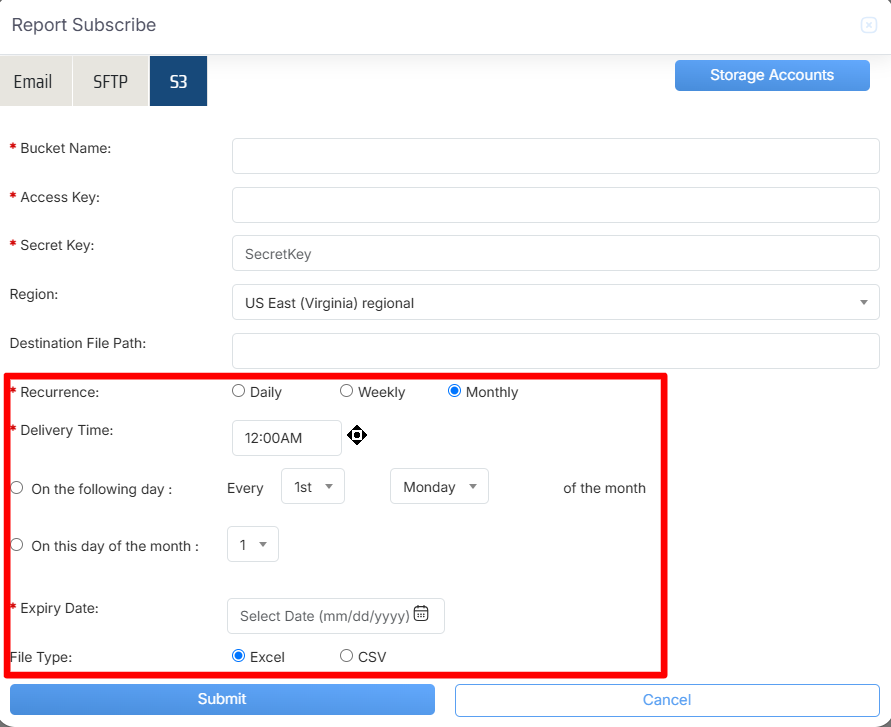
Recurrence on Monthly Basis
Once all the required details are configured, click Submit to save the report subscription. Click Cancel to discard the changes.
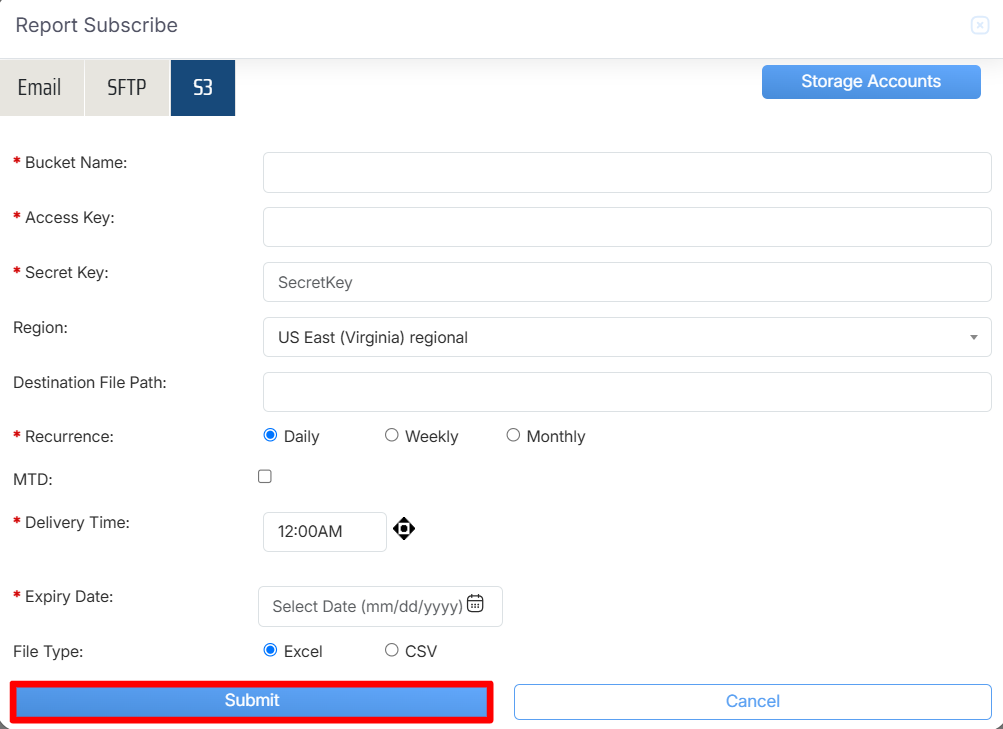
Submit
An acknowledgment message will appear on the screen confirming that the report has been scheduled.
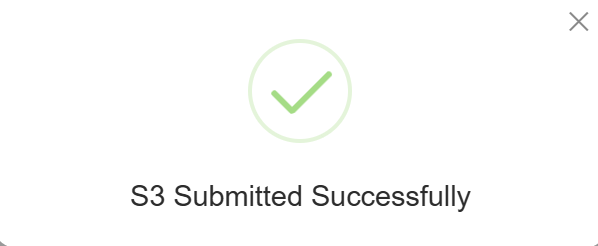
Acknowledgement Message
S3 Storage Accounts
The Storage Account serves as a centralized location for storing and managing evaluation-related data. It displays details such as Host Name, User Name, Password, Port, Created Date, and Action. Users can add new storage account details and manage existing records as needed. This feature helps keep storage account information organized and accessible for future reference and processing.
To access this feature, click the Storage Accounts button, as highlighted in the screen below.
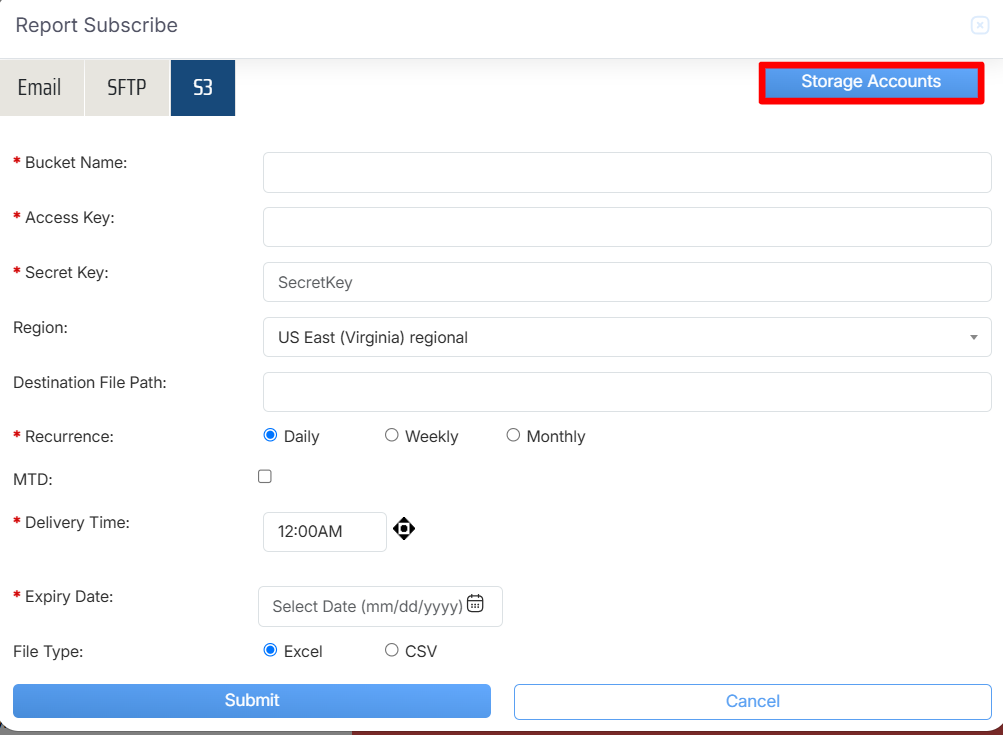
Storage Accounts
The Storage Accounts pop-up window will appear, displaying a list of all previously added records, as shown below.
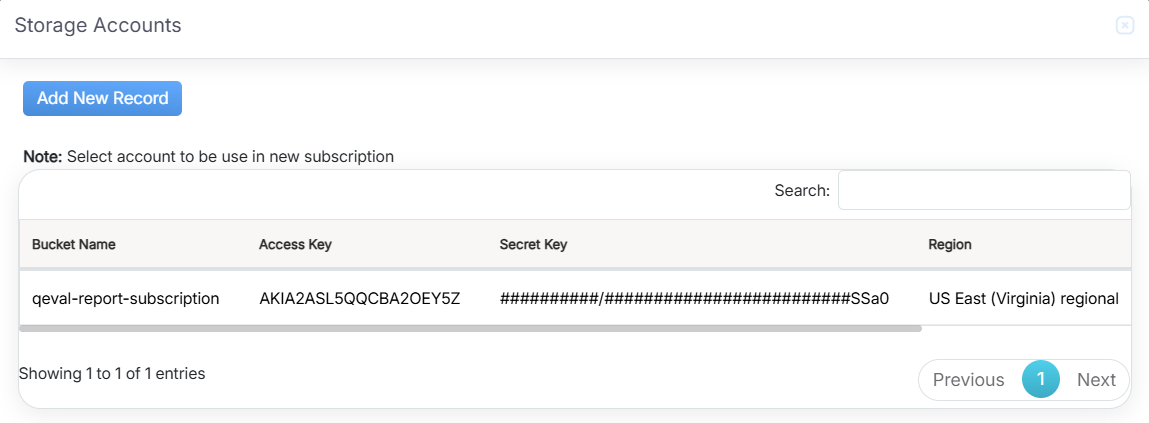
Record Details
The data elements displayed on the screen are explained below:
- Bucket Name: Displays the name of the storage bucket where data is stored.
- Access Key: Displays the key used to authenticate access to the storage bucket.
- Secret Key: Displays the confidential key used along with the Access Key to securely access the storage bucket.
- Region: Displays the geographical region where the storage bucket is located, such as US-East or EU-West.
- Created Date: Displays the date on which the storage account record was created.
- Action: Allows users to edit or delete a specific record. Click the Edit icon to update the record or the Delete icon to remove it.
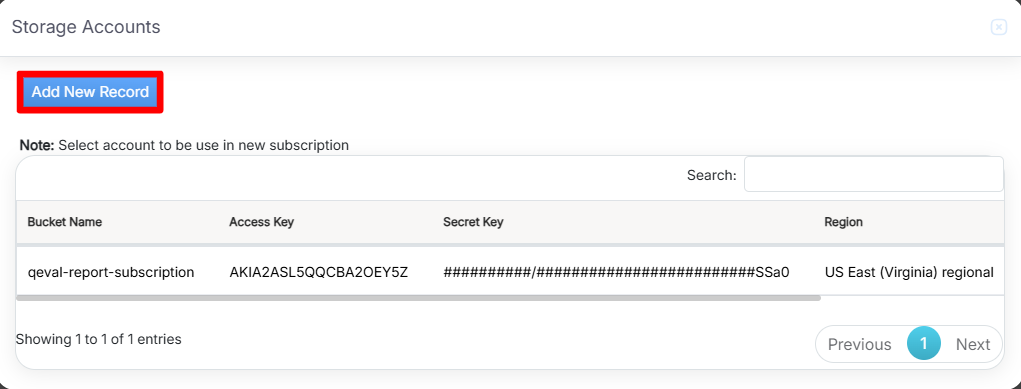
Add New Record
The Add New Record feature allows users to add new storage account details to the system.
Add New Record
To add a new record, click the Add New Record button, as highlighted in the screenshot below.
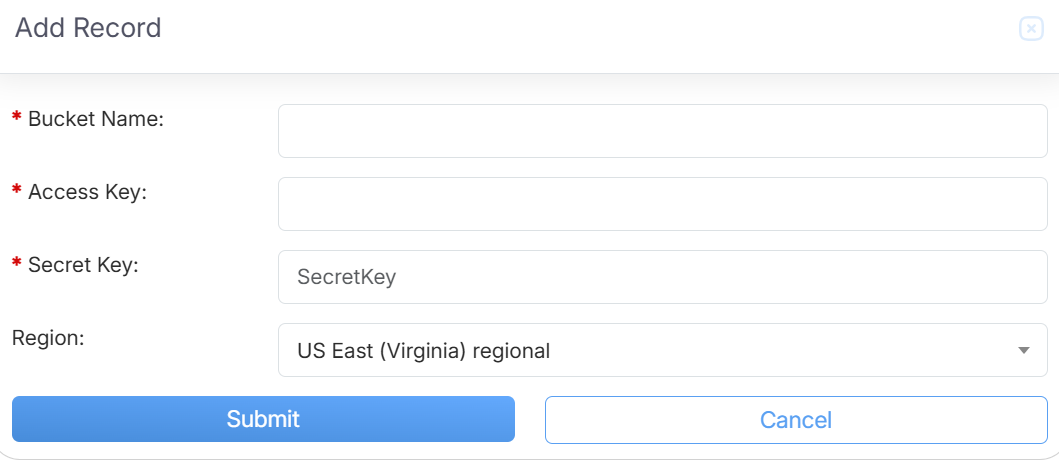
After clicking the Add New Record button, the Add Record pop-up window will appear, as shown below.
Add Record Details
Enter the required information in the appropriate fields and click Submit to save the new record in the Storage Accounts list.
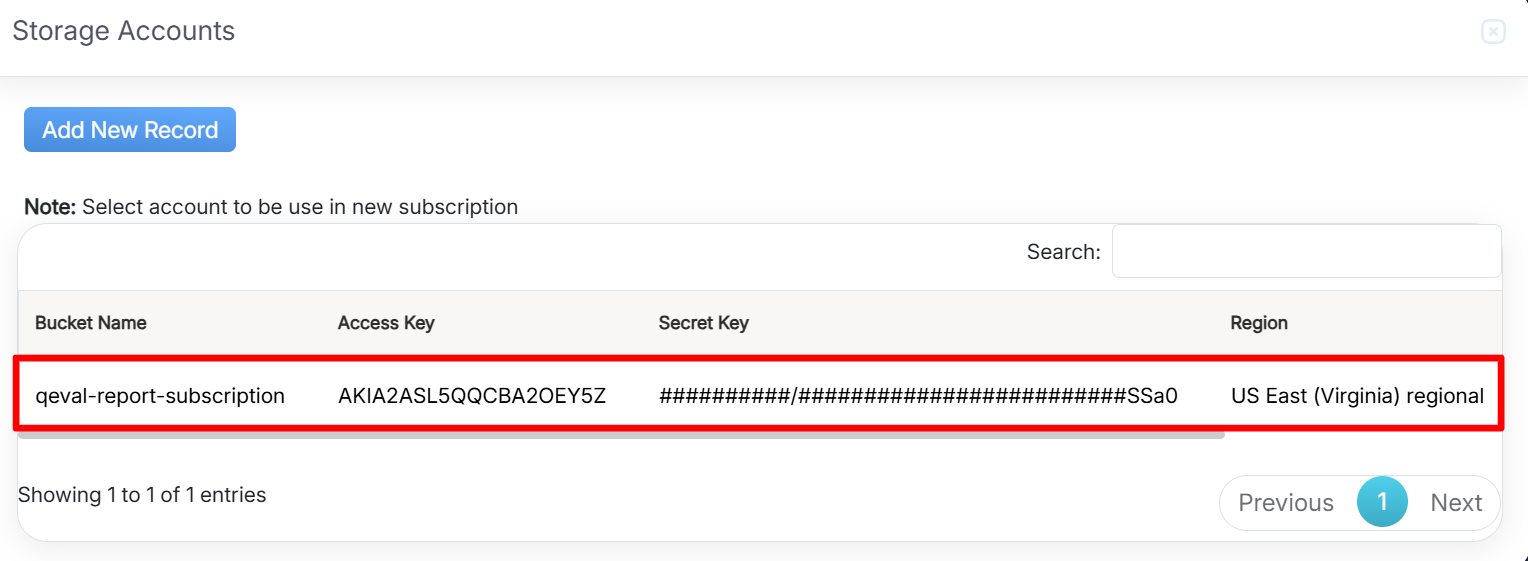
The system also allows users to automatically populate the SFTP Details by selecting an existing storage account record. This reduces manual data entry and saves time.
To use this feature, click the required storage account record, as highlighted in the screenshot below. The corresponding details will be automatically populated in the SFTP Details section.
Existing Record
After selecting the record, the corresponding details will be automatically populated in the S3 Details section, as shown in the screenshot below.
Record Details
Subscription History
Subscription History provides a record of subscription-related activities and updates, such as subscription dates, renewals, plan changes, and cancellations.
To access this feature, click the Subscription History button, as highlighted in the screenshot below.
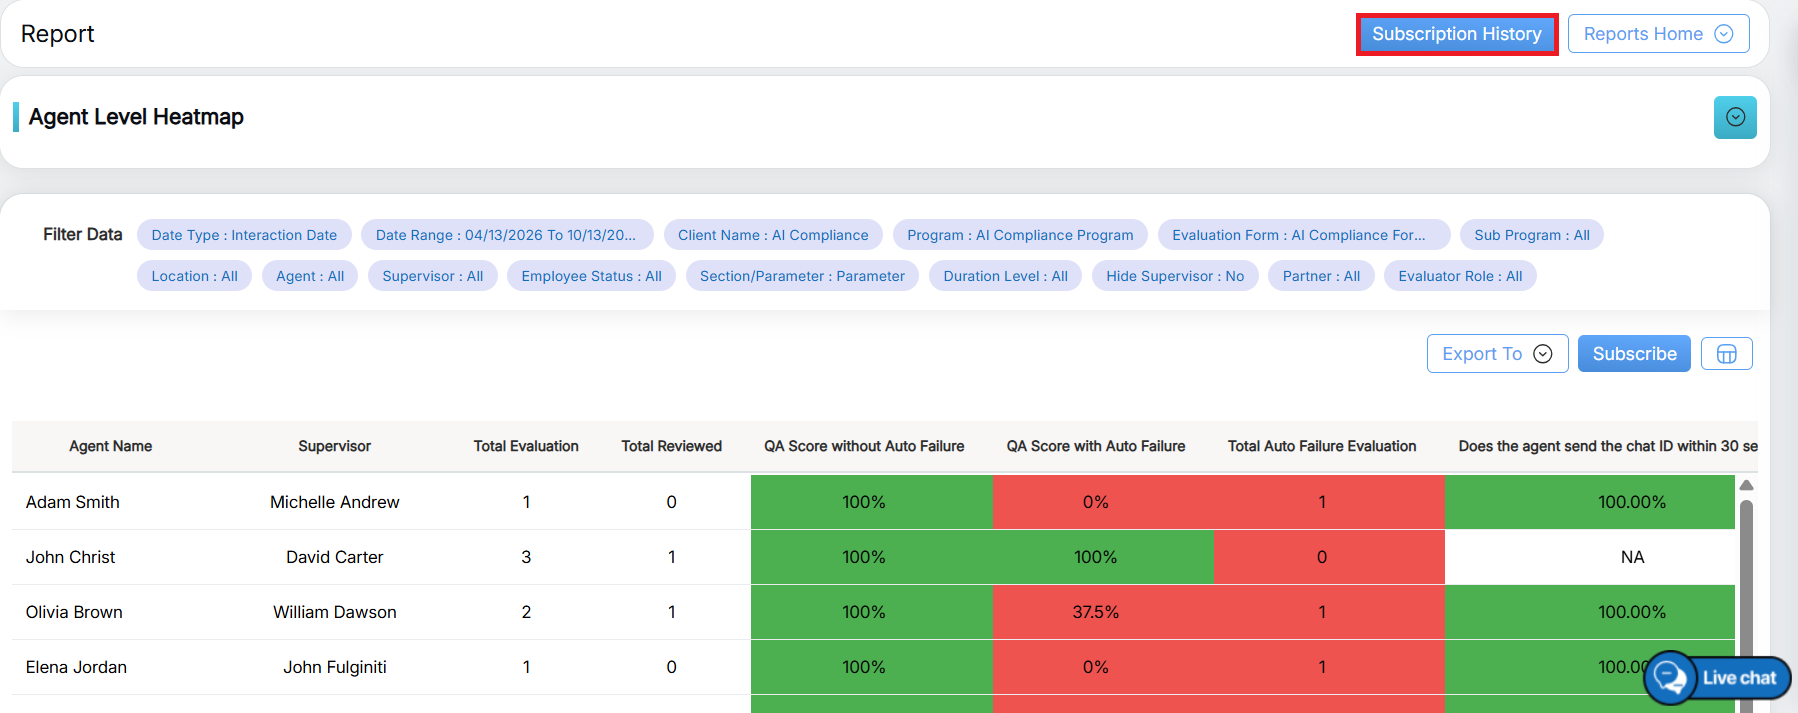
Subscription History
Subscription Report
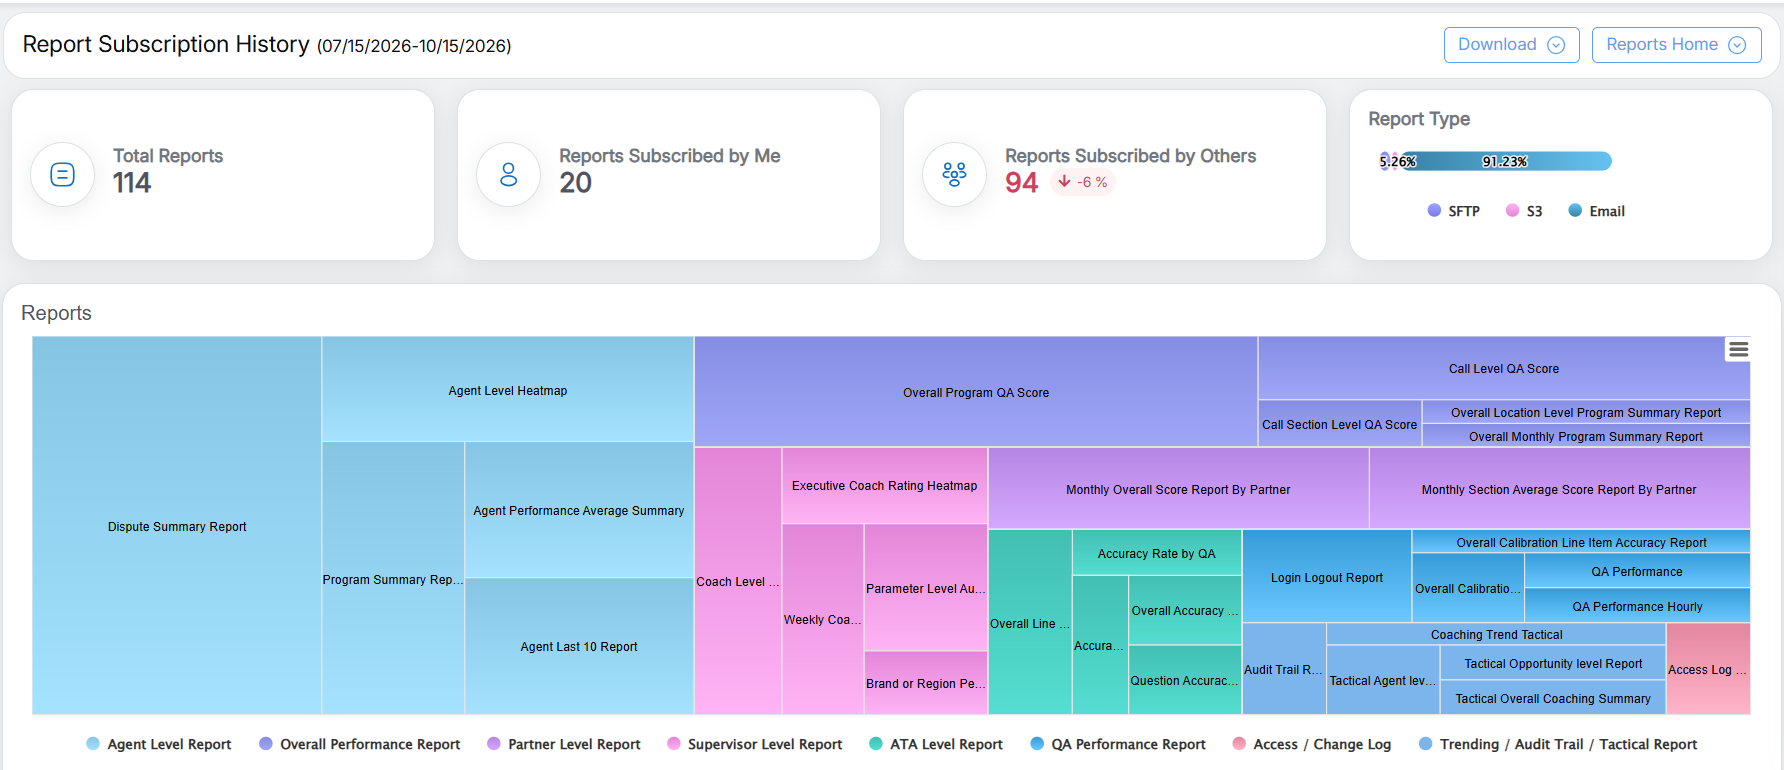
After clicking the Subscription History button, the Report Subscription History page will appear, as shown below.
The page provides an overview of report subscription activity through the following elements:
- Summary Cards: Display key information, including the total number of reports, reports subscribed to by the logged-in user, reports subscribed to by others, and the delivery methods used: SFTP, S3, and Email. Each delivery method is represented by a distinct color.
- Report Type Treemap: Displays report categories, such as Tactical Reports, Agent Level Reports, Overall Performance Reports, and Supervisor-Level Reports. The size of each block represents the relative frequency of report access, helping users identify commonly accessed report types.
- Action Buttons: Allow users to download the report history or return to the main Reports dashboard.
- Subscribed List: Displays the list of report subscriptions. Scroll down the page to view the table and its details.
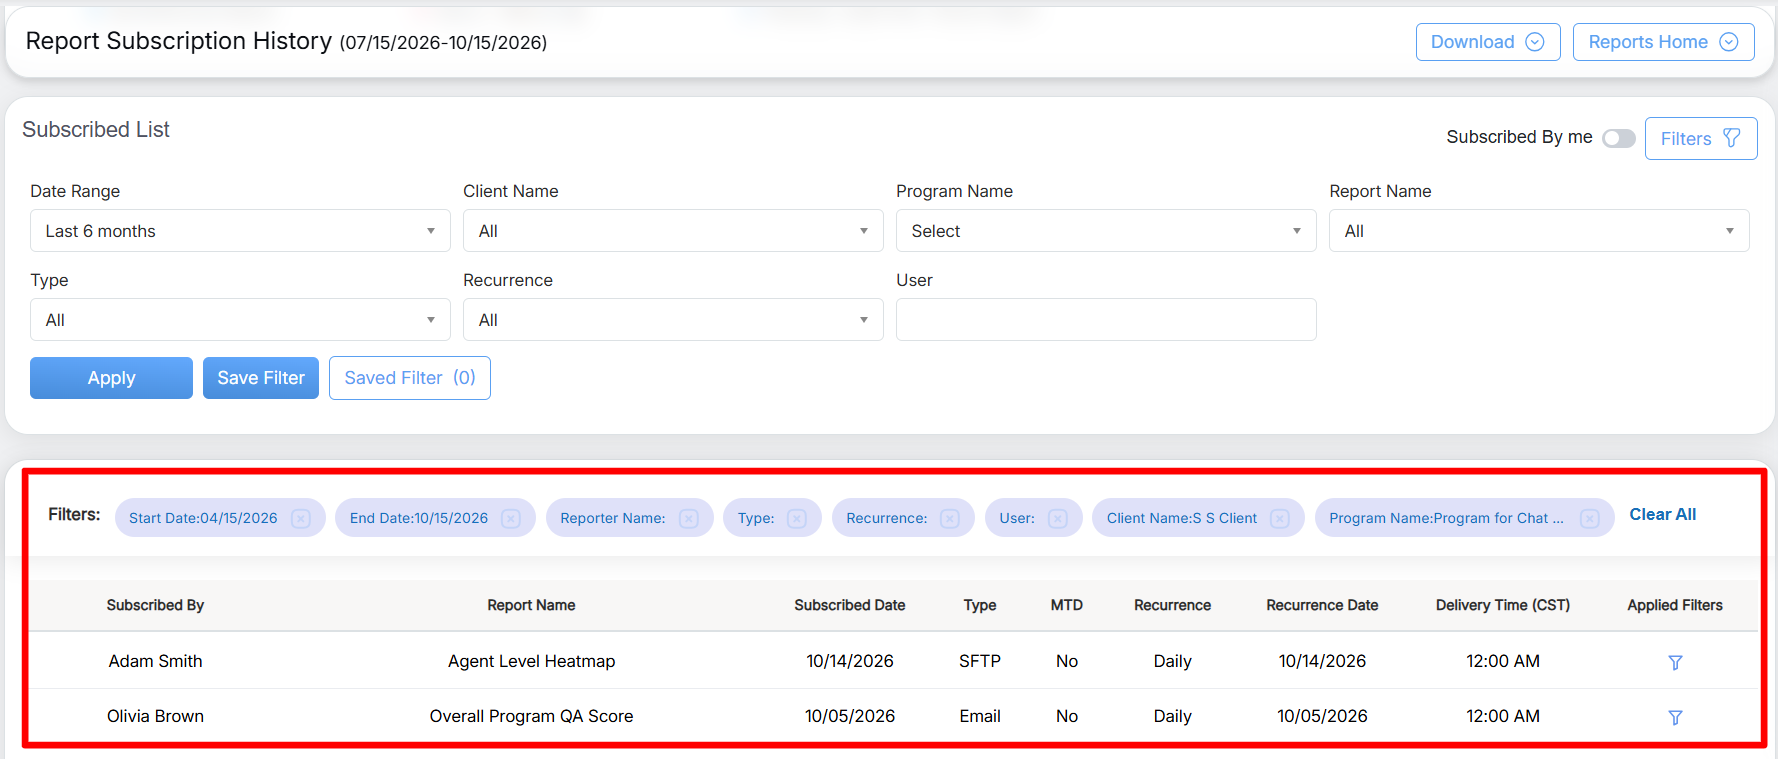
Subscribed List
Use the available filters to refine the subscription list and view details in the following columns: Subscribed By, Report Name, Subscribed Date, Delivery Type, MTD, Recurrence, Recurrence Date, and Delivery Time.
Toggle the Subscribed by Me option on or off to filter the list and view report subscriptions created by the logged-in user.
Video