The Parameter Specific Dispute Report provides a detailed view of all parameter-level disputes raised by agents against their evaluations. Each disputed question is displayed as a separate record, along with the corresponding evaluation details, dispute comments, review status, and resolution information. This report helps users identify frequently disputed parameters, analyze dispute trends across programs and teams, and support coaching, calibration, and quality improvement initiatives.
Note: Unlike the Dispute Summary Report, which summarizes disputes at the evaluation level, the Parameter Specific Dispute Report displays each disputed parameter (question) as a separate record, providing detailed visibility into dispute comments, review status, and resolution for every disputed question.
To view this report, select:
Report > Reports Home > Agent Level Report > Parameter Specific Dispute Report
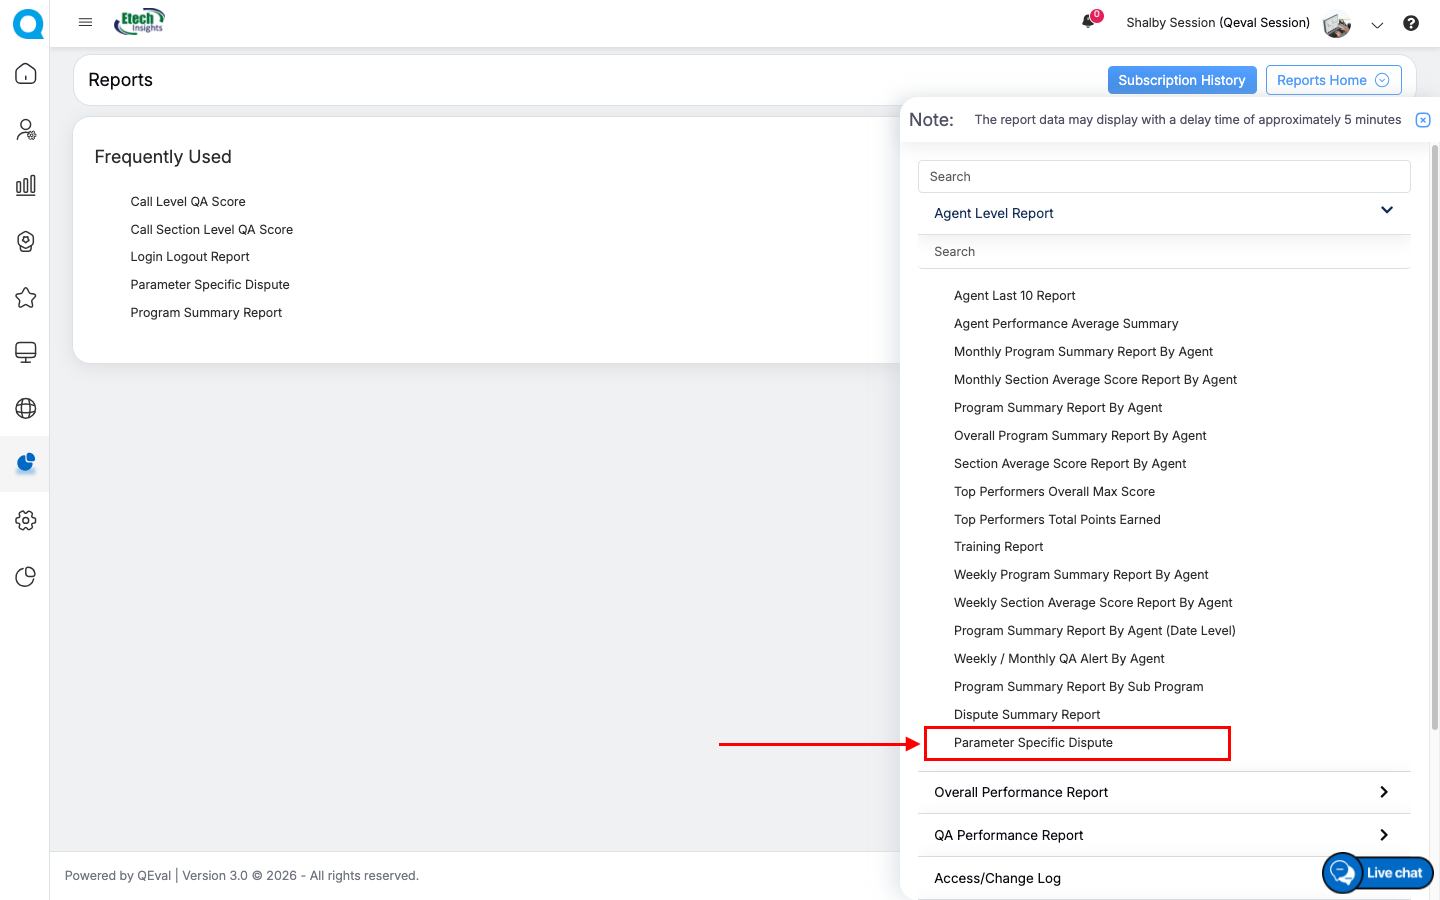
Reports Home Tab
The following page will be displayed.
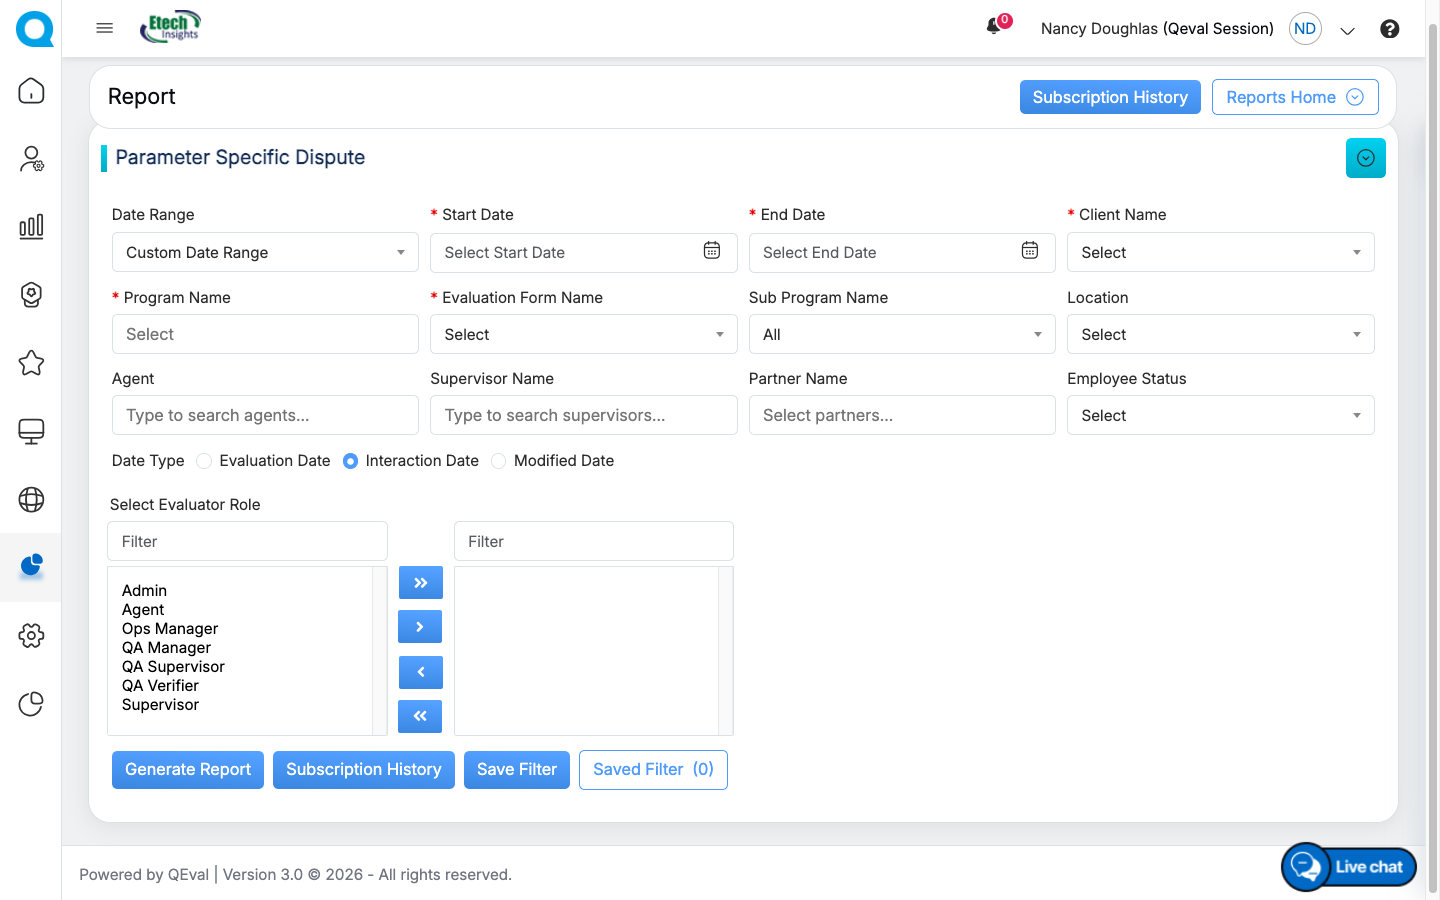
Parameter Specific Dispute Report filter page
Configure the following fields to view the required result:
| Screen Elements | Description |
|---|---|
| Date Range | User can define a date range by selecting one of the predefined timeframes from the dropdown or by specifying a custom date range. Available options include Today, Last 7 Days, Last 10 Days, Last 30 Days, Last 12 Weeks, Last 6 Months, Week to Date, Month to Date, Previous Day, Previous Week, Previous Month, and Custom Date Range. |
| Start Date | If Custom Date Range is selected, specify the start date. |
| End Date | Select the end date for the report. |
| Client Name | Select the required Client Name from the dropdown list. |
| Program Name |
Select one or more Program Names based on the selected Client Name. Multiple programs can be selected as required. Note: Users can select a maximum of 10 Program Names. |
| Evaluation Form Name | Select the Evaluation Form associated with the selected Client and Program. |
| Sub Program Name | Select the required Sub Program Name. By default, All is selected. |
| Location | Select the required Location from the dropdown list. |
| Agent |
Enter the initial characters of the Agent name and select the required Agent from the list. Multiple agents can be selected. Note: Users can select a maximum of 10 Agents. |
| Supervisor Name |
Enter the initial characters of the Supervisor name and select the required Supervisor. Multiple supervisors can be selected. Note: Users can select a maximum of 10 Supervisors. |
| Partner |
Select one or more Partner Names from the dropdown list. Note: Users can select a maximum of 10 Partners. |
| Employee Status | Select the required Employee Status from the dropdown list such as Active, Inactive, or All. |
| Date Type |
Select the required Date type: Evaluation Date: Select the radio button to search on the basis of the Evaluation date. Interaction Date: Select the radio button to search on the basis of Interaction date. Modified Date: Select the radio button to search on the basis of the evaluation form modified date. Note: In QEval AI instances, Interaction Date is the default selected Date Type in the filter panel. Users can switch the Date Type to Evaluation Date or Modified Date as needed. |
| Evaluator Role |
Select the required Evaluator role from the left-hand side box which will display the list of all the user roles of higher order. One can also search the roles by entering the role’s name in the Filter field. Once the role(s) is selected, click on To move all the roles to the right-hand side box at once, click on To remove a few roles from the right-hand side box and move them back to the left-hand side box, firstly, select such roles and then, click on To move all the roles from the right-hand side box to the left-hand side box at once, click on |
 button, and the selected role(s) will be moved to the right-hand side box.
 button.
 button.
 button.
Once the search criteria are configured, click the Generate Report button.
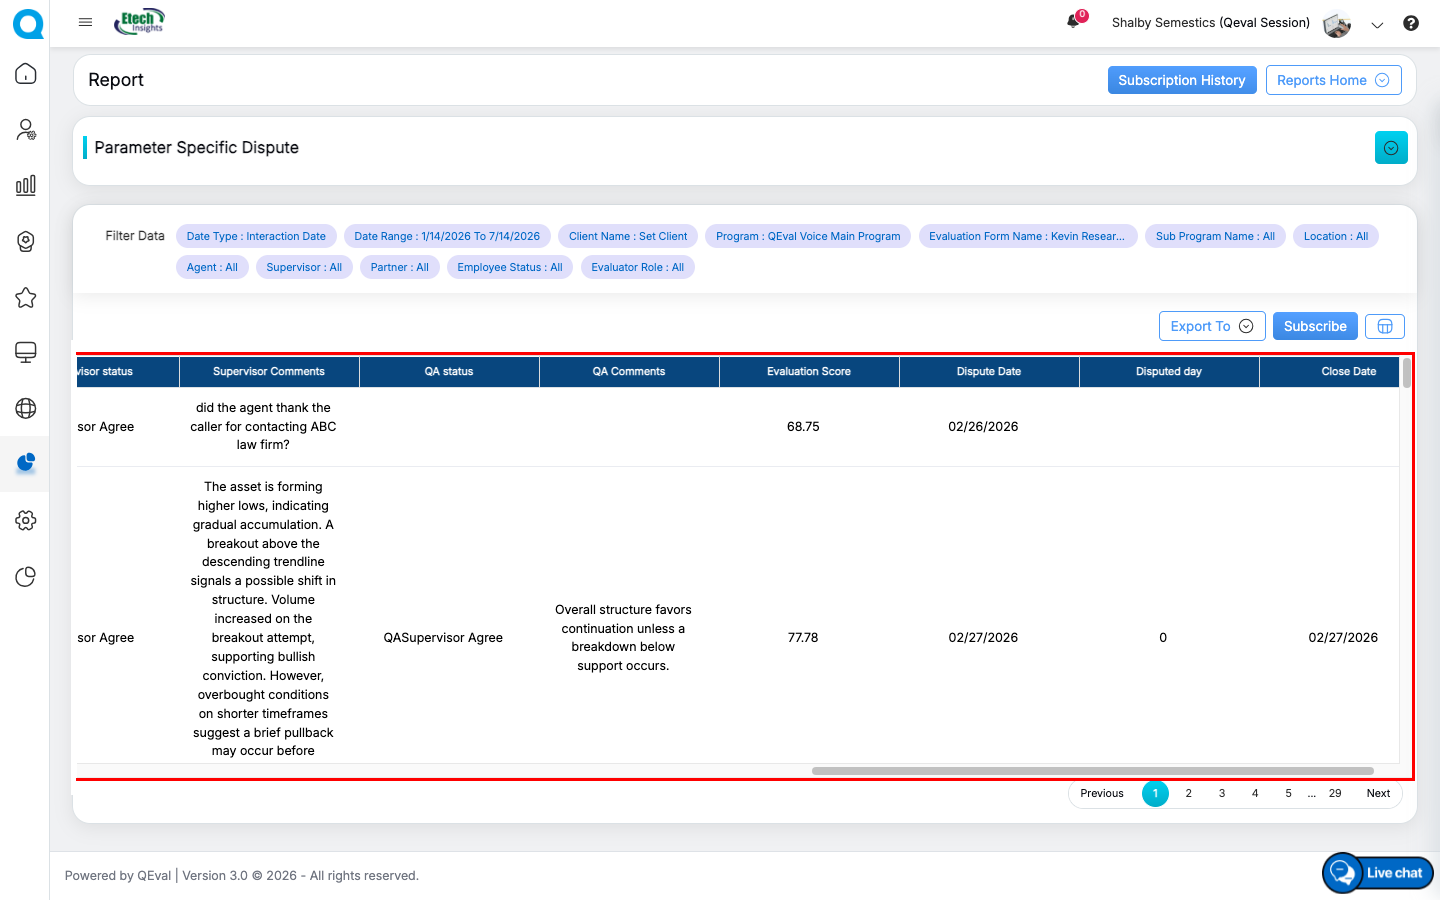
After clicking Generate Report, the system displays the report in a tabular format. Each row represents a single disputed parameter from an evaluation, including the dispute details, comments provided during each review stage, evaluation information, and dispute resolution status.
The report includes the following details for each disputed parameter: Agent Name, Supervisor Name, Evaluation ID, Evaluation Date, Interaction Date, Program Name, Disputed Question Name, Question Answer, Agent Comments, Supervisor Status, Supervisor Comments, QA Status, QA Comments, Evaluation Score, Dispute Date, Disputed Days, and Closed Date.
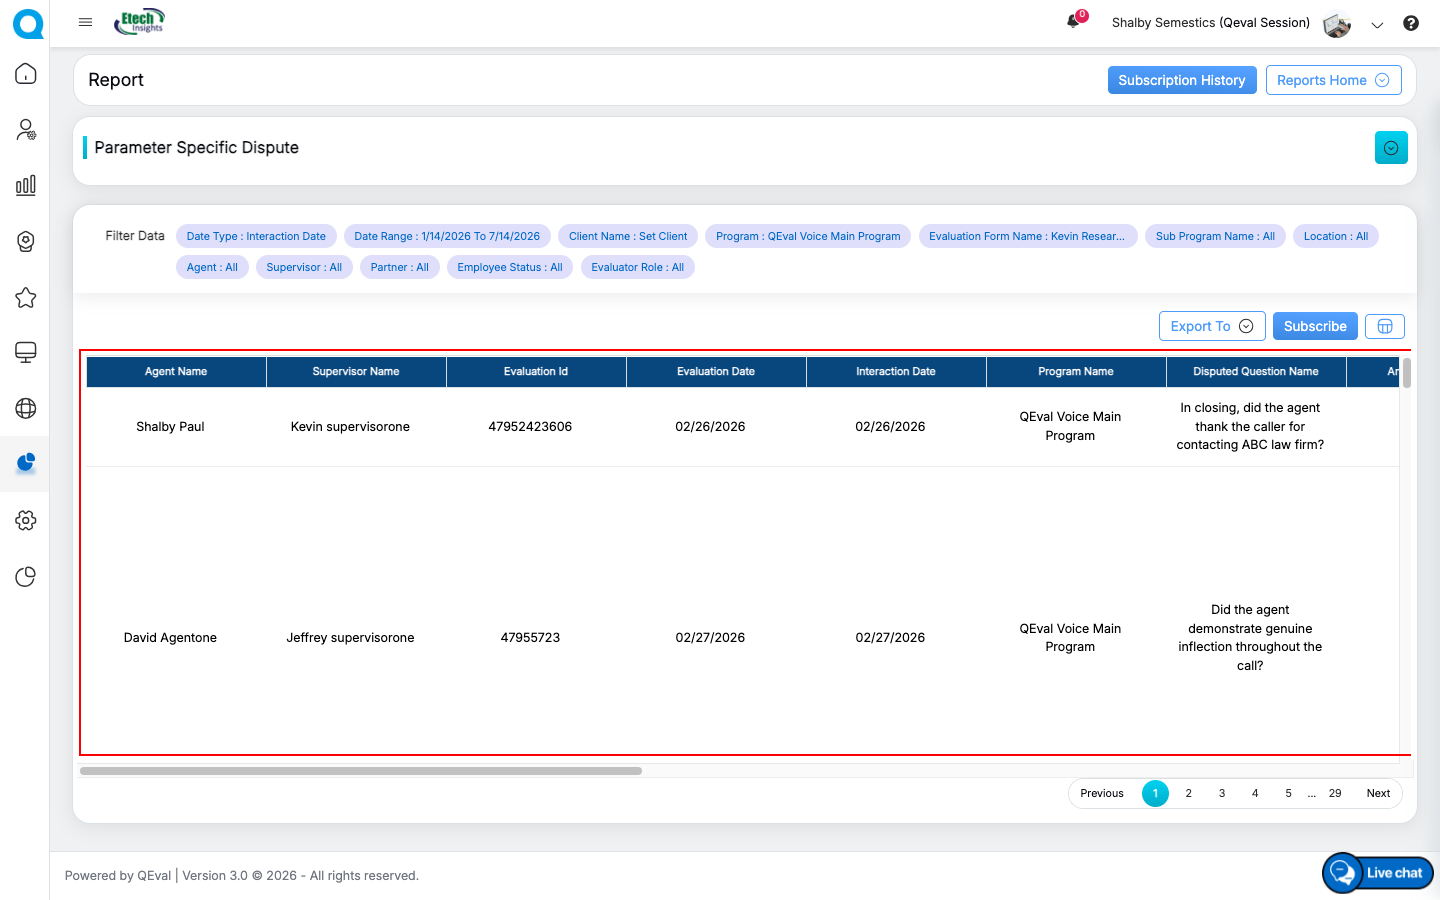
Generated Report
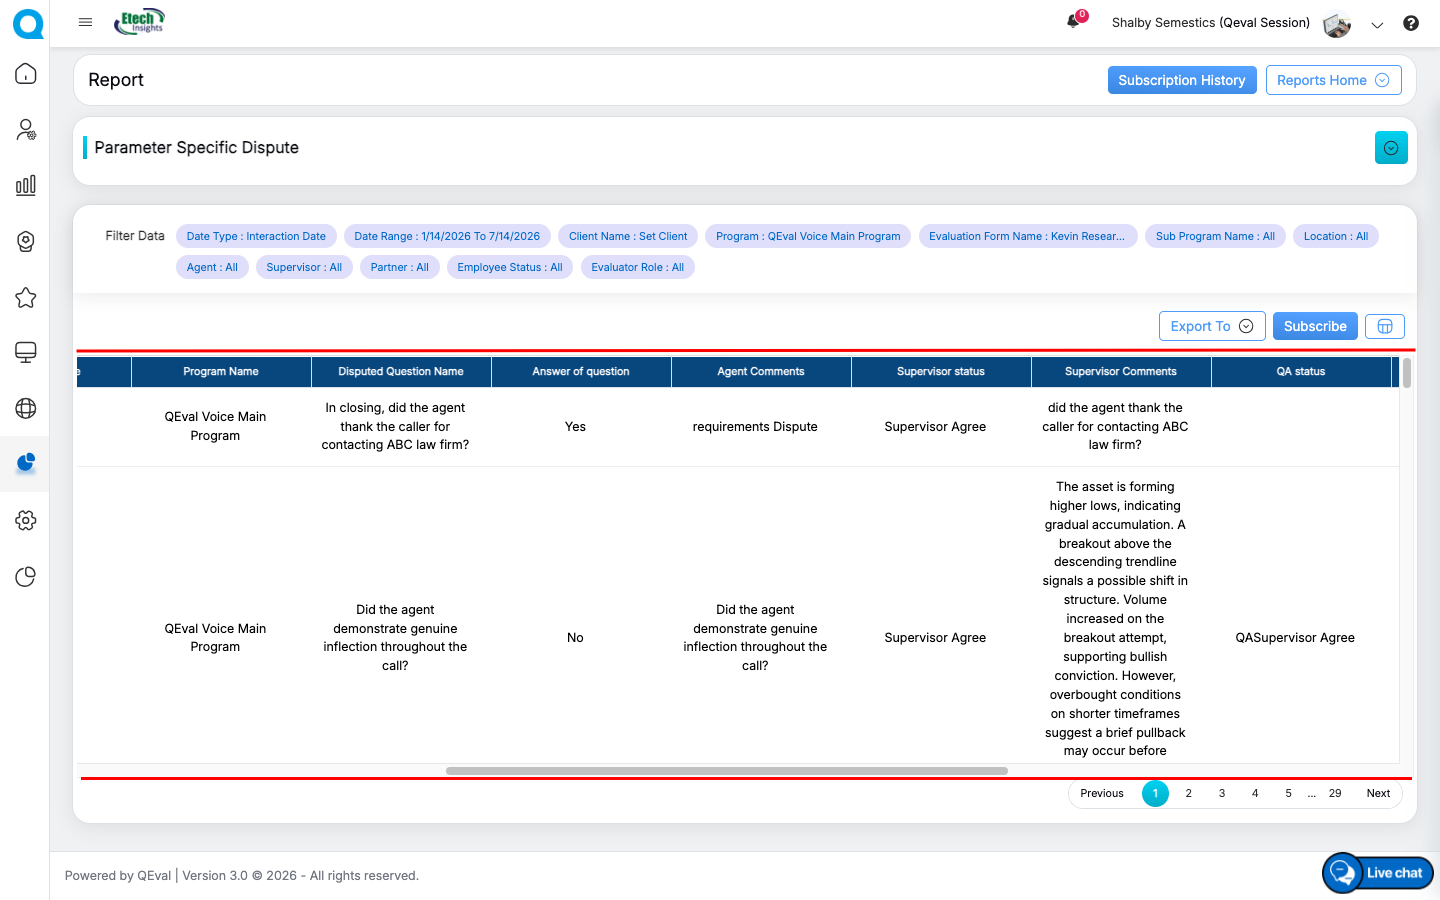
Generated Report
Generated Report
Notes
- Each disputed parameter is displayed as a separate row, even if multiple parameters are disputed within the same evaluation.
- Supervisor and QA comments are displayed only after the respective review actions are completed.
- If no action has been taken by the Supervisor or QA Supervisor, the corresponding Status and Comments fields remain blank.
- Closed Date represents the date on which the dispute is resolved. A dispute is considered closed when the Supervisor disagrees with the dispute or when the QA Supervisor completes the final review by either agreeing or disagreeing.
- Disputed Days indicates the total number of days between the dispute submission date and the dispute closure date.
- For disputes that are still under review, the Supervisor or QA Supervisor Status and Comments remain blank until an action is performed.
- Users with the appropriate Parameter Specific Dispute Report permission assigned under Add/Edit User > Assign Roles can access this report.
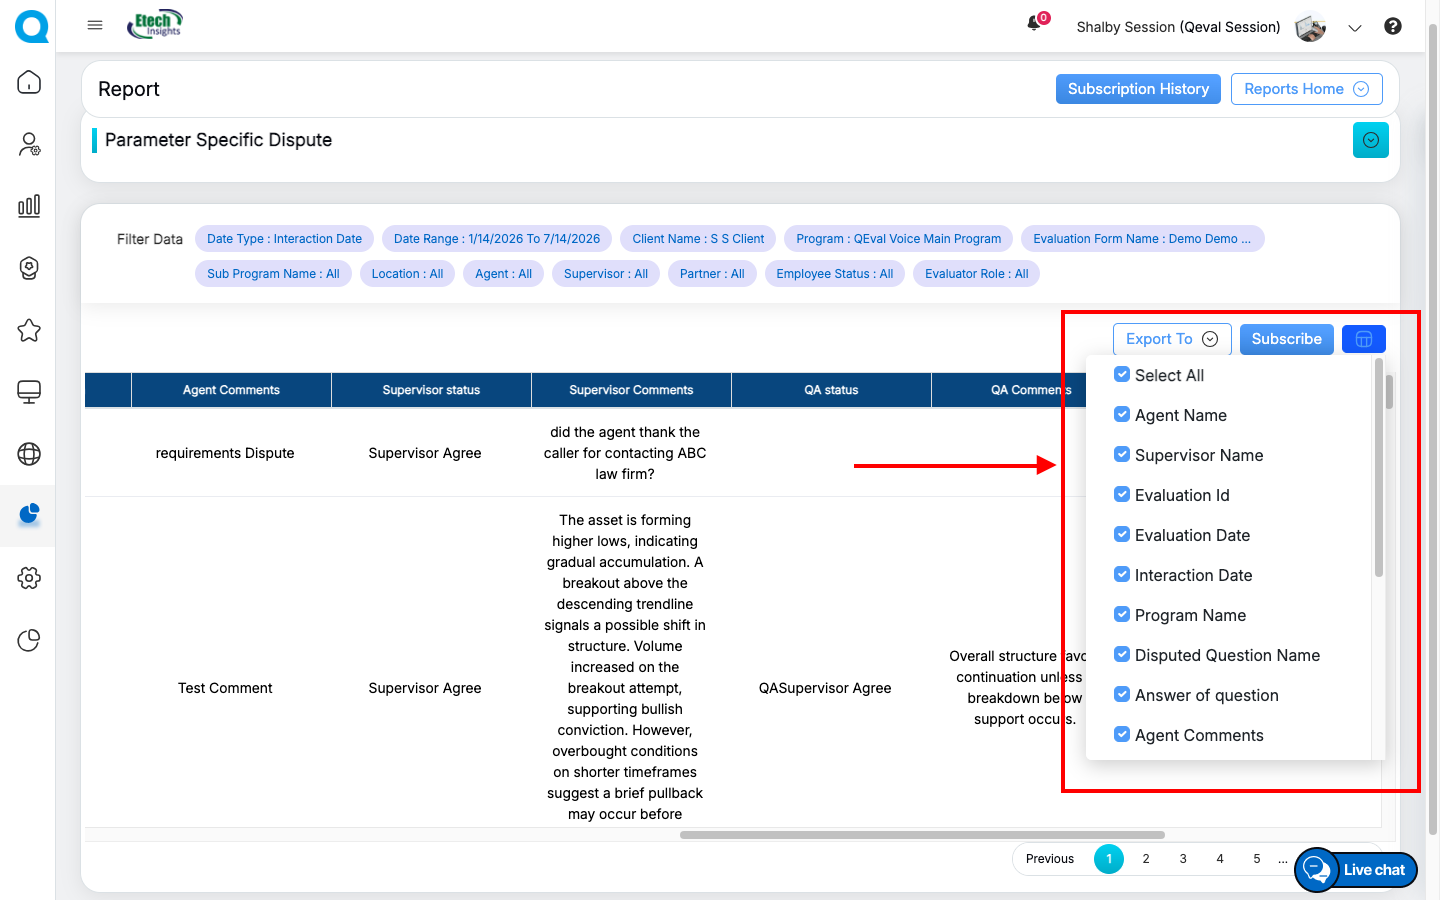
- The report supports Column Selection, allowing users to choose which columns are displayed and exported.
- Evaluation Score is displayed with up to two decimal places.
- Dates are displayed in MM-DD-YYYY format in both the report and exported files.
Column Selection
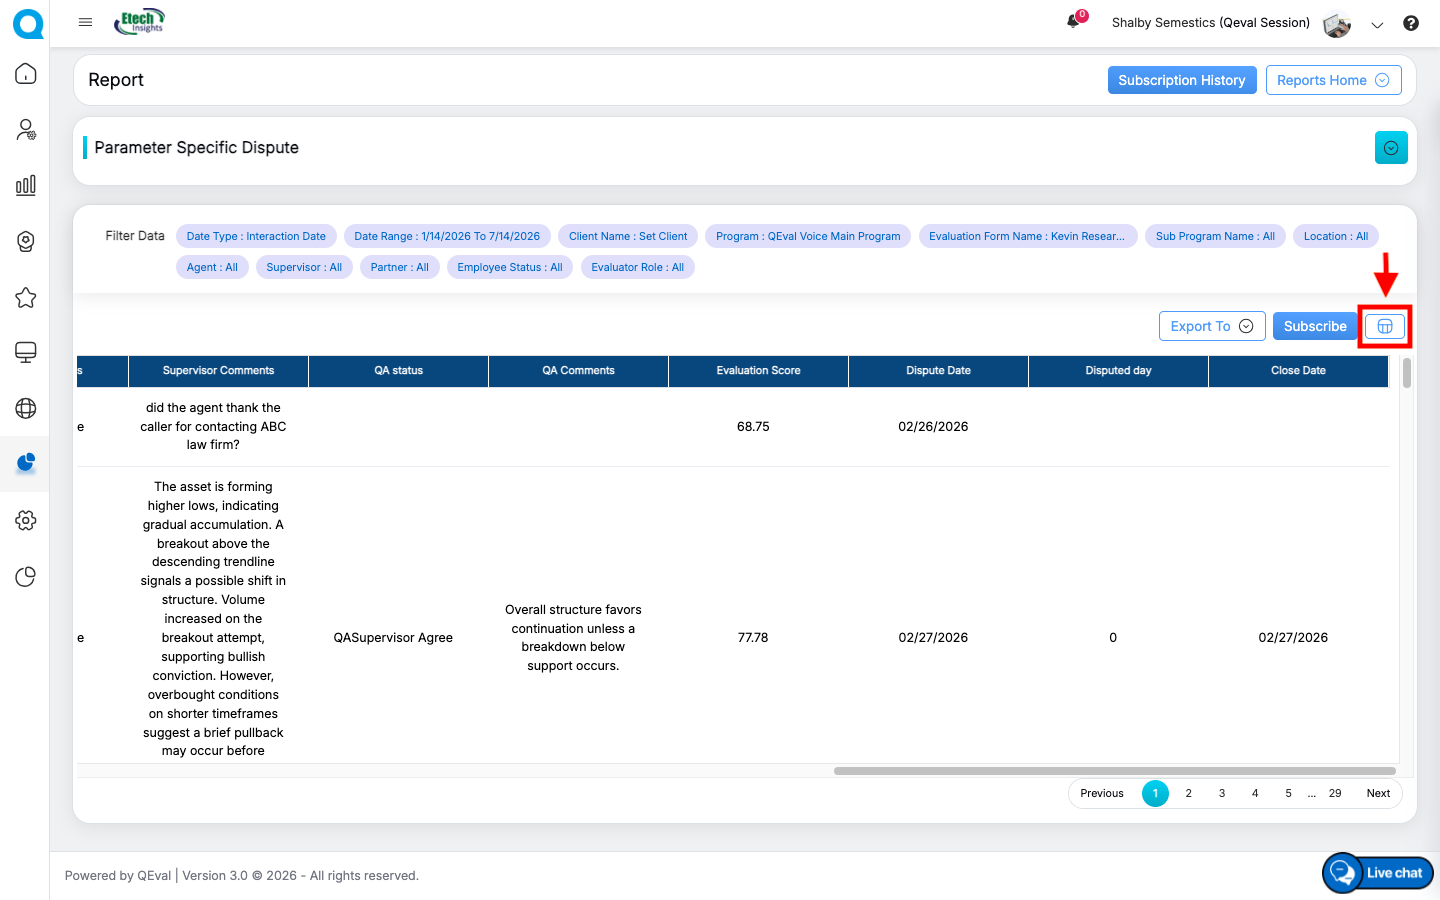
At the top-right corner of the report, a Column Selection button is available.
Column Selection Button
Click this button to view the list of available column headers. Select or clear the required checkboxes to display only the desired columns in the report table.
Column Selection Pop-up
Export Report
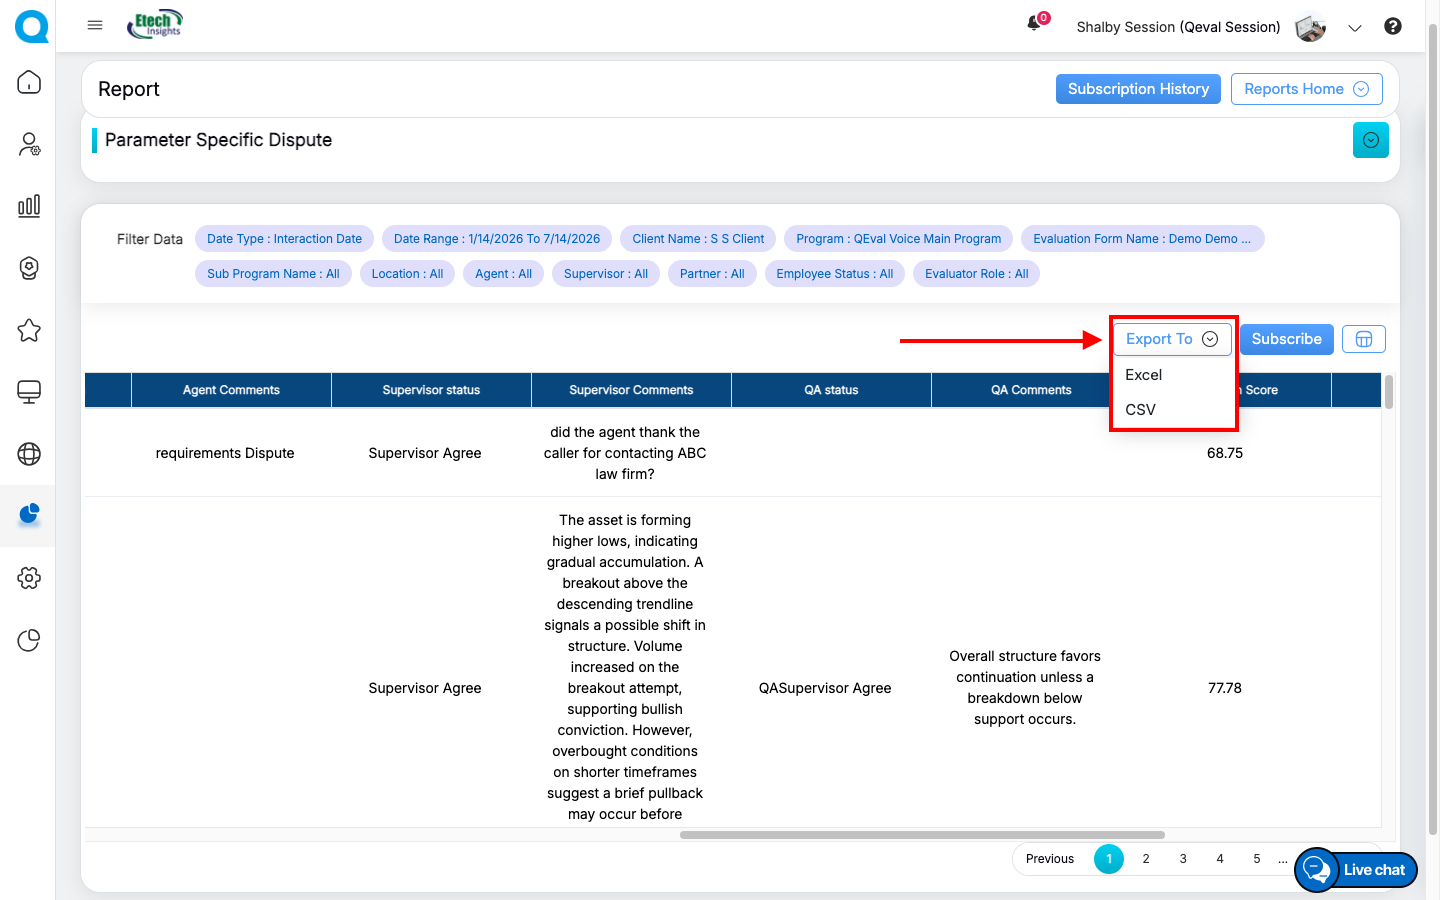
The report can be exported by clicking the Export To button and selecting either Excel or CSV format. The exported file contains all currently displayed report data and selected columns.
Export To Report
Subscribe to Report
To schedule this report, click the Subscribe button.
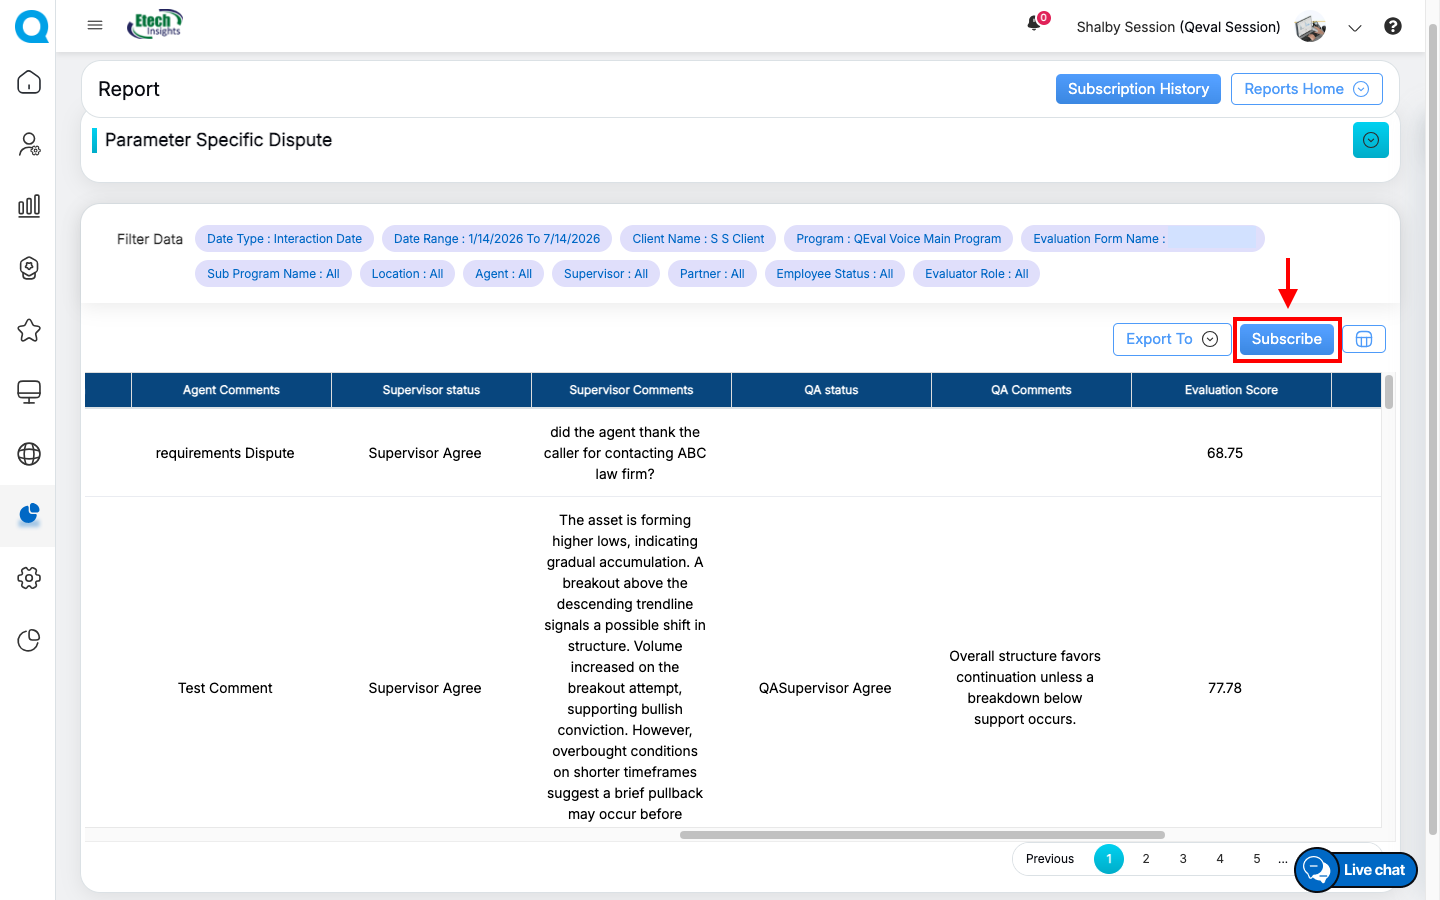
Subscribe Report Button
Once you click on “Subscribe” button, it pop-up a new window of Report Subscribe as mentioned in below screenshot:
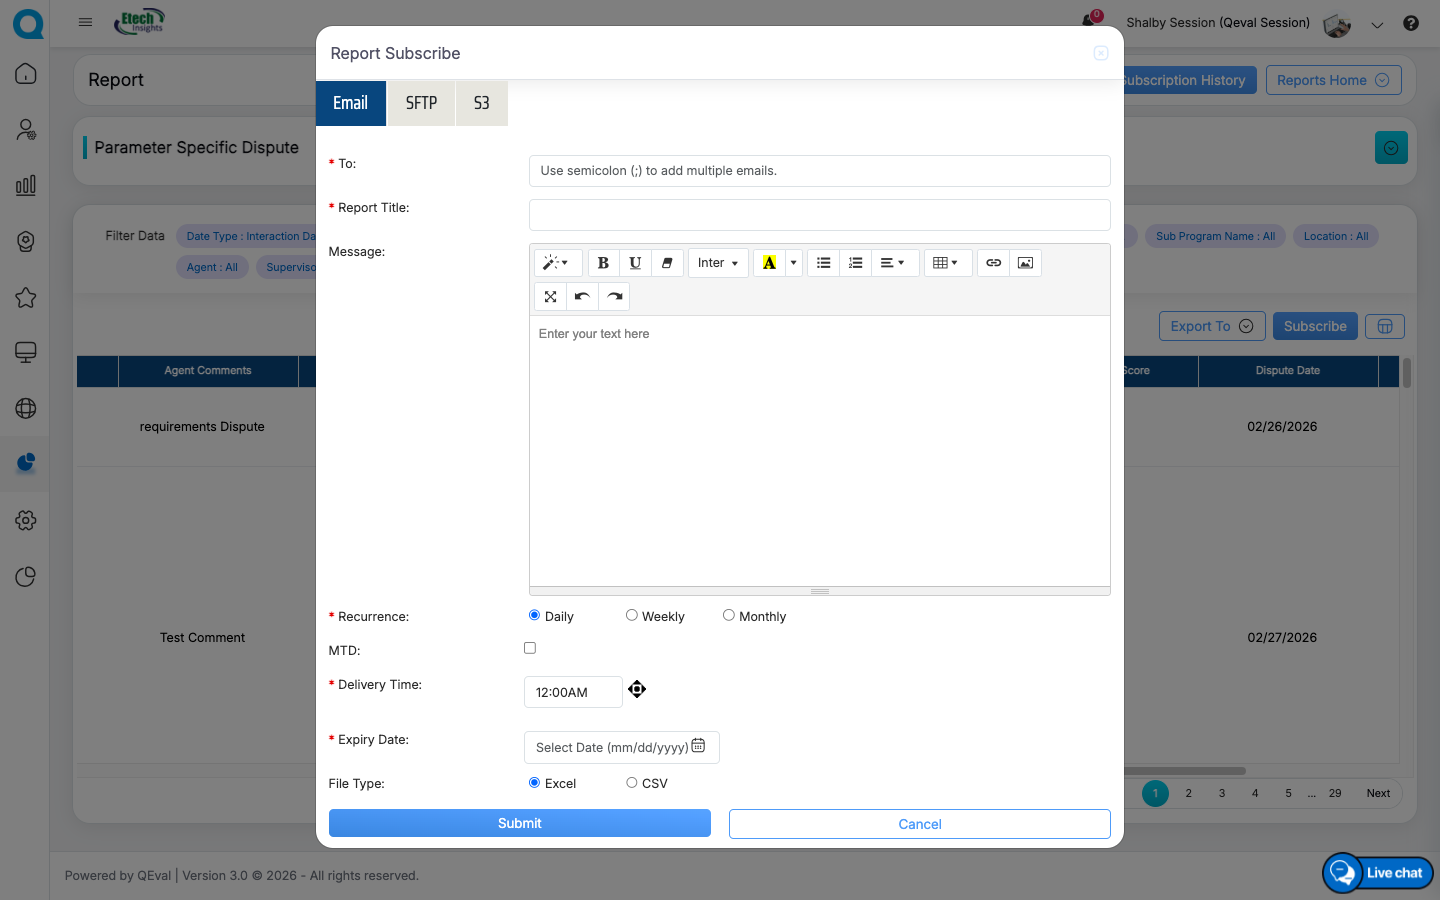
Report Subscribe Pop-up
The data elements displayed on the screen are explained below:
- To: Mention the email ID to whom you need schedule a report. You can add multiple email IDs and separate it by semi-colon.
- Report Title: Add the title of the report.
- Message: Mention the content which you want to add under email body.
- Recurrence: It shows Daily, Weekly, Monthly. This means it schedule the report weekly, monthly or you need only once, you can select as per your requirement.
- When the Recurrence as Daily is selected you need to select
- MTD: Select the Month to Date box, if required.
- Delivery Time: Select the timing for report delivery.
- Expiry Day: Select the expiry date on while the report scheduling will stop.
- When the Recurrence as Daily is selected you need to select
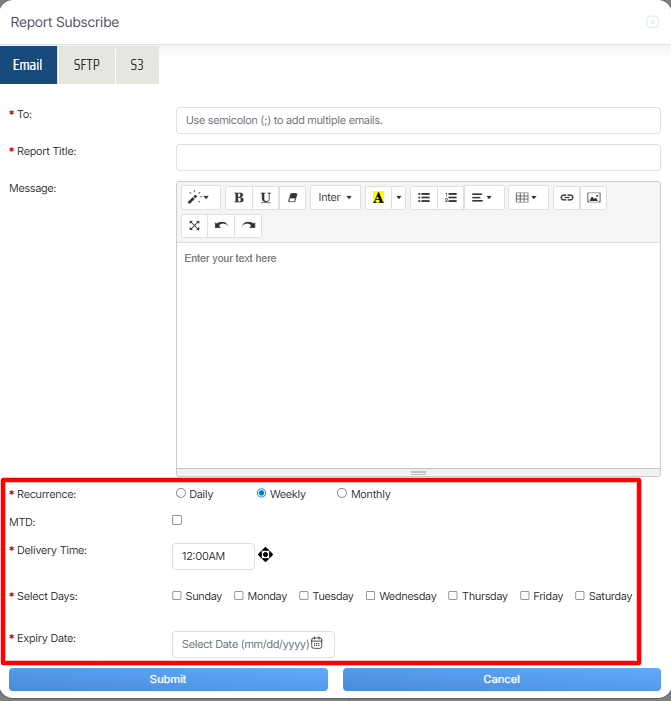
Recurrence on Weekly Basis
When the Recurrence as Weekly is selected you need to select
- MTD: Select the Month to Date box, if required.
- Delivery Time: Select the timing for report delivery.
- Selected Days: You can select the days by clicking on the checkbox for which it will trigger an email notification on every week on that day. E.g. If you select “Monday” & “Friday”, it will trigger an email notification for the report on every Monday & Friday of the week.
- Expiry Day: Select the expiry date on while the report scheduling will stop.
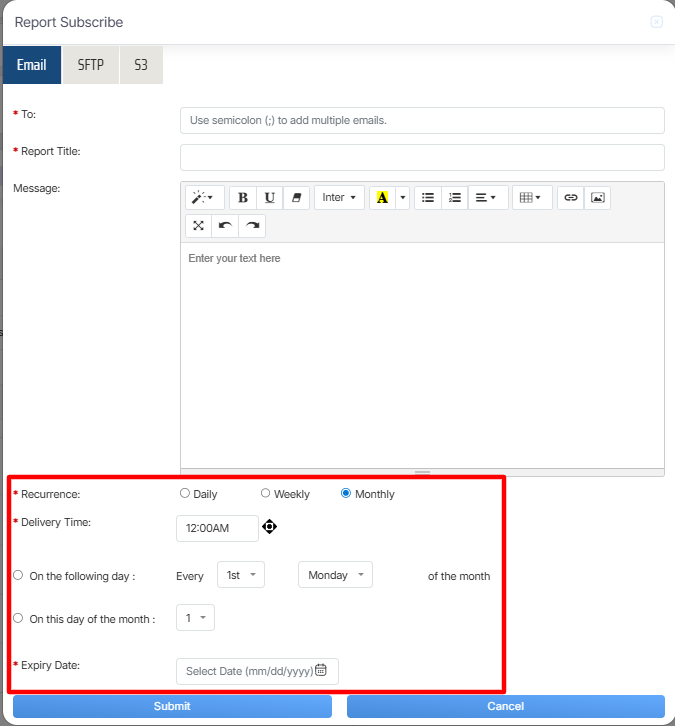
Recurrence on Monthly Basis
When the Recurrence as Monthly is selected you need to select
- Delivery Time: Select the timing for report delivery.
From On the following day and On this day of the month select any 1 option
- On the following day: It allows to select the date and the day of the specific month for which the report will be scheduled
- On this day of the month: It allows to select the date of the month for which the report will be scheduled.
- Expiry Day: Select the expiry date on while the report scheduling will stop.
Once the necessary details are configured, click on the Submit button to subscribe the report or click on the Cancel button to discard the process.
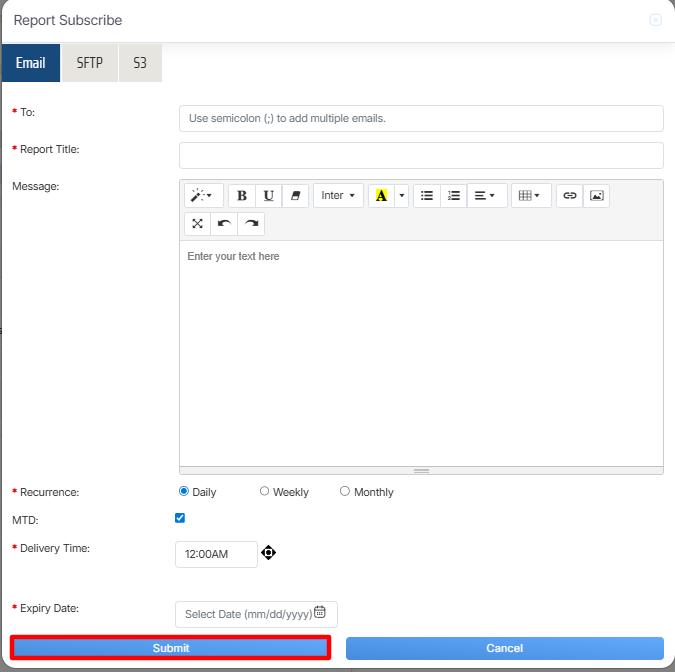
Submit Button
An acknowledgment message will be displayed on the screen and the report will be scheduled.
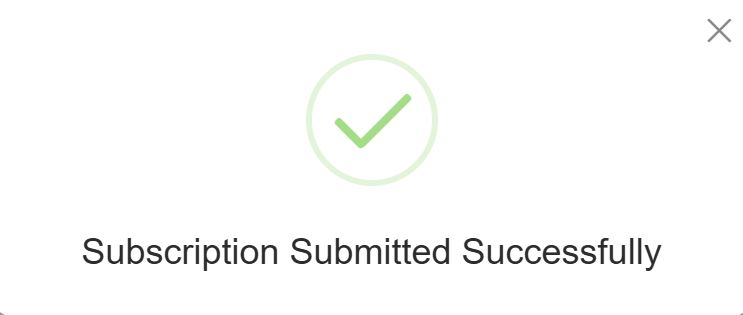
Acknowledgement Message
Now, click on “SFTP” button, from the window of Report Schedule as mentioned in below screenshot:
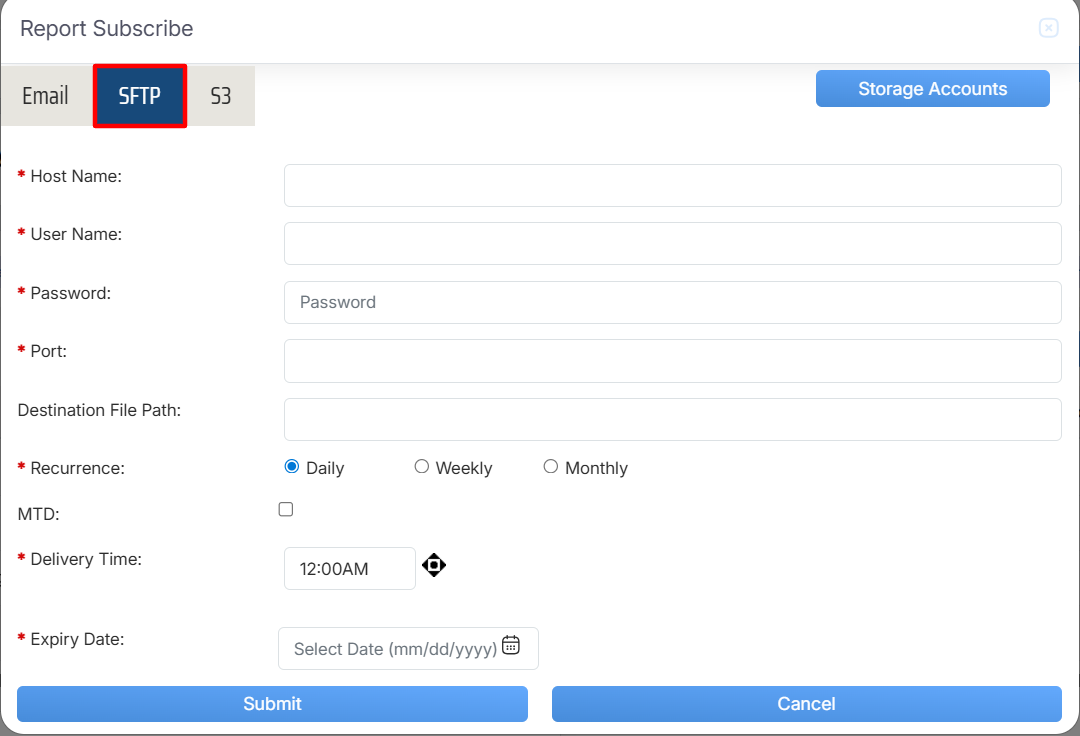
Report Subscribe > SFTP
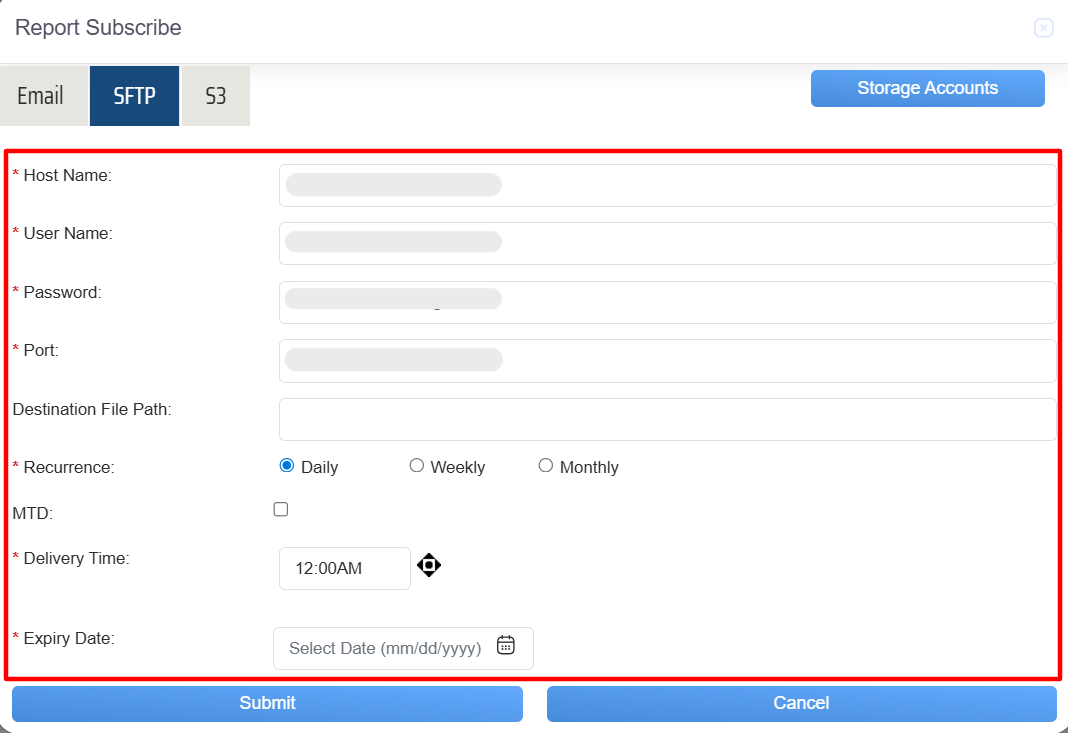
The data elements displayed on the screen are explained below:
- Host Name : Add the name or IP address of the server to be connected to.
- User Name: Add the login credential used for authenticating the connection to the host.
- Password: Add the secret key required for authentication, used in conjunction with the user name.
- Port: Add the network port number designated for the connection (e.g., 22 for SSH, 21 for FTP).
- Destination Path: Enter the specific file path on the destination server where files will be transferred or accessed. Files are stored in nested folder levels (e.g.,
FolderA/FolderB/FolderC).
Note: If no path is provided in the destination path, then the file will be delivered to the default root folder. - When the Recurrence as Daily is selected you need to select
- MTD: Select the check box, if required.
- Delivery Time: Select the timing for report delivery.
- Expiry Day: Select the expiry date on while the report scheduling will stop.
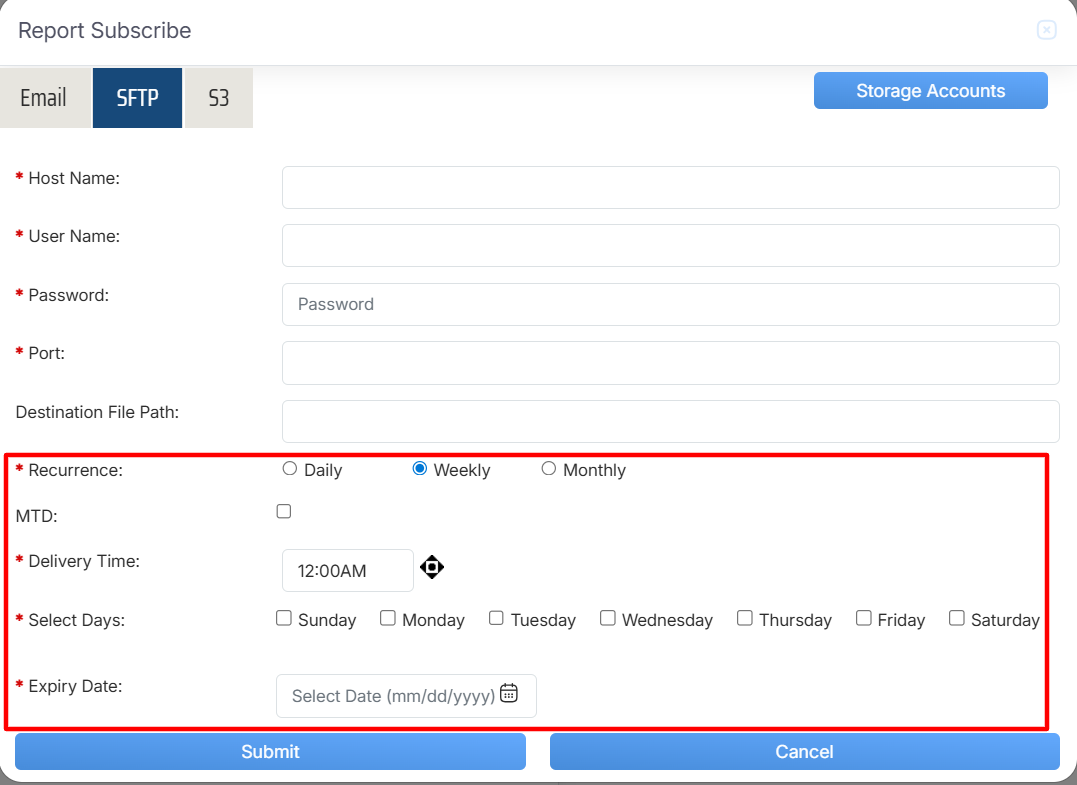
Recurrence on Weekly Basis
When the Recurrence as Weekly is selected you need to select
- MTD: Select the Month to Date check box, if required.
- Delivery Time: Select the timing for report delivery.
- Selected Days: You can select the days by clicking on the checkbox for which it will trigger an email notification on every week on that day. E.g. If you select “Monday” & “Friday”, it will trigger an email notification for the report on every Monday & Friday of the week.
- Expiry Day: Select the expiry date on while the report scheduling will stop.
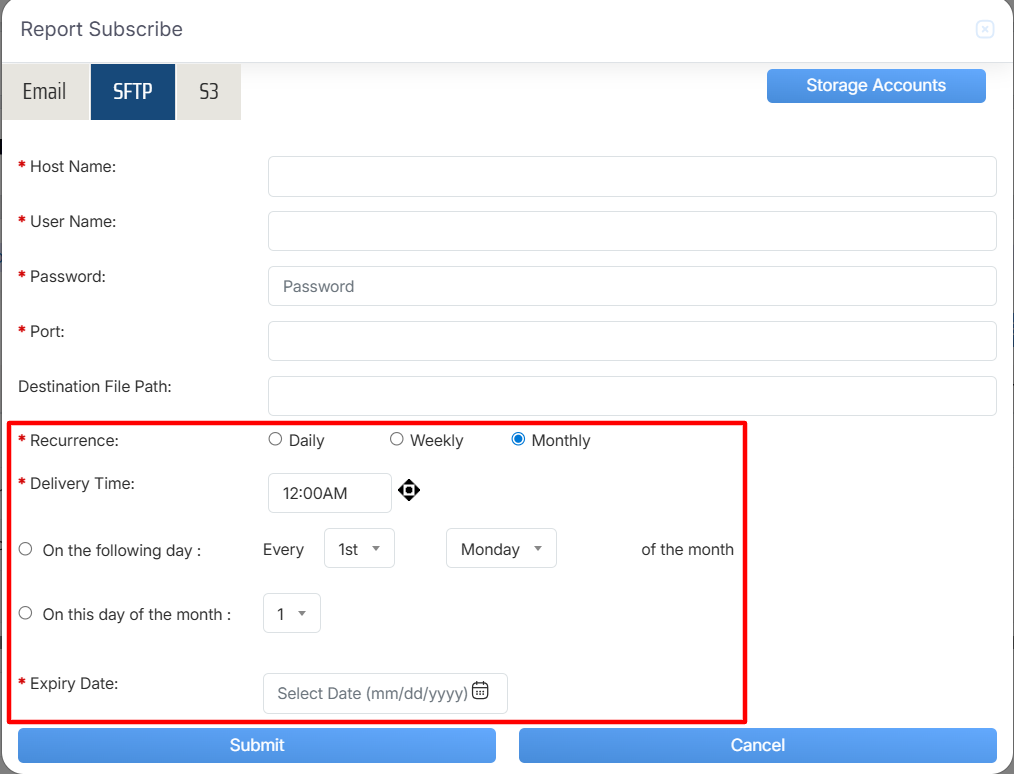
Recurrence on Monthly Basis
When the Recurrence as Monthly is selected you need to select
- Delivery Time: Select the timing for report delivery.
From On the following day and On this day of the month select any 1 option
- On the following day: It allows to select the date and the day of the specific month for which the report will be scheduled
- On this day of the month: It allows to select the date of the month for which the report will be scheduled.
- Expiry Day: Select the expiry date on while the report scheduling will stop.
Once the necessary details are configured, click on the Submit button to subscribe the report or click on the Cancel button to discard the process.
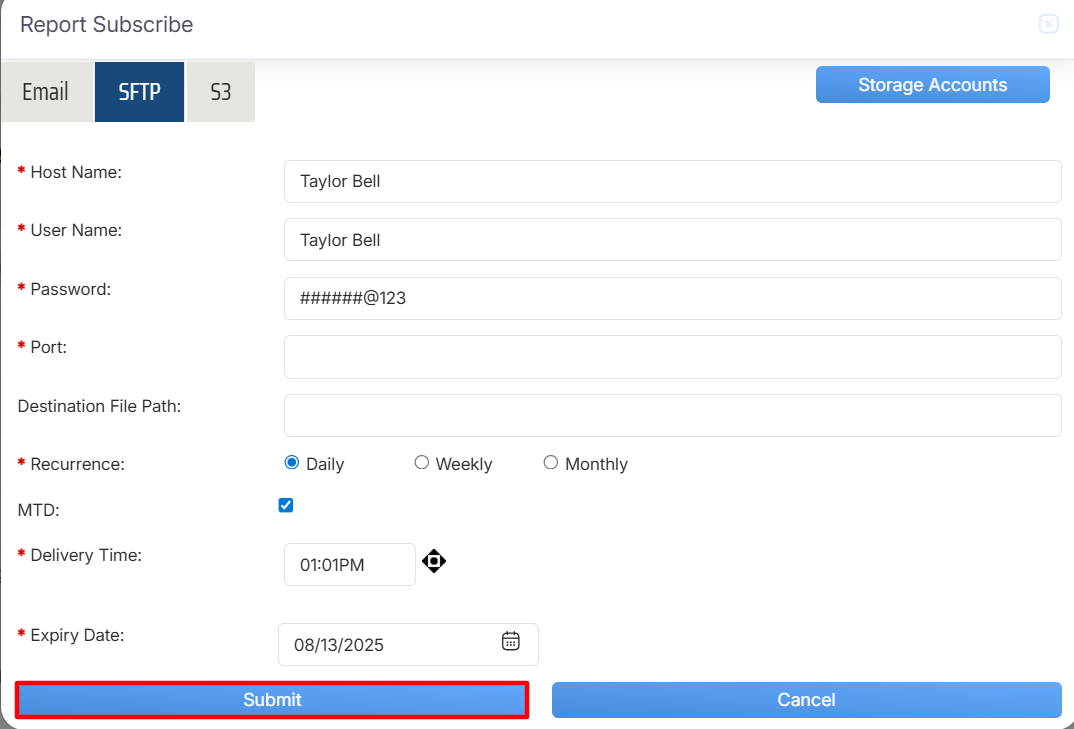
Submit Button
An acknowledgment message will be displayed on the screen and the report will be scheduled.
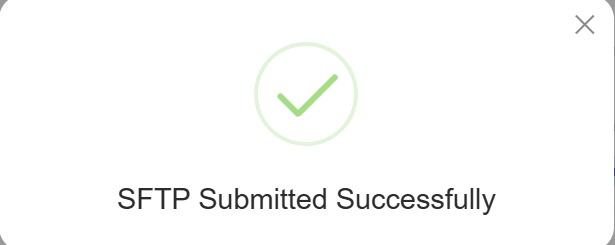
Acknowledgement Message
Storage Accounts
The Storage Account serves as a centralized repository for securely storing and managing evaluation-related data. It includes key details such as Host Name, User Name, Password, Port, Created Date, and Action, and provides users with the ability to add and maintain records. This system ensures that all evaluation data is organized, easily accessible, and securely stored for efficient reference and processing in the future.
To access this feature, click on the Storage Accounts button, as highlighted in the screen below-
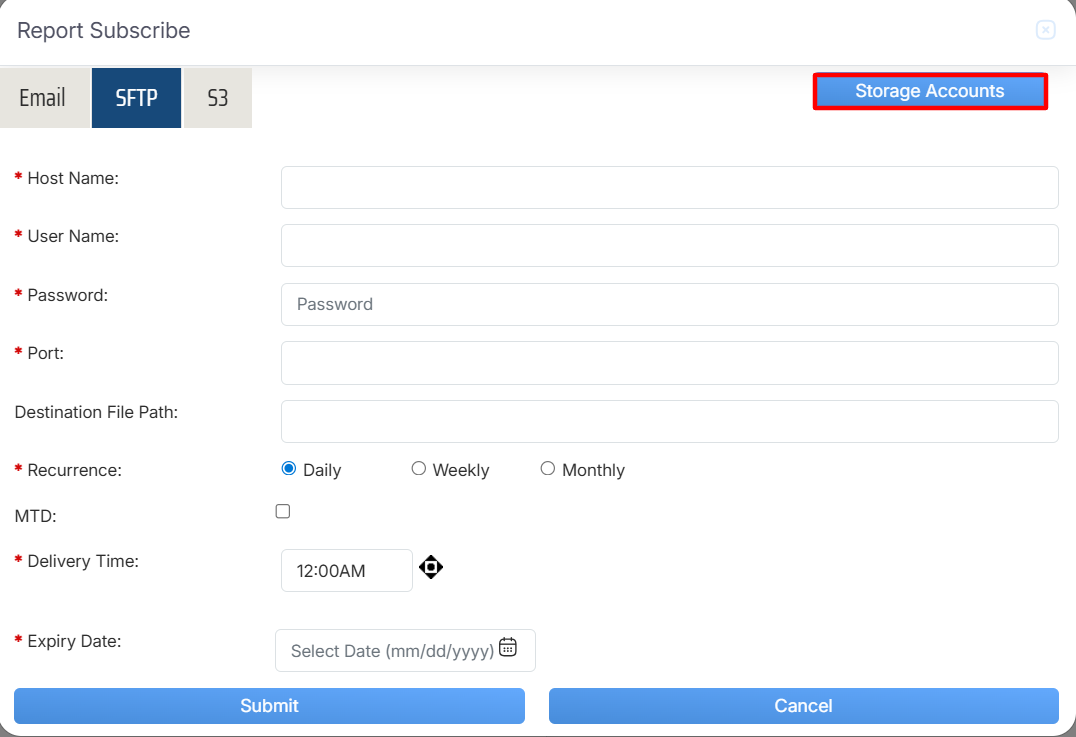
Storage Accounts
The user will be directed to the Storage Accounts pop-up window , this page displays the list of all added records as shown below-
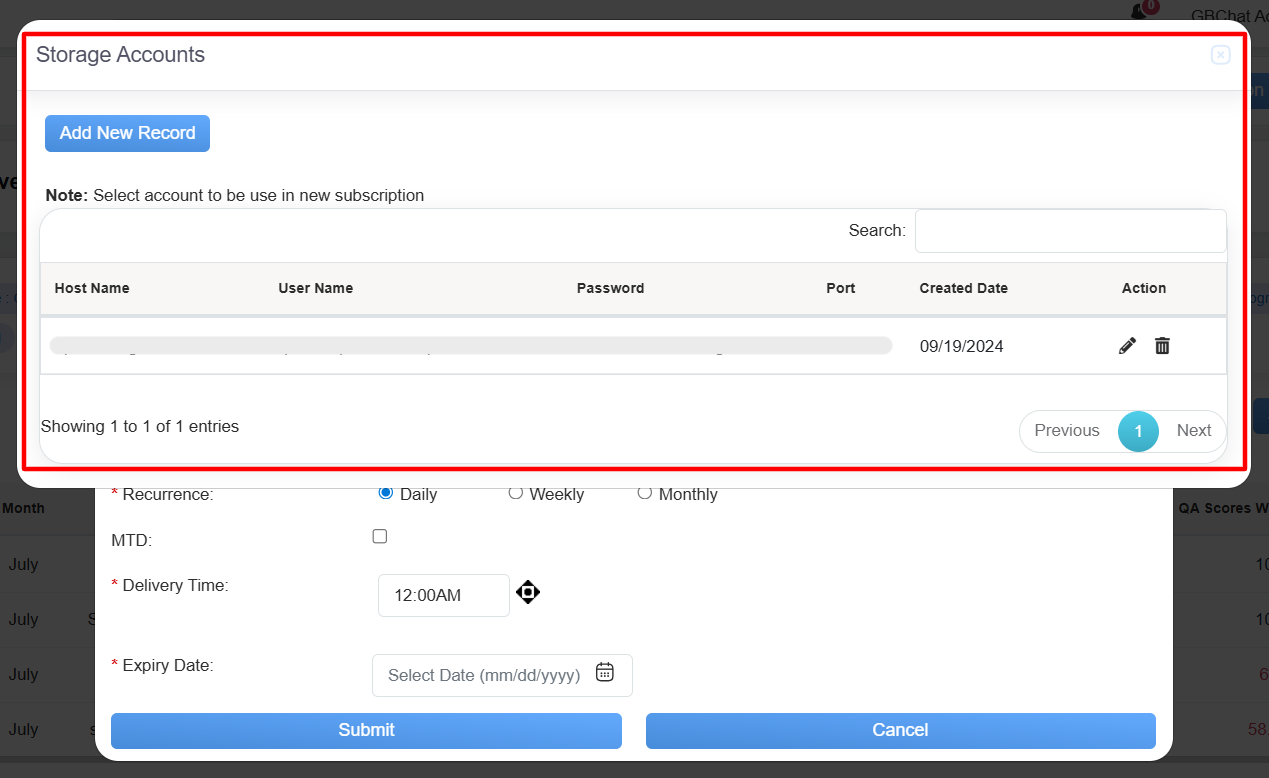
Storage Accounts Pop-up Window
The data elements displayed on the screen are explained below:
- Host Name : Displays the name or IP address of the server to be connected to.
- User Name: Displays the login credential used for authenticating the connection to the host.
- Password: Displays the secret key required for authentication, used in conjunction with the user name.
- Port: Displays the network port number designated for the connection (e.g., 22 for SSH, 21 for FTP).
- Created Date: Displays the date on which the record was created.
- Action: User can edit or delete the specific record using the options available in the Action field. Simply click the
 or
or  respective icons to update or remove the report subscription as needed.
Add New Record
The Add New Record functionality allows users to input and save new data into the system, creating a fresh entry in the database. This feature enables the addition of new information, ensuring the system stays up-to-date with the latest records.
To access this feature, click on the Add New Record button, as highlighted in the screen below-
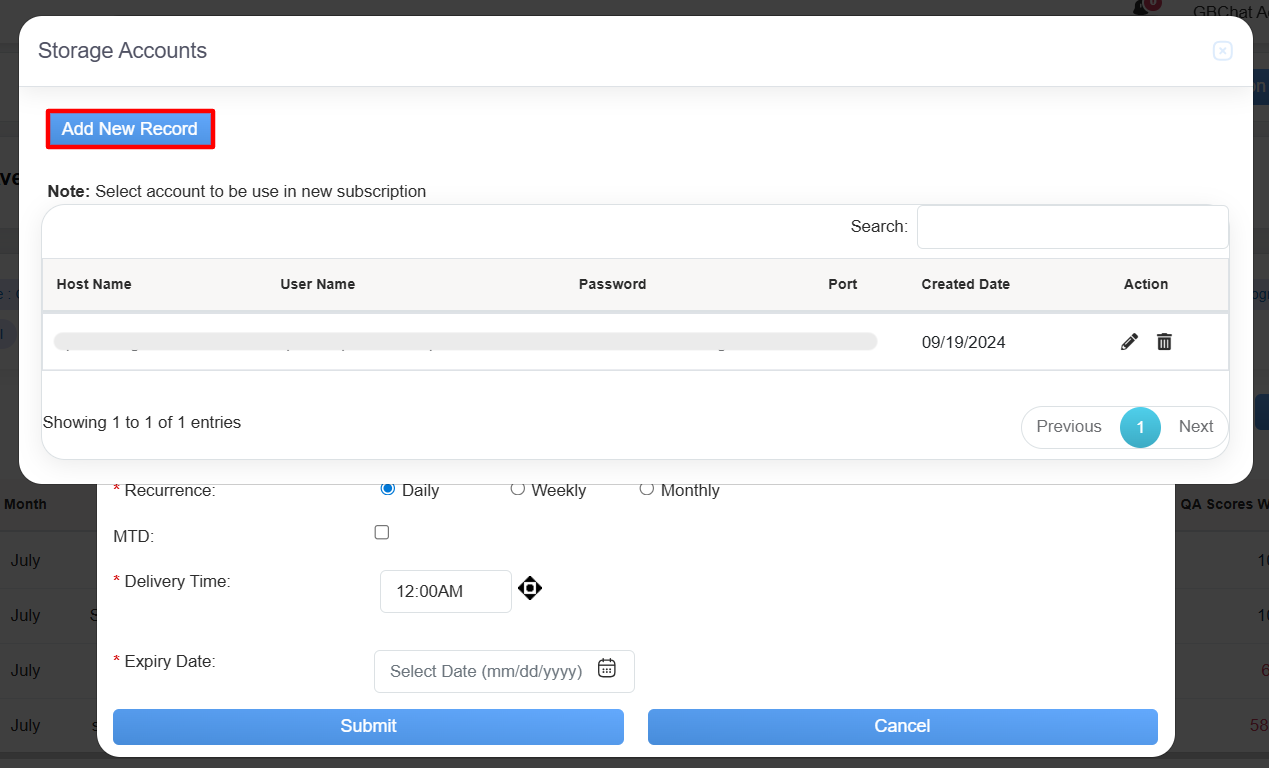
Add New Record
Upon clicking on the Add New Record button, the following Add Record pop-up window will be displayed.
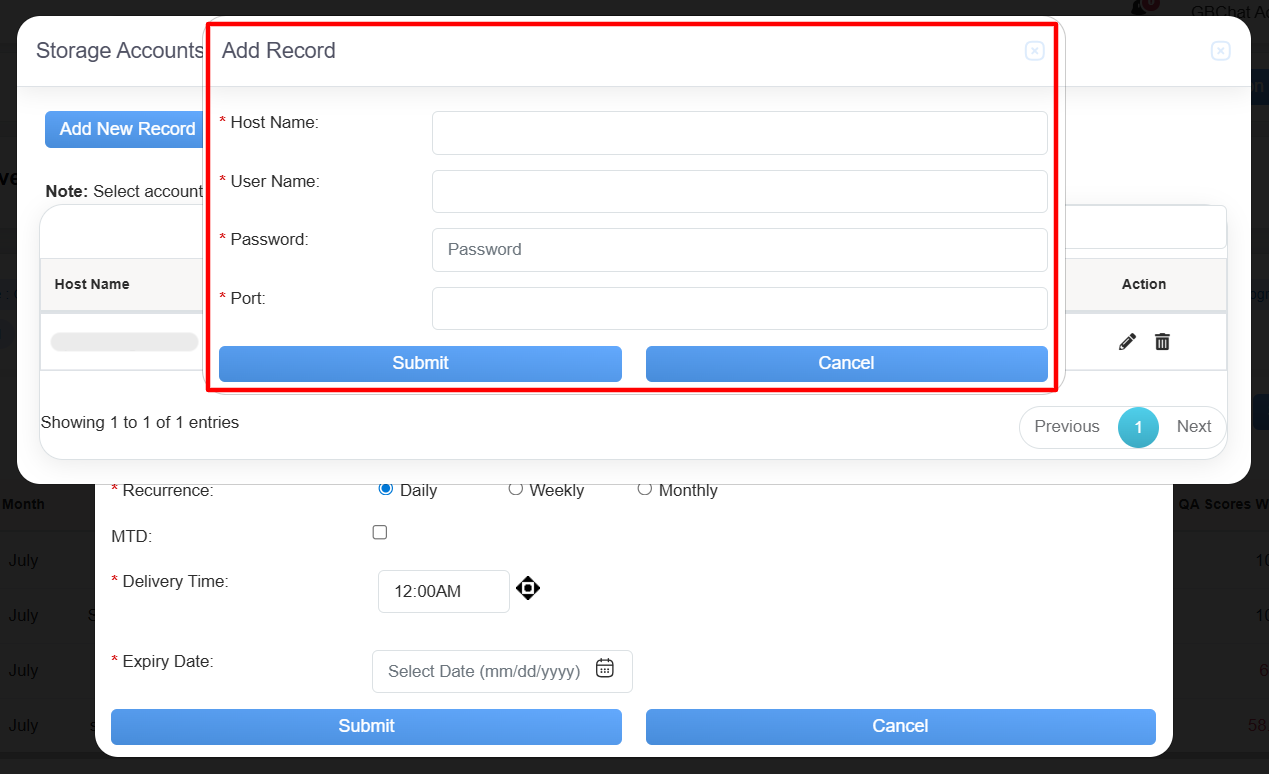
Add Record Details
Provide the necessary information in the appropriate fields and click the Submit button to save and store the new record in the storage account.
In addition to manually entering details, the system offers an automated feature that retrieves and populates relevant fields with existing data when a specific record is selected in a row. This functionality significantly optimizes the data entry process by reducing manual effort, saving time, and improving overall efficiency.
To utilize this feature, simply click on the desired record that needs to be added under the SFTP details, as illustrated in the highlighted section of the screen below-
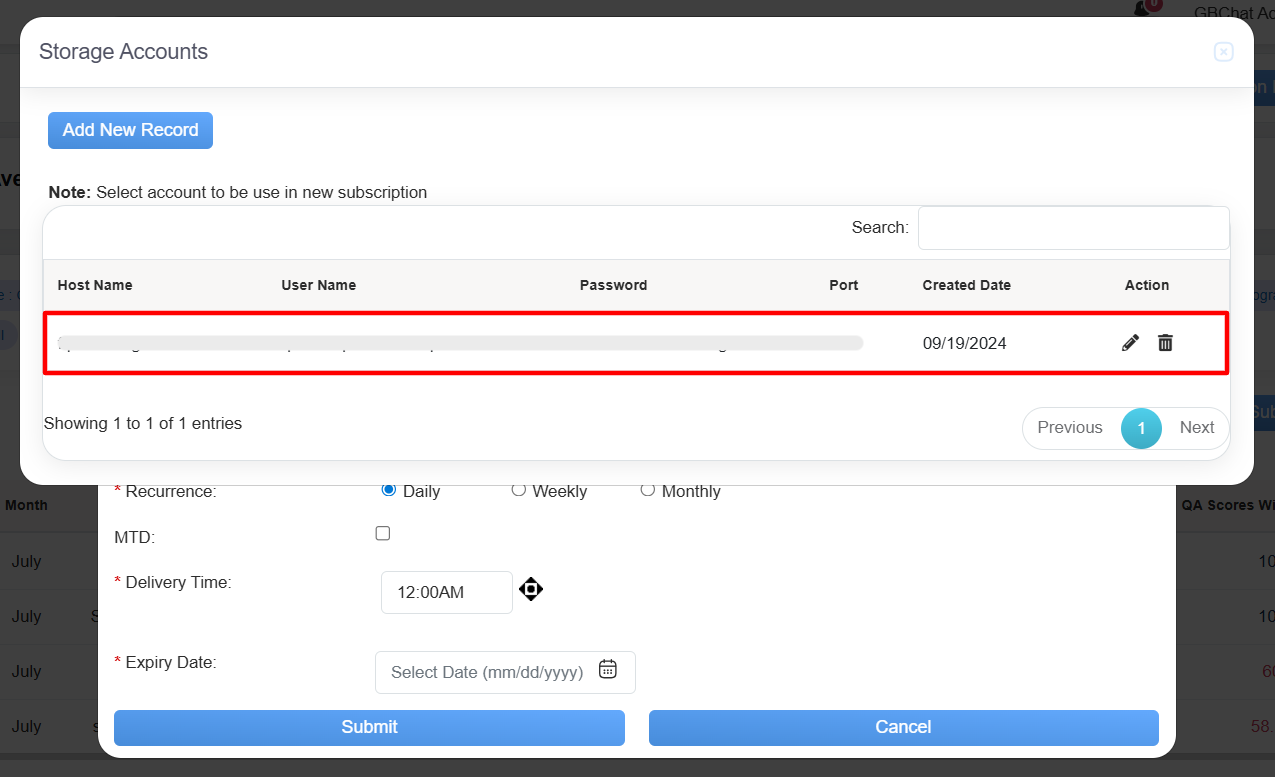
Record Details
Upon clicking, the corresponding details will be populated under the SFTP details section, as shown in the screen below.
Record Details
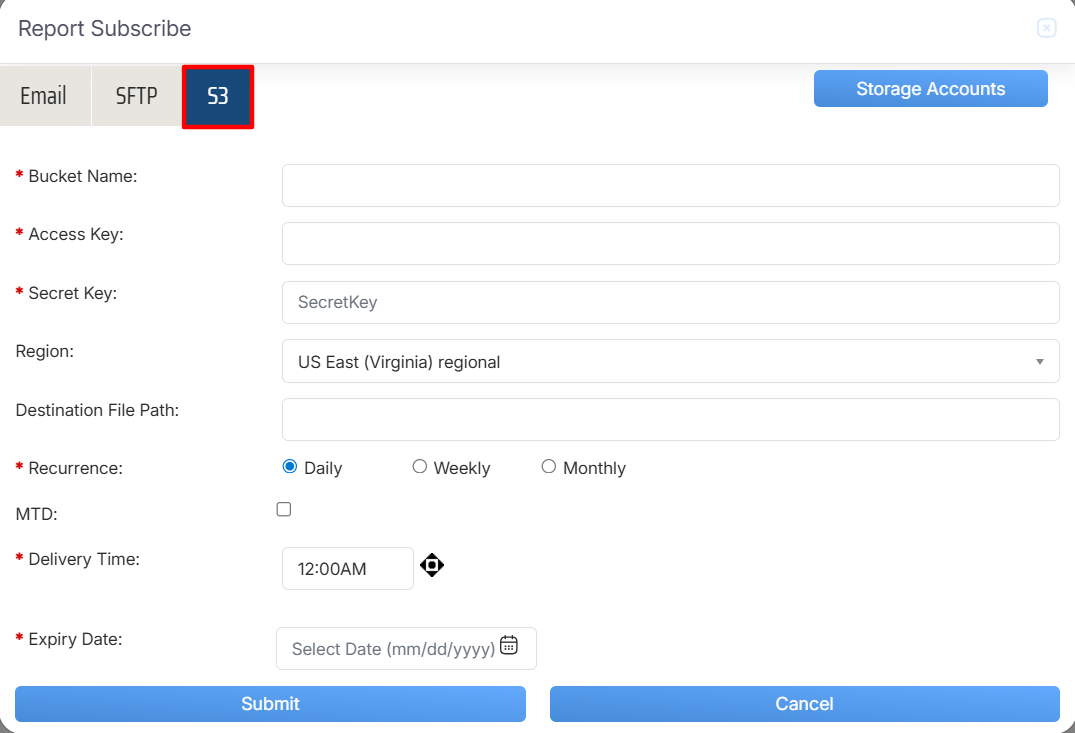
Now, click on “S3” button, from the window of Report Schedule as mentioned in below screenshot:
Report Subscribe > S3
The data elements displayed on the screen are explained below:
- Bucket Name : Enter the name of the storage bucket where data is stored.
- Access Key: Enter the unique key used to authenticate access to the storage.
- Secret Key: Enter the confidential key used alongside the Access Key for secure authentication.
- Region: The geographical location of the storage bucket (e.g., US-East, EU-West).
- When the Recurrence as Daily is selected you need to select
- MTD: Select the check box, if required.
- Delivery Time: Select the timing for report delivery.
- Expiry Day: Select the expiry date on while the report scheduling will stop.
- When the Recurrence as Daily is selected you need to select
Recurrence on Weekly Basis
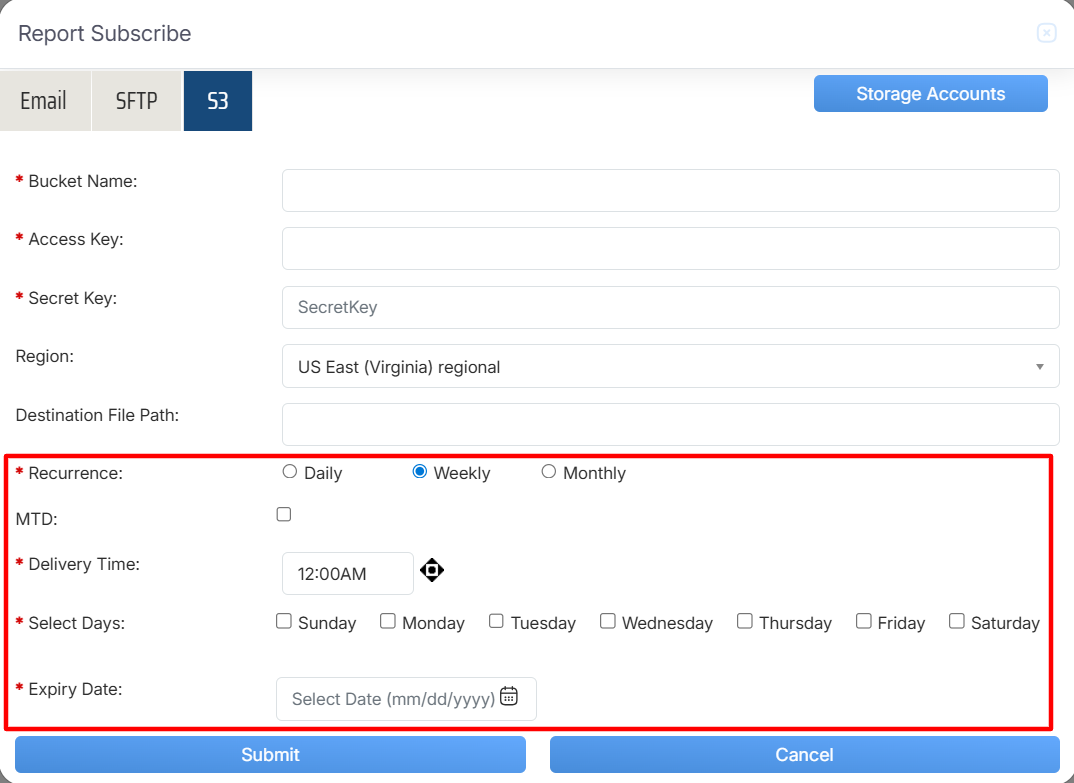
When the Recurrence as Weekly is selected you need to select
- MTD: Select the check box, if required.
- Delivery Time: Select the timing for report delivery.
- Selected Days: You can select the days by clicking on the checkbox for which it will trigger an email notification on every week on that day. E.g. If you select “Monday” & “Friday”, it will trigger an email notification for the report on every Monday & Friday of the week.
- Expiry Day: Select the expiry date on while the report scheduling will stop.
Recurrence on Monthly Basis
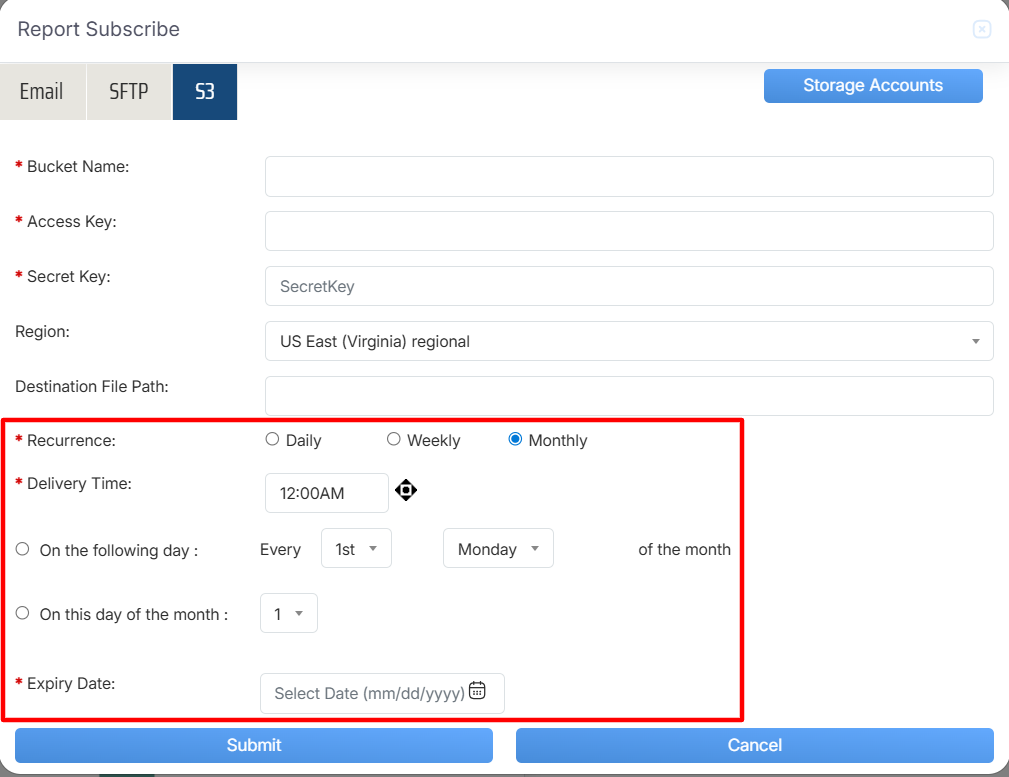
When the Recurrence as Monthly is selected you need to select
- Delivery Time: Select the timing for report delivery.
From On the following day and On this day of the month select any 1 option
- On the following day: It allows to select the date and the day of the specific month for which the report will be scheduled
- On this day of the month: It allows to select the date of the month for which the report will be scheduled.
- Expiry Day: Select the expiry date on while the report scheduling will stop.
Once the necessary details are configured, click on the Submit button to subscribe the report or click on the Cancel button to discard the process.
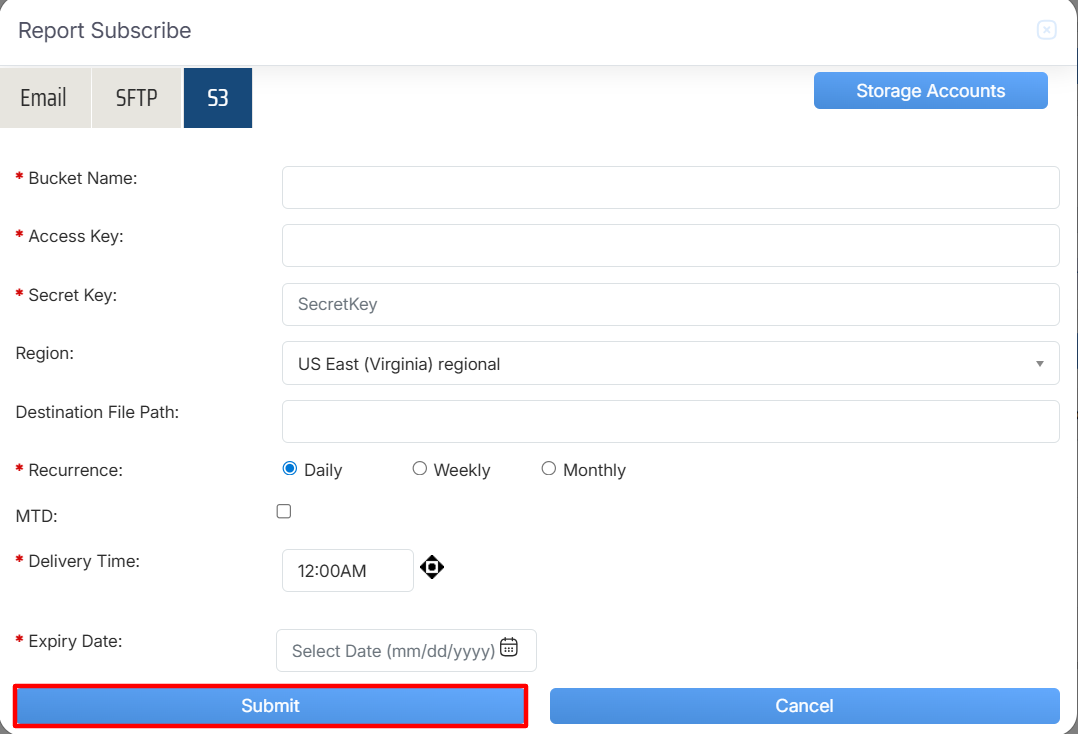
Submit Button
An acknowledgment message will be displayed on the screen and the report will be scheduled.
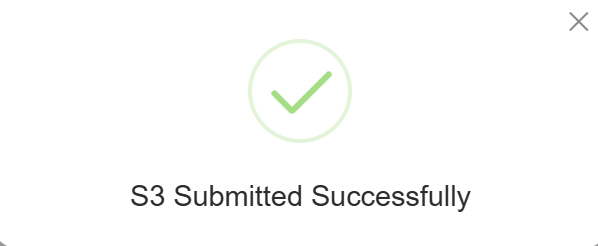
Acknowledgement Message
Storage Account
The Storage Account serves as a centralized repository for securely storing and managing evaluation-related data. It includes key details such as Host Name, User Name, Password, Port, Created Date, and Action, and provides users with the ability to add and maintain records. This system ensures that all evaluation data is organized, easily accessible, and securely stored for efficient reference and processing in the future.
To access this feature, click on the Storage Accounts button, as highlighted in the screen below-
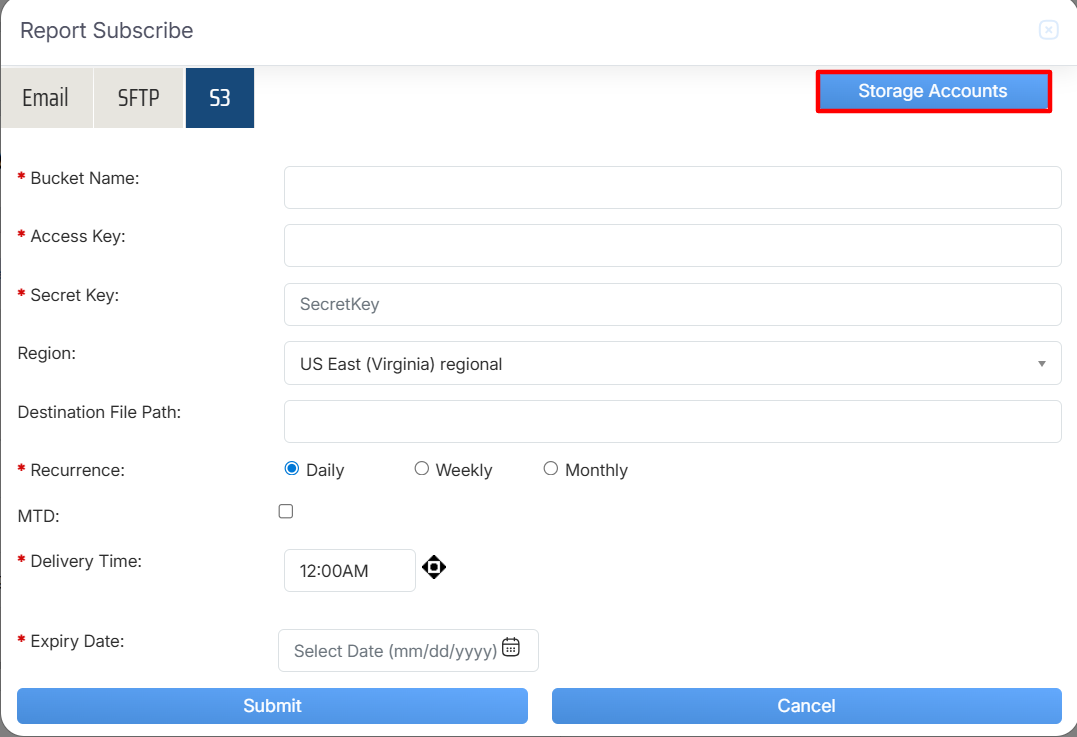
Storage Accounts
The user will be directed to the Storage Accounts pop-up window , this page displays the list of all added records as shown below-
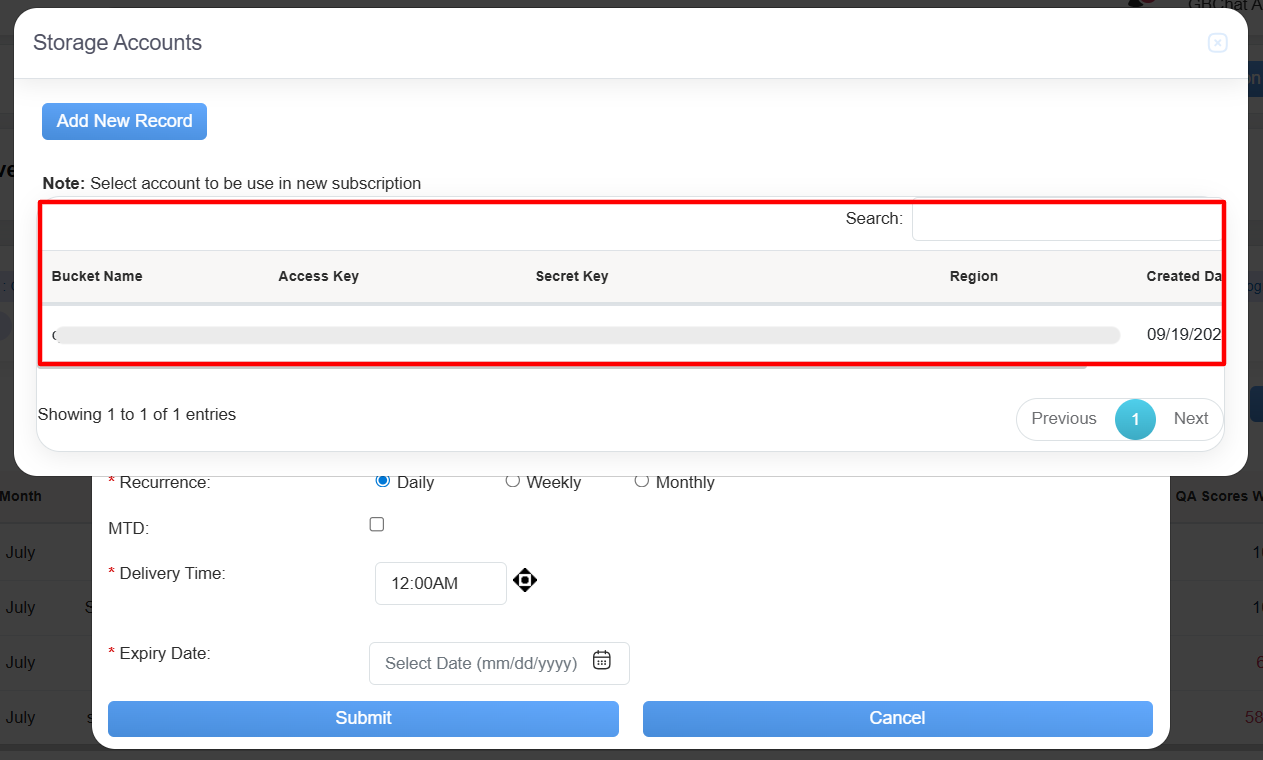
Storage Accounts Pop-up Window
The data elements displayed on the screen are explained below:
- Bucket Name : Displays the name of the storage bucket where data is stored.
- Access Key: Displays the unique key used to authenticate access to the storage.
- Secret Key: Displays the confidential key used alongside the Access Key for secure authentication.
- Region: Displays the geographical location of the storage bucket (e.g., US-East, EU-West).
- Created Date: Displays the date on which the record was created.
- Action: User can edit or delete the specific record using the options available in the Action field. Simply click the or
 respective icons to update or remove the report subscription as needed.
Add New Record
The Add New Record functionality allows users to input and save new data into the system, creating a fresh entry in the database. This feature enables the addition of new information, ensuring the system stays up-to-date with the latest records.
To access this feature, click on the Add New Record button, as highlighted in the screen below-
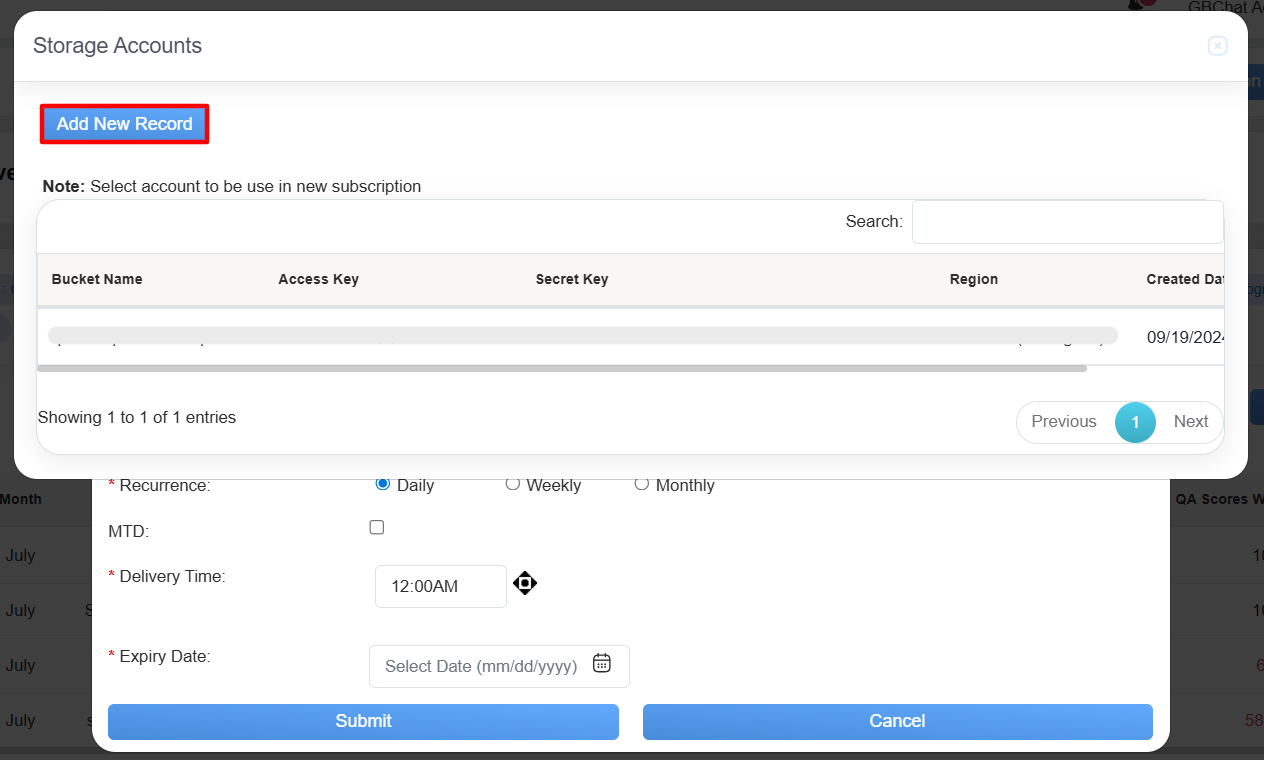
Add New Record
Upon clicking on the Add New Record button, the following Add Record pop-up window will be displayed.
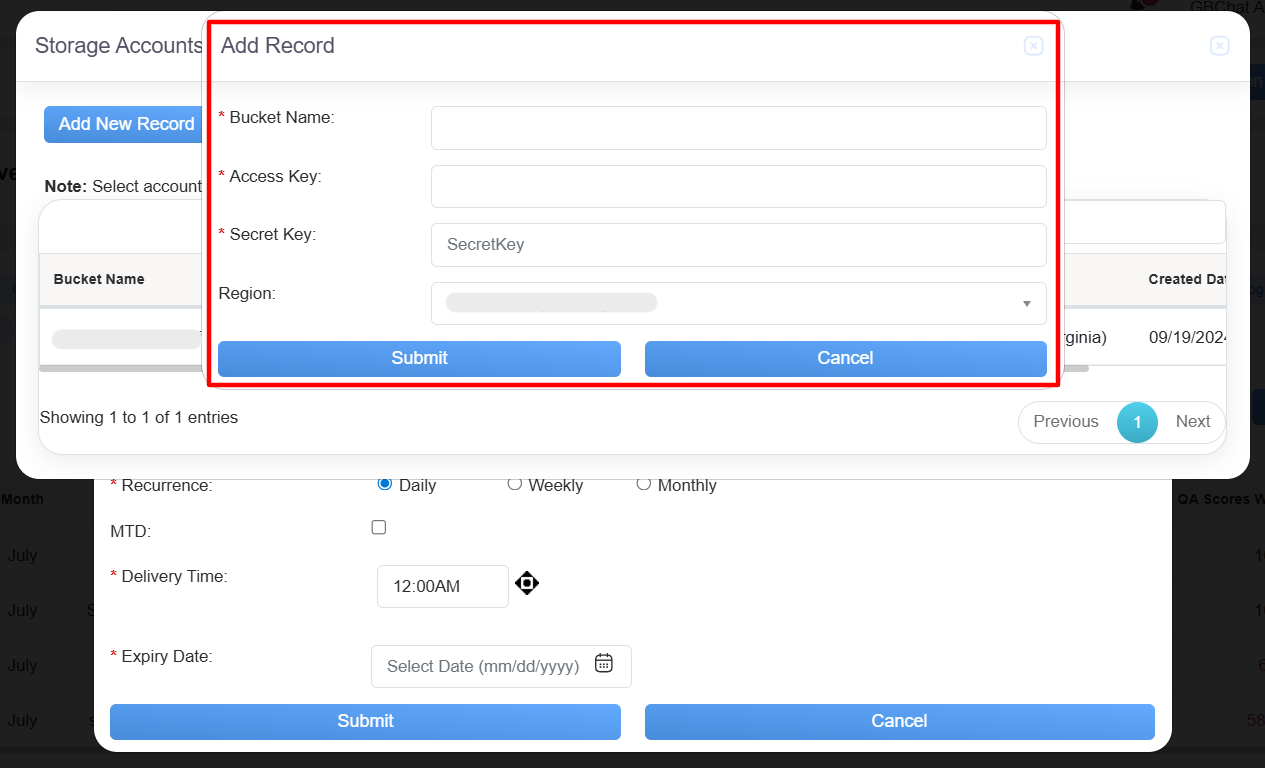
Add Record Details
Provide the necessary information in the appropriate fields and click the Submit button to save and store the new record in the storage account.
In addition to manually entering details, the system offers an automated feature that retrieves and populates relevant fields with existing data when a specific record is selected in a row. This functionality significantly optimizes the data entry process by reducing manual effort, saving time, and improving overall efficiency.
To utilize this feature, simply click on the desired record that needs to be added under the SFTP details, as illustrated in the highlighted section of the screen below-
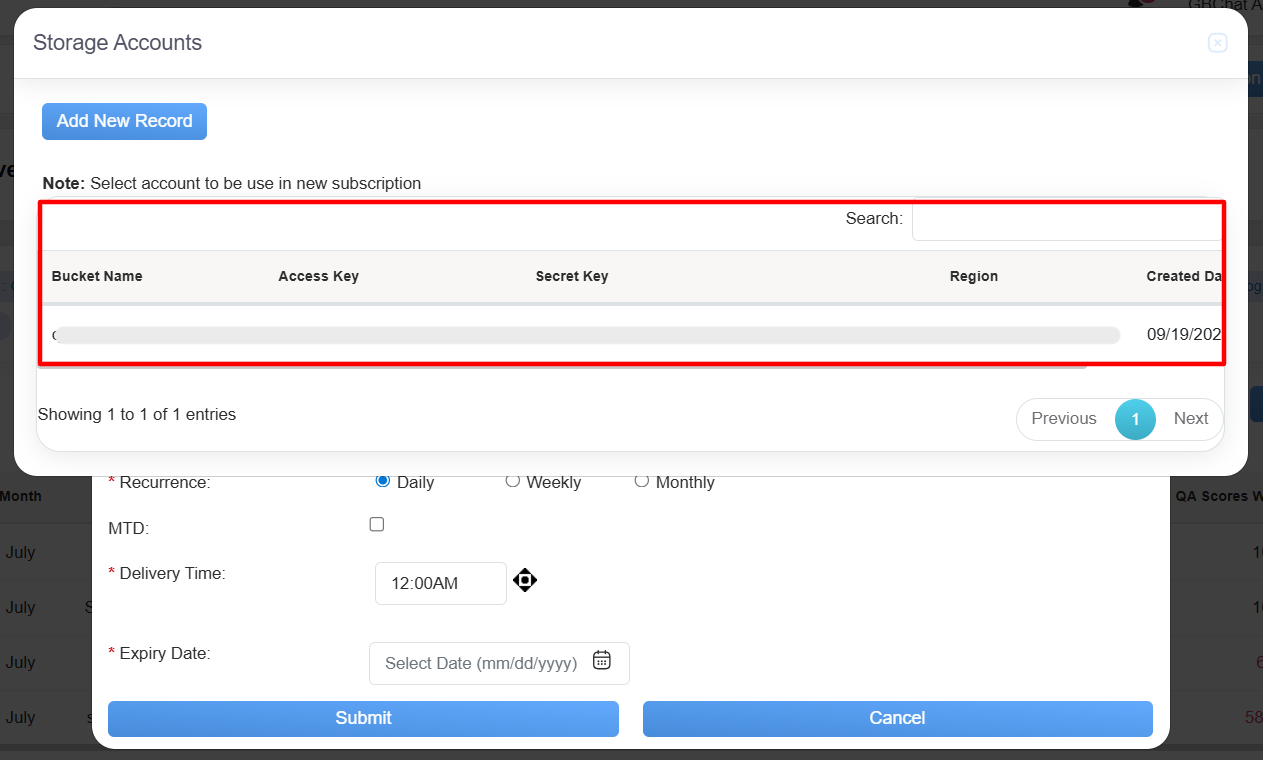
Record Details
Upon clicking, the corresponding details will be populated under the S3 details section, as shown in the screen below-
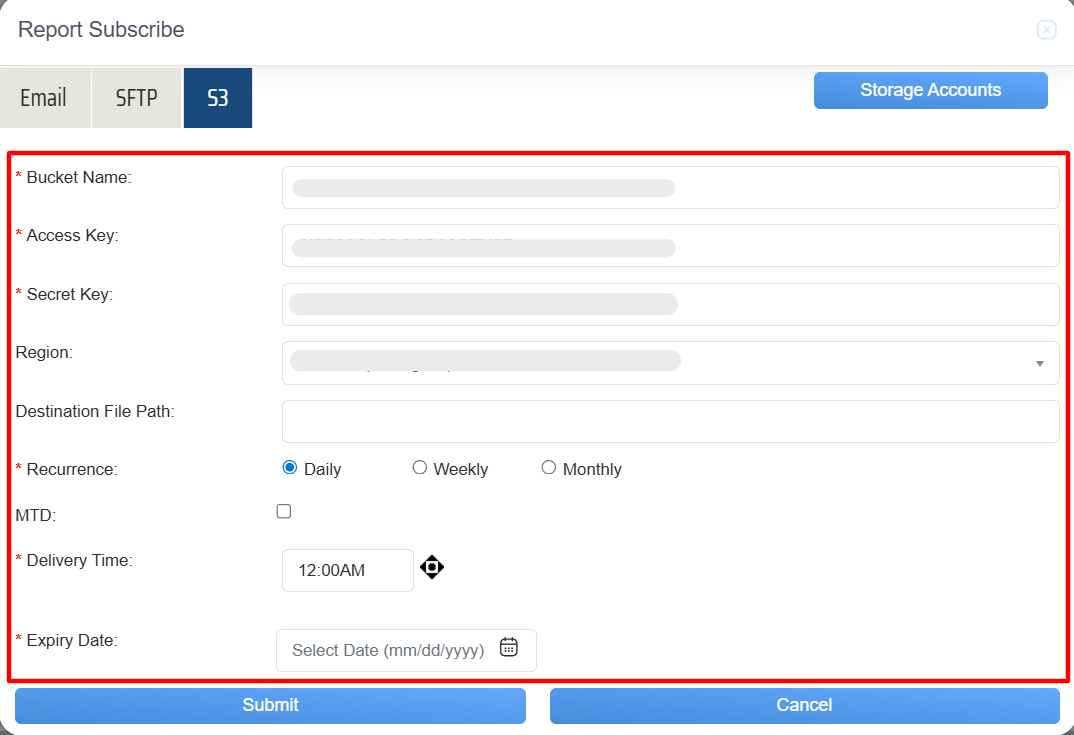
Report Details
Subscription History
Subscription History refers to a detailed record of all subscription-related activities and transactions associated with a user or account. This includes information such as subscription start and end dates, renewal history, payment details, plan changes, cancellations, and other relevant actions or updates made to the subscription over time.
To access this functionality, click on the Subscription History button as highlighted in the screen below-
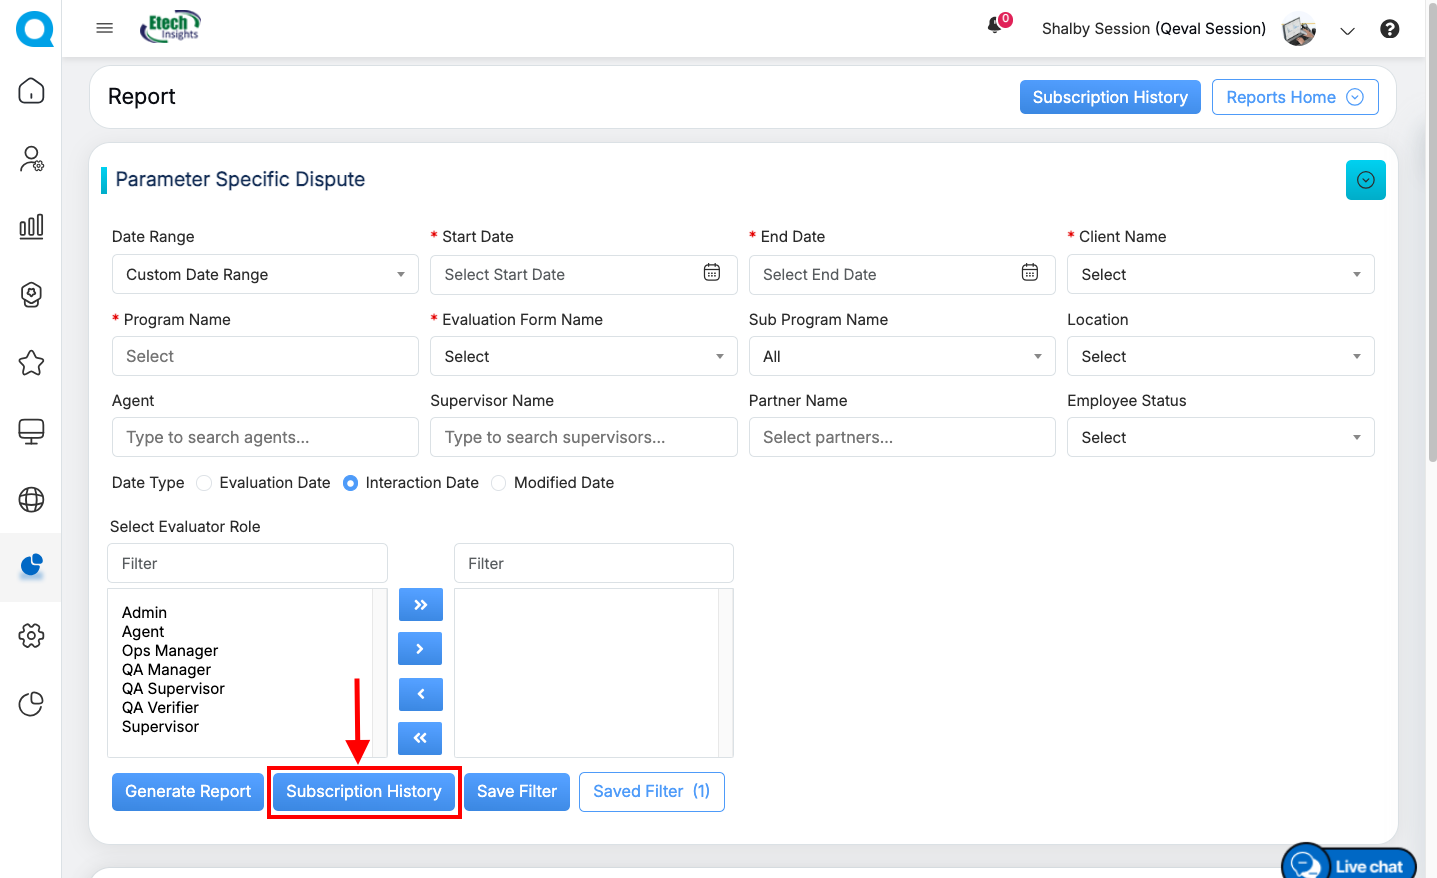
Subscription History
Upon clicking on the Subscription History button, the following Report Schedule Grid pop-up window will be displayed-
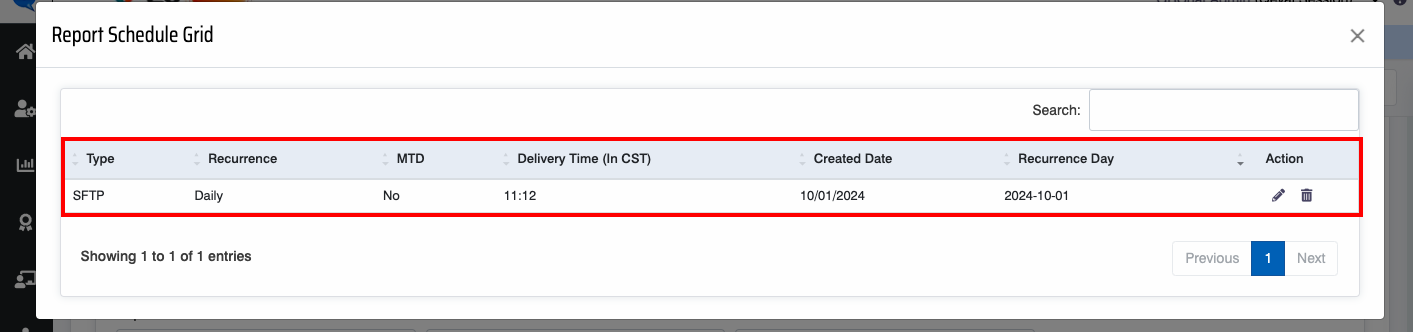
Report Schedule Grid
or respective icons to update or remove the report subscription as needed.
Video